The original certificate that is used by Wi-Fi profiles to trust that you are sending authentication requests to the right RADIUS server is a public certificate issued by DigiCert (DigiCert Global Root CA G1). SecureW2 has been using a new Digicert G3 trust chain for some time now, but our records indicate that you are still using the old G1 chain, and it poses a future connectivity risk.
While G1 was due to be trusted till 2031, browser manufacturers have decided to shorten the trust in browsers to April 15, 2026. Now, these RADIUS trust certificates aren't used in the browser but in the operating system, and that theoretically should not impact you; however, OS manufacturers can decide to distrust at any point if they choose to. This results in a high-risk situation that we want to immediately remediate for you.
Act now — while your devices are still connected
If an OS vendor decides to distrust the old G1 RADIUS CA before you've updated device network configurations, those devices go offline, and you lose the ability to push any profile update to them at all. We recommend customers take action as soon as possible.
Timeline
Apr 15
Recommended completion date, especially for IT-managed devices. After this point, customers on G1 are at risk of network outage.
Oct 1
Hard cutover. SecureW2 completes the server-side migration. Devices that have not been updated will fail RADIUS authentication.
Required Actions
IT Managed Devices
Update IT Managed Devices
Push a Wi-Fi/Network profile via MDM to add the new DigiCert Global Root G3, additionally (keep G1) as a trusted RADIUS CA on all managed endpoints. This change should be transparent to end users.
BYOD Devices
Update BYOD Devices
Ask end users to re-run the JoinNow MultiOS device onboarding software with the G3 trust included. If you have republished your device onboarding Profile anytime past Nov 2024, the chances are very high that the G3 trust is already in your profile; in case that isn't in your profile, it can be easily added.
Notify SecureW2
Notify SecureW2
When the profile updates have been completed, please immediately notify SecureW2 support, and we will cut over your trust to exclusively use the new G3 trust.
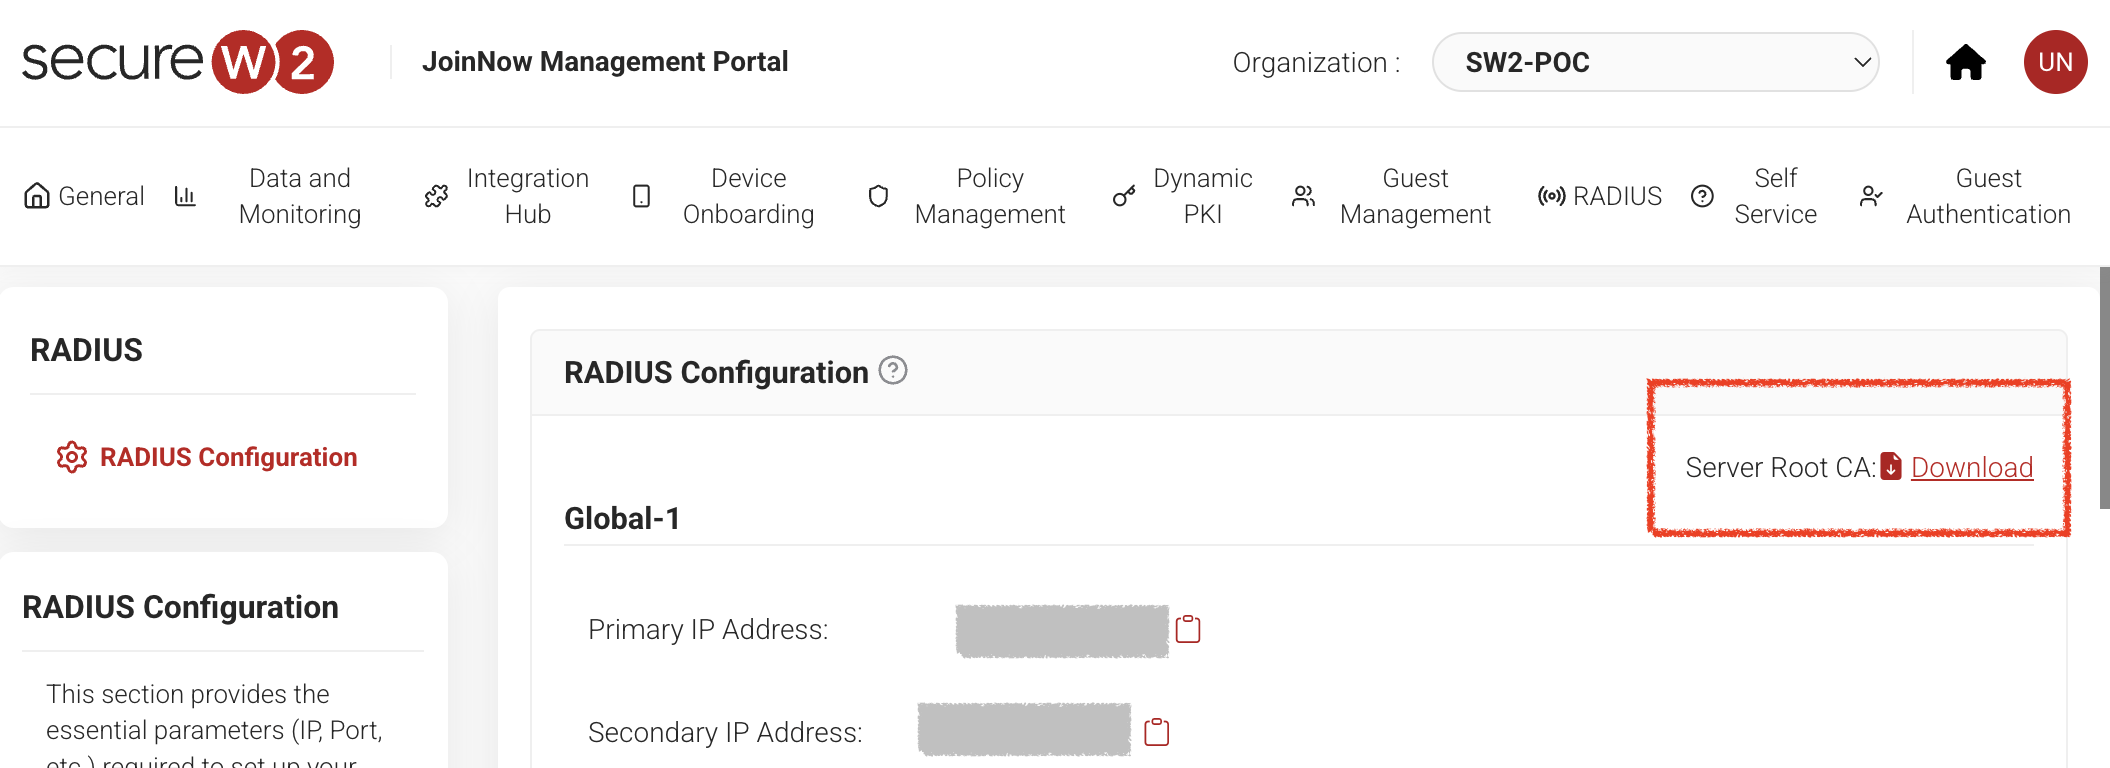
Download the new certificate first
Before following any steps below, download the new DigiCert Global Root G3 certificate from the JoinNow Management Portal.
RADIUS > RADIUS Configuration > Server Root CA > Download
Microsoft Intune
Prerequisites
Active subscription to the JoinNow Management Portal and CloudRADIUS
A Microsoft Online Services account with a Microsoft Intune (Microsoft Endpoint Manager) subscription
Part A Create a Trusted Certificate Profile
Creating a Trusted Certificate Profile Using the New RADIUS Server Root CA Certificate
1
Sign in to the Microsoft Endpoint Manager portal.
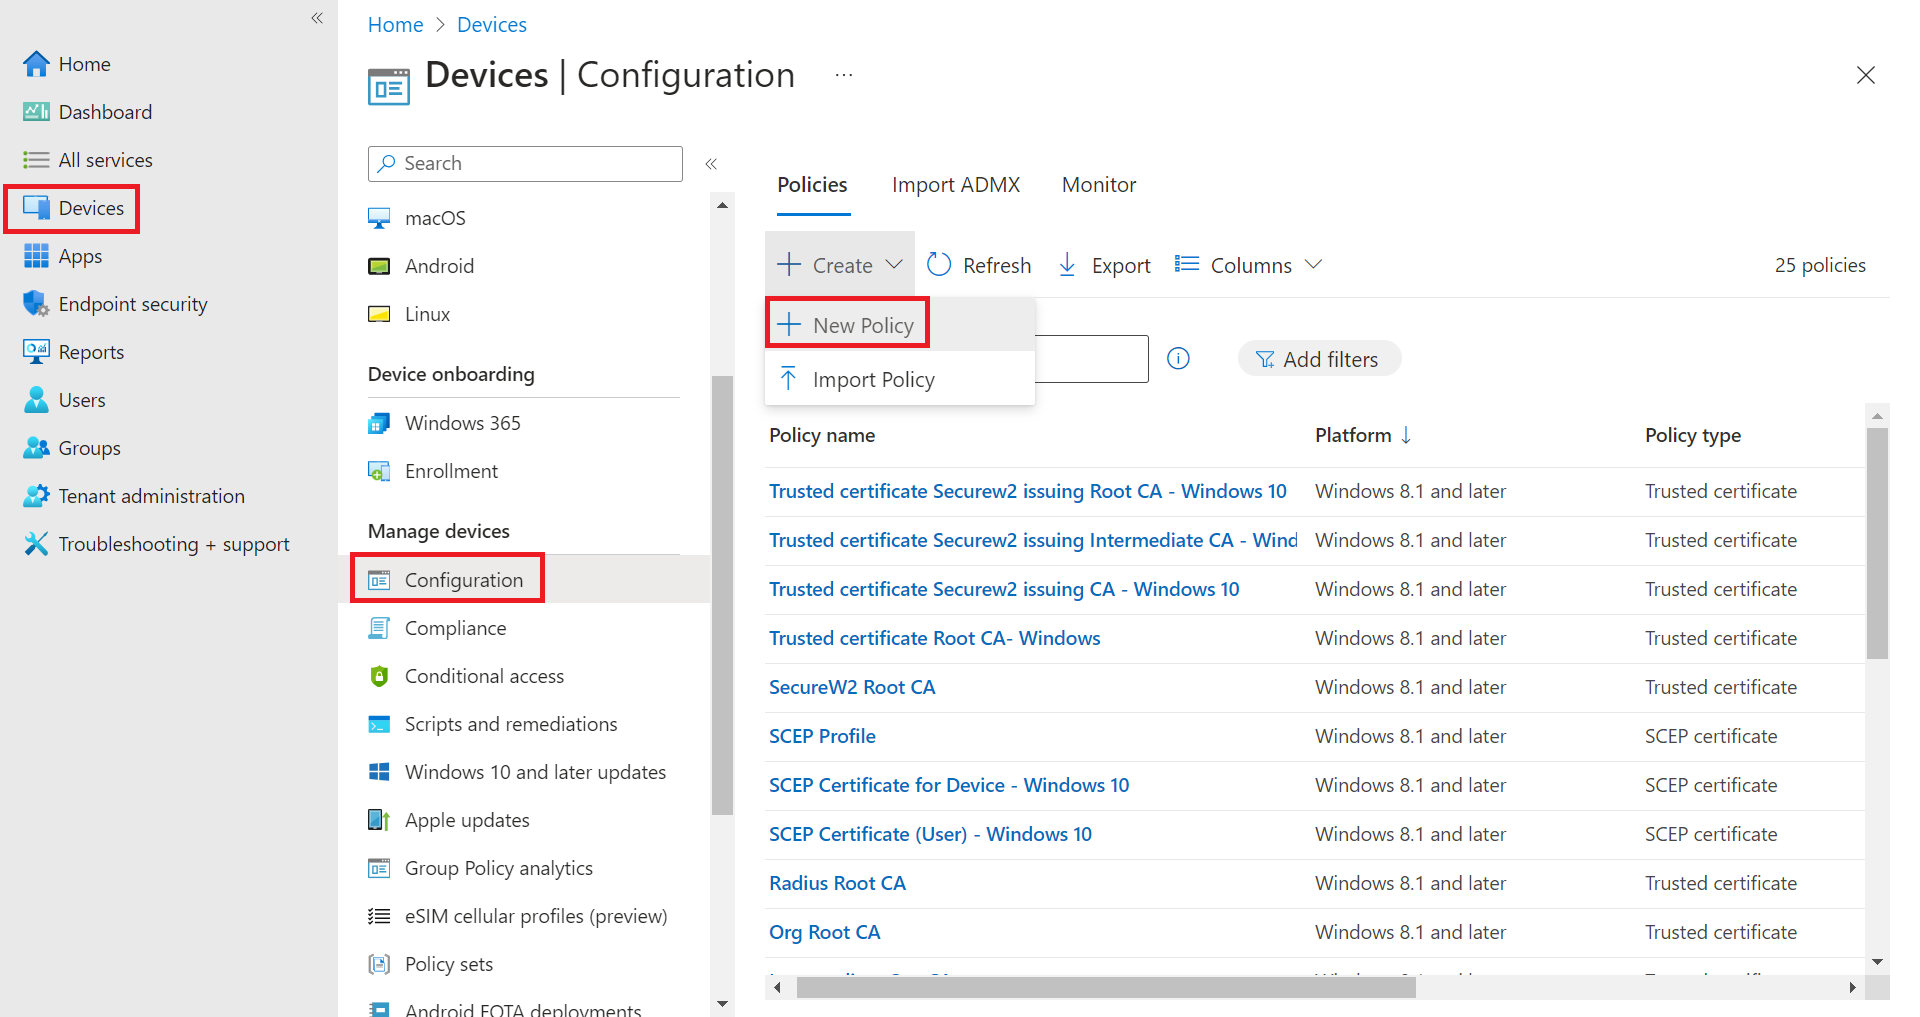
2
Navigate to Devices > Configuration > Create > New Policy.
Devices > Configuration > Create > New Policy
3
On the Create a profile page, from the Platform drop-down list, select the device platform for this trusted certificate:
–Android device administrator
–Android (AOSP)
–Android Enterprise
–iOS/iPadOS
–macOS
–Windows 10 and later
–Windows 8.1 and later
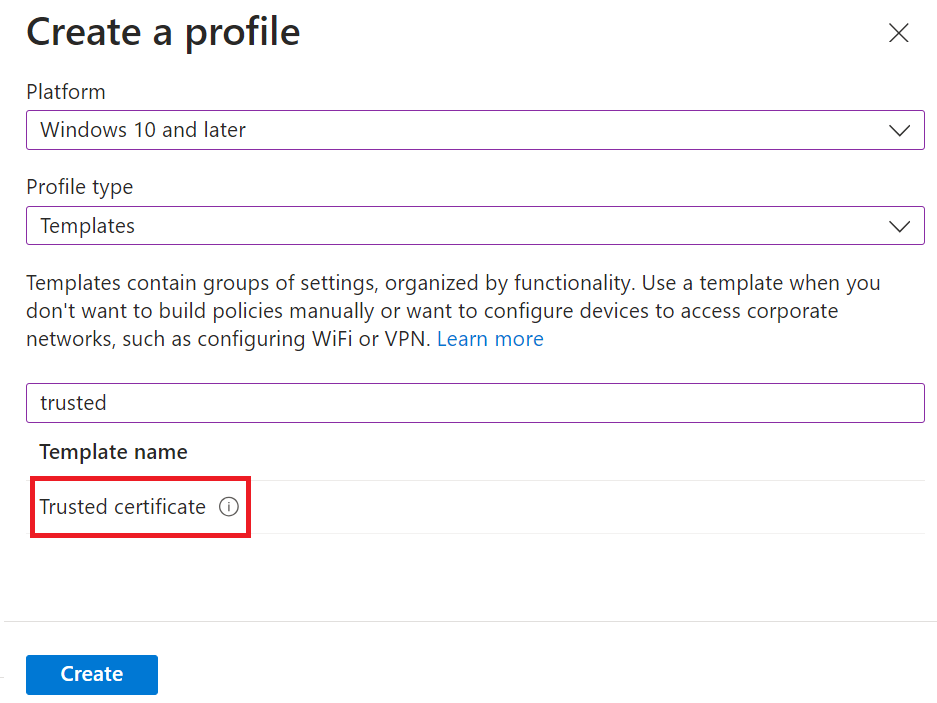
Selecting Platform and Profile type
4
From the Profile type drop-down list, select Templates, then select Trusted certificate.You must create a separate profile for each OS platform. The steps to create trusted certificates are similar for each device platform.Profile type: Templates > Trusted certificate
5
Click Create.
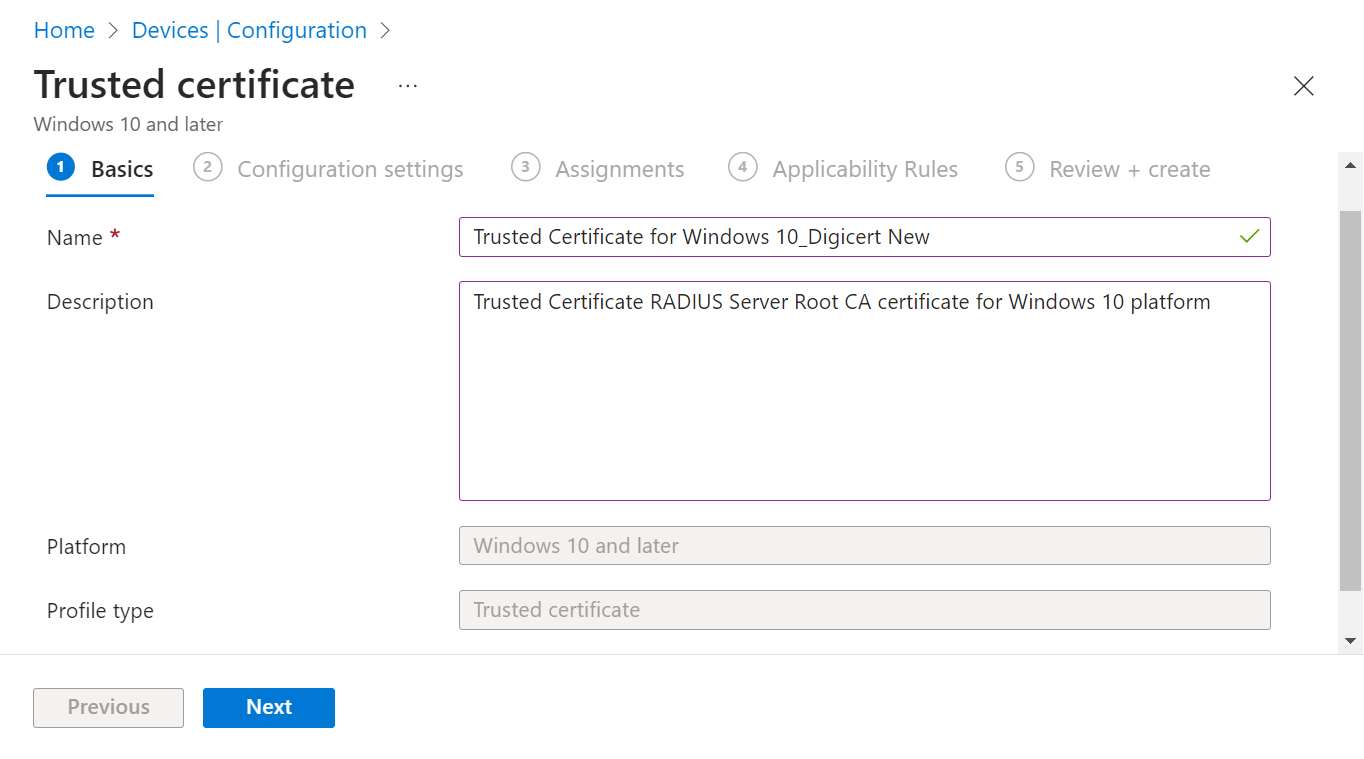
6
On the Trusted Certificate page, in the Basics section, enter the name of the trusted certificate in the Name field.
7
In the Description field, enter a suitable description for the trusted certificate.
8
Click Next.
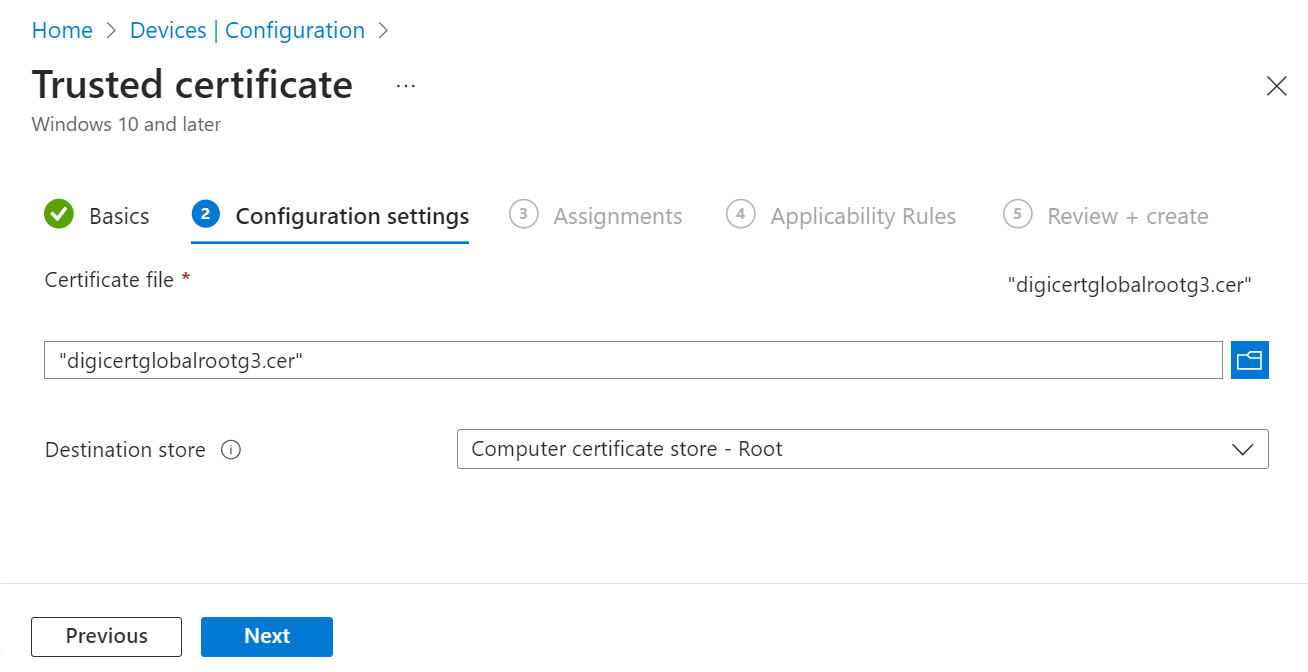
9
On the Configuration settings page, add the Root CA certificate you saved earlier by clicking the Browse button.
Configuration settings — Browse to upload DigiCert Global Root G3
10
Click Next.
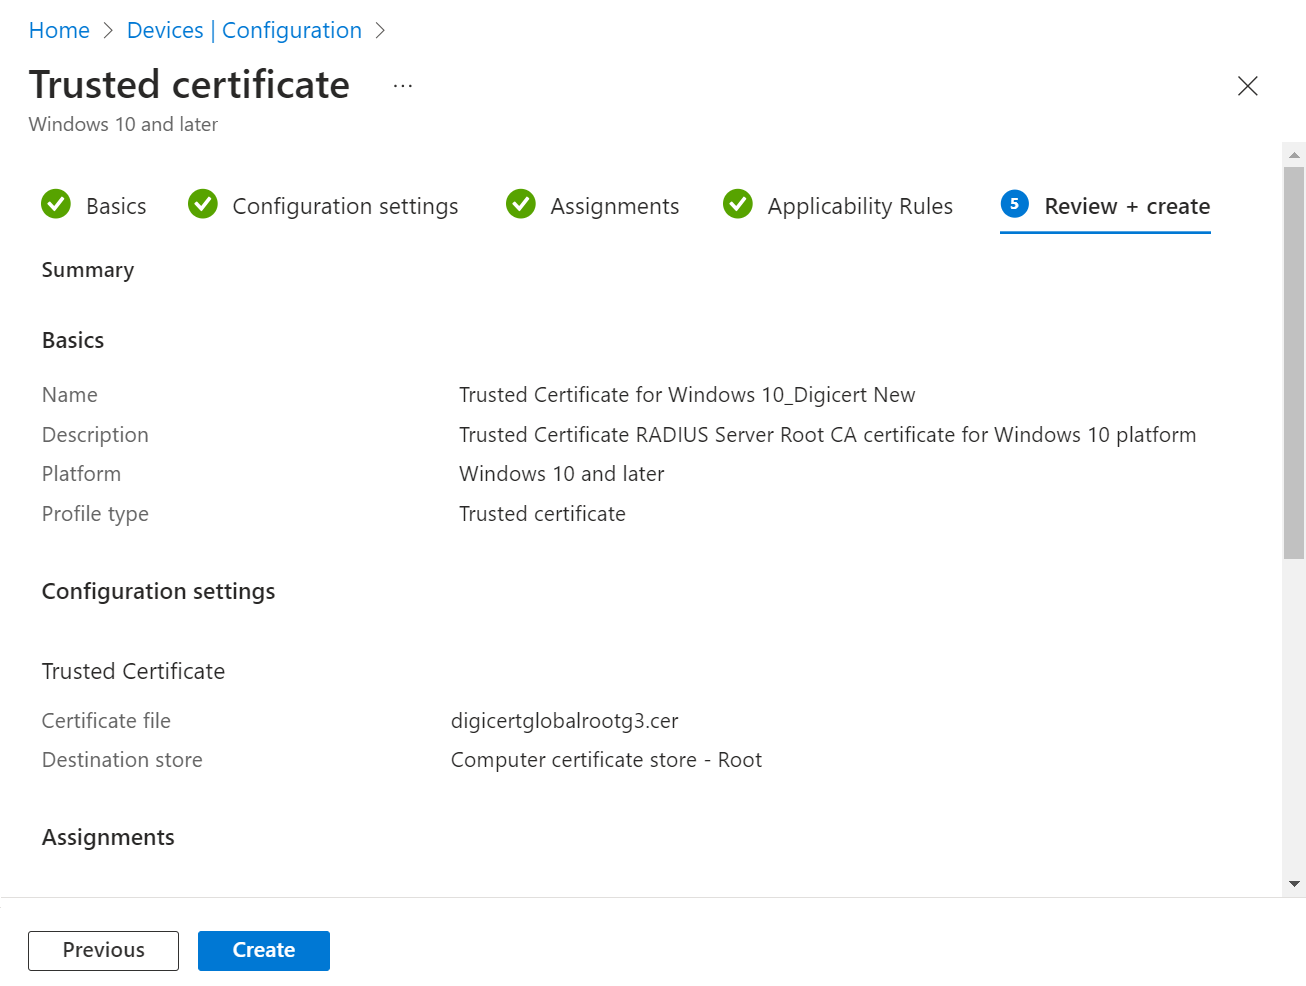
11
Assign the profile to the appropriate Groups and Rules, review it, and click Create.
Assignments — Groups and Rules > Create
Part B Configure the Wi-Fi Profile
Configuring a Wi-Fi Profile
When renewing the server certificate for CloudRADIUS, you must also update the new Root CA for all existing customer Network profiles to enable Server Certificate Validation.
1
Sign in to the Microsoft Endpoint Manager portal.
2
Navigate to Devices > Configuration.
3
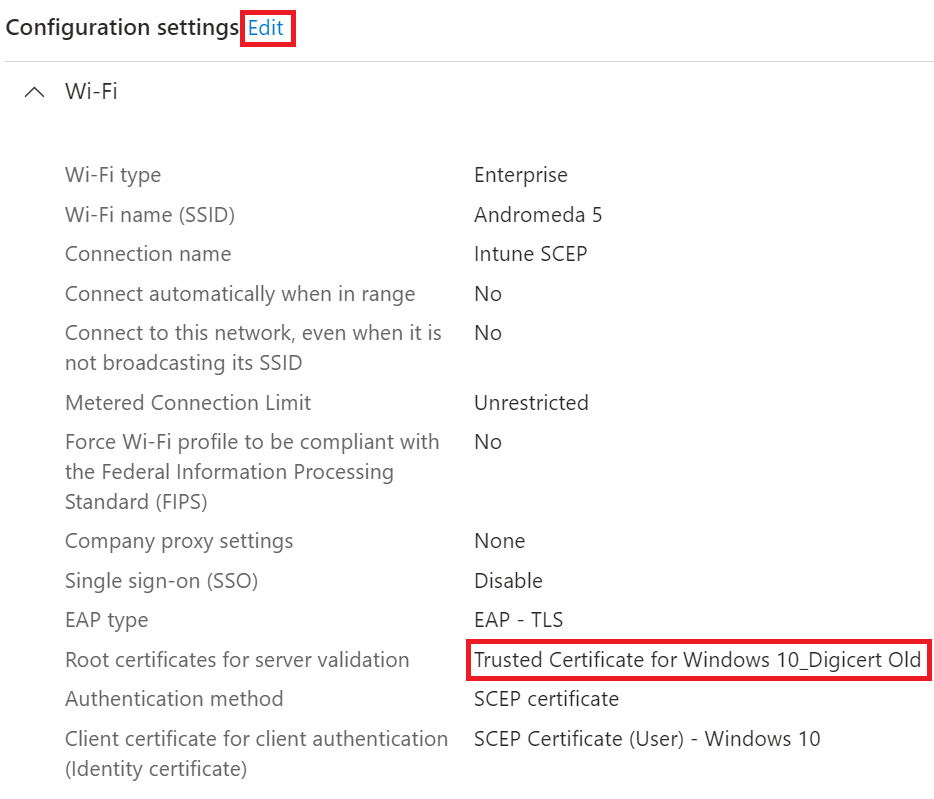
On the Configuration page, select the Wi-Fi profile for updating the new Root CA.
Selecting the Wi-Fi profile to update
4
Scroll to the Configuration settings section and click the Edit link.
Configuration settings section — Edit
5
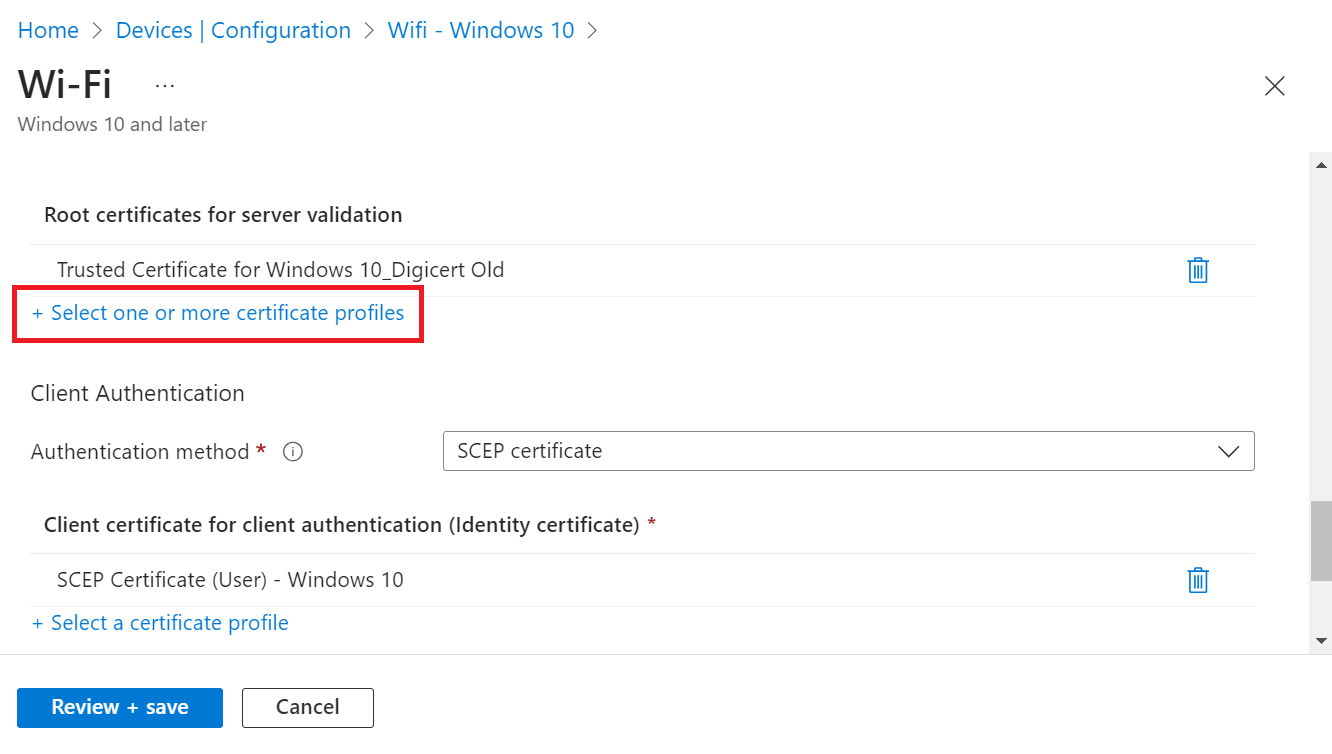
Under the Root Certificates for server validation section, click + Select one or more certificate profiles to add the new Root CA.
Root Certificates for server validation — + Select one or more certificate profiles
6
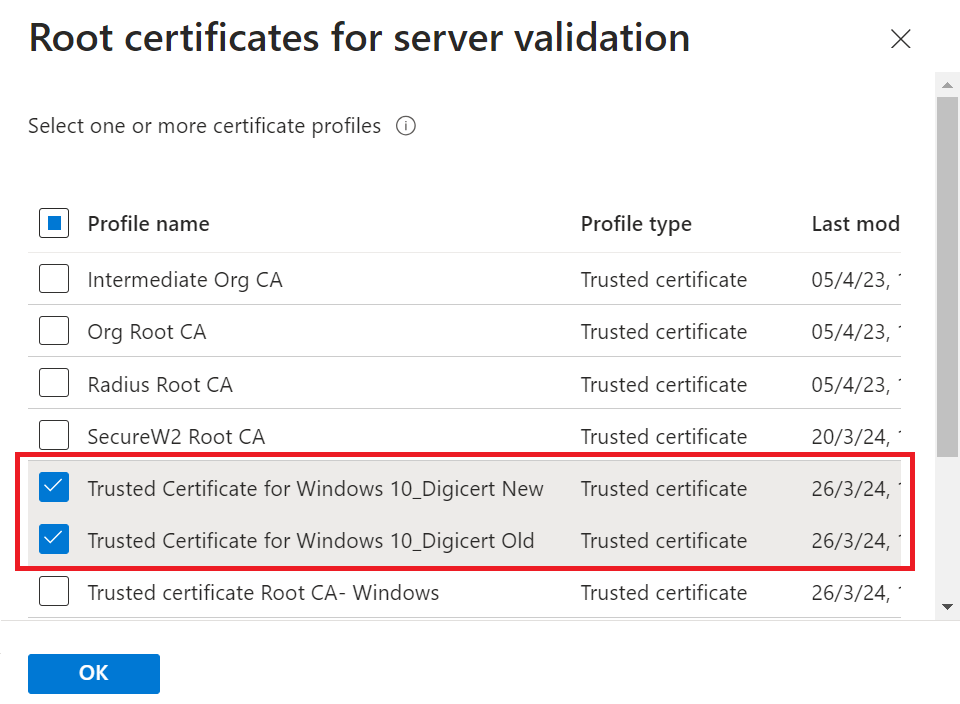
On the Root Certificates for server validation page, select the certificate profile with the new Root CA and click OK.Retain the existing Root CA — do not remove it during this step.Selecting the certificate profile containing DigiCert Global Root G3
7
Click the Review + Save button.
Review + Save
8
Click Save.
Confirming success
Once the certificate is enrolled, the "Certificate issued" message is displayed on the Events page. Log in to the JoinNow Management Portal and navigate to Data and Monitoring > General Events.
Jamf
Prerequisites
Active subscription to the JoinNow Management Portal and CloudRADIUS
Active subscription to the Jamf Portal
Part A macOS — Set Up New Root CA
Setting Up a New Root CA on the macOS Configuration Profile
1
Sign in to the Jamf Pro Portal.
2
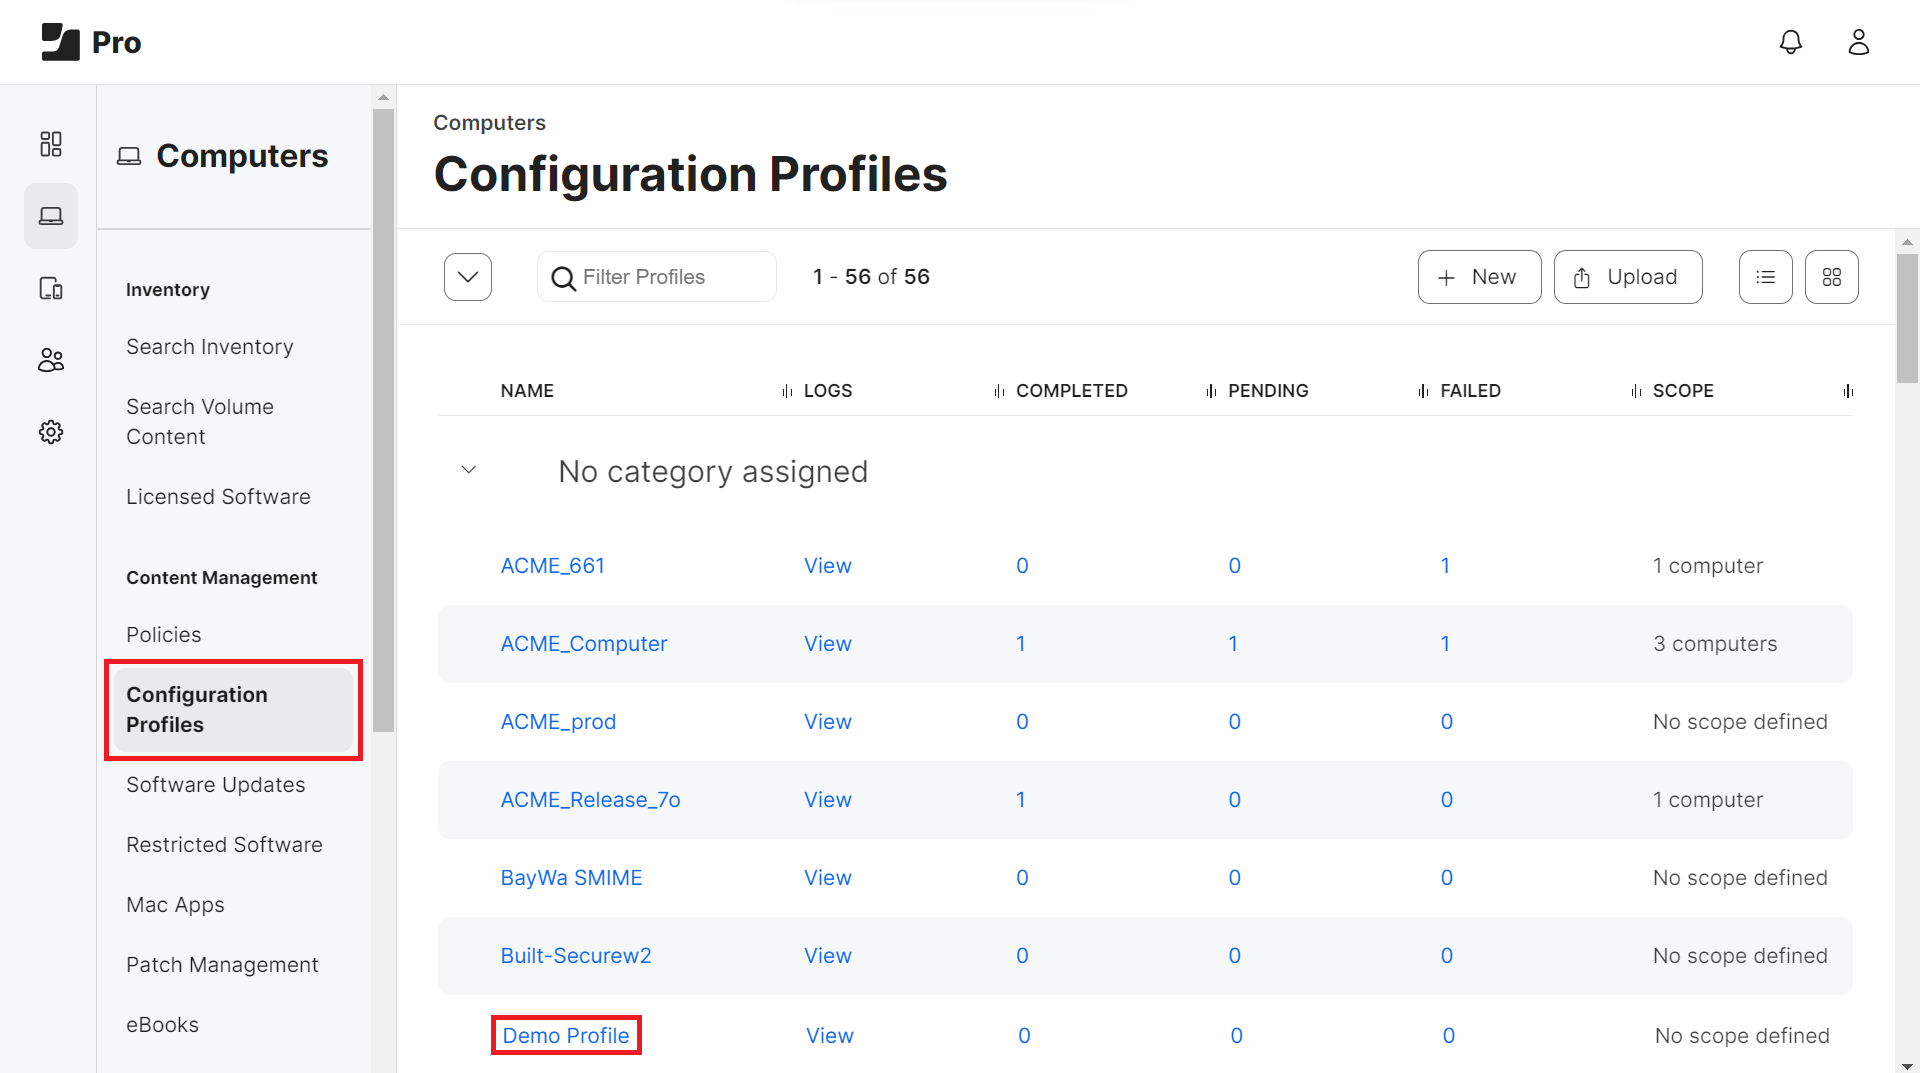
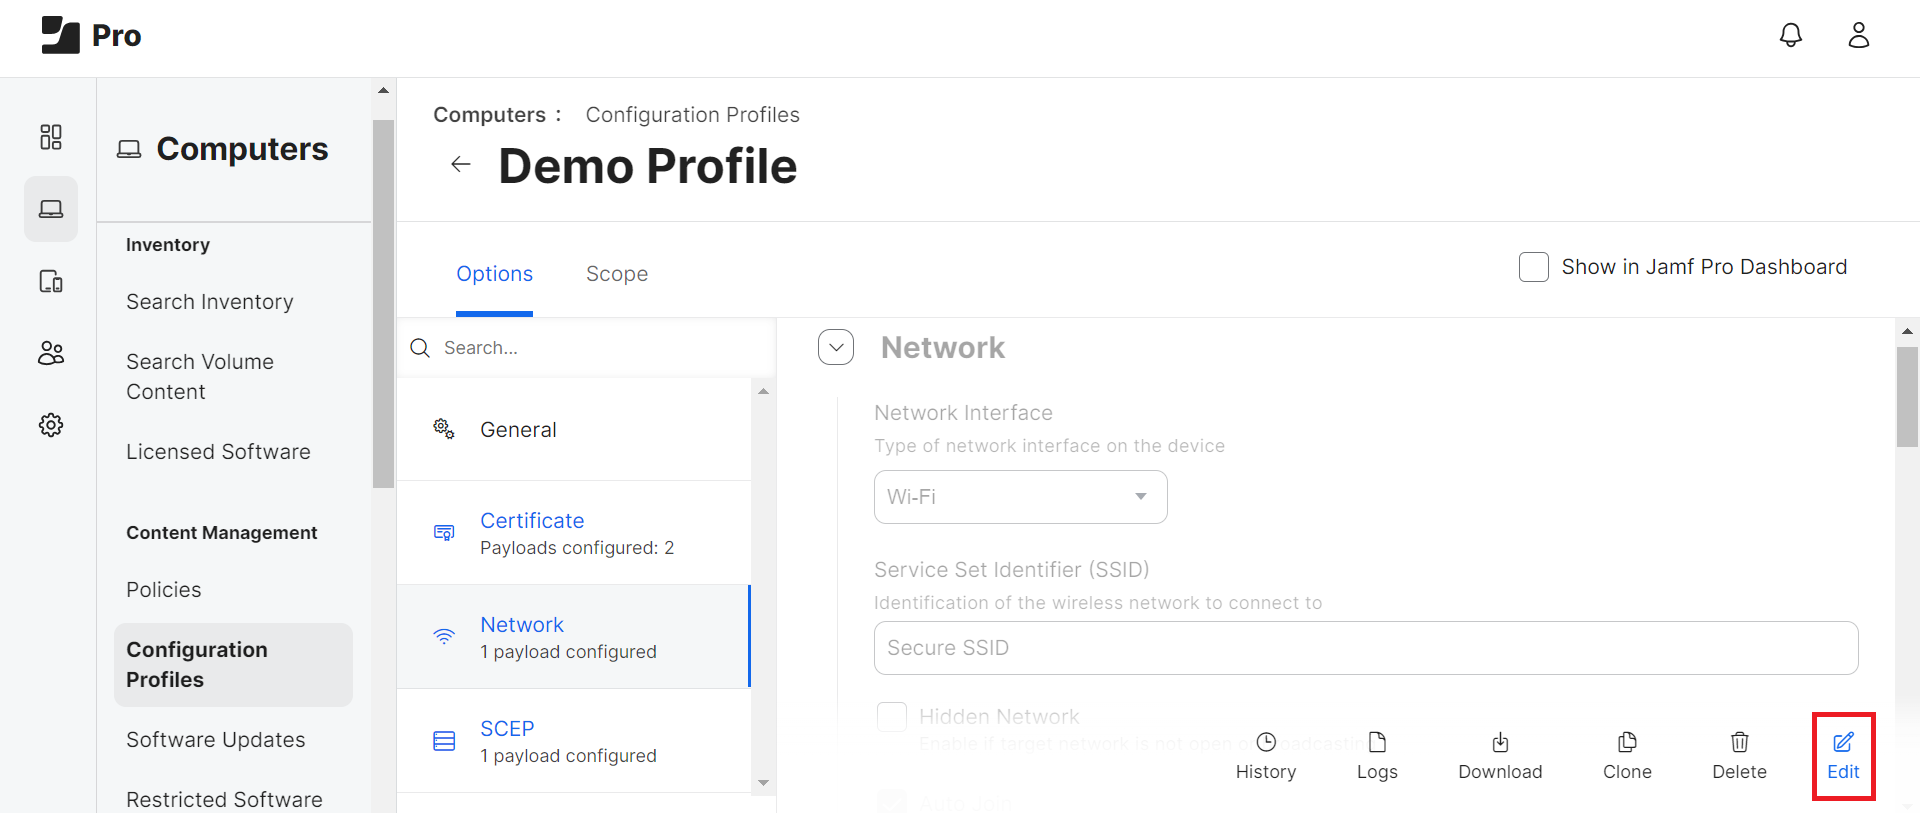
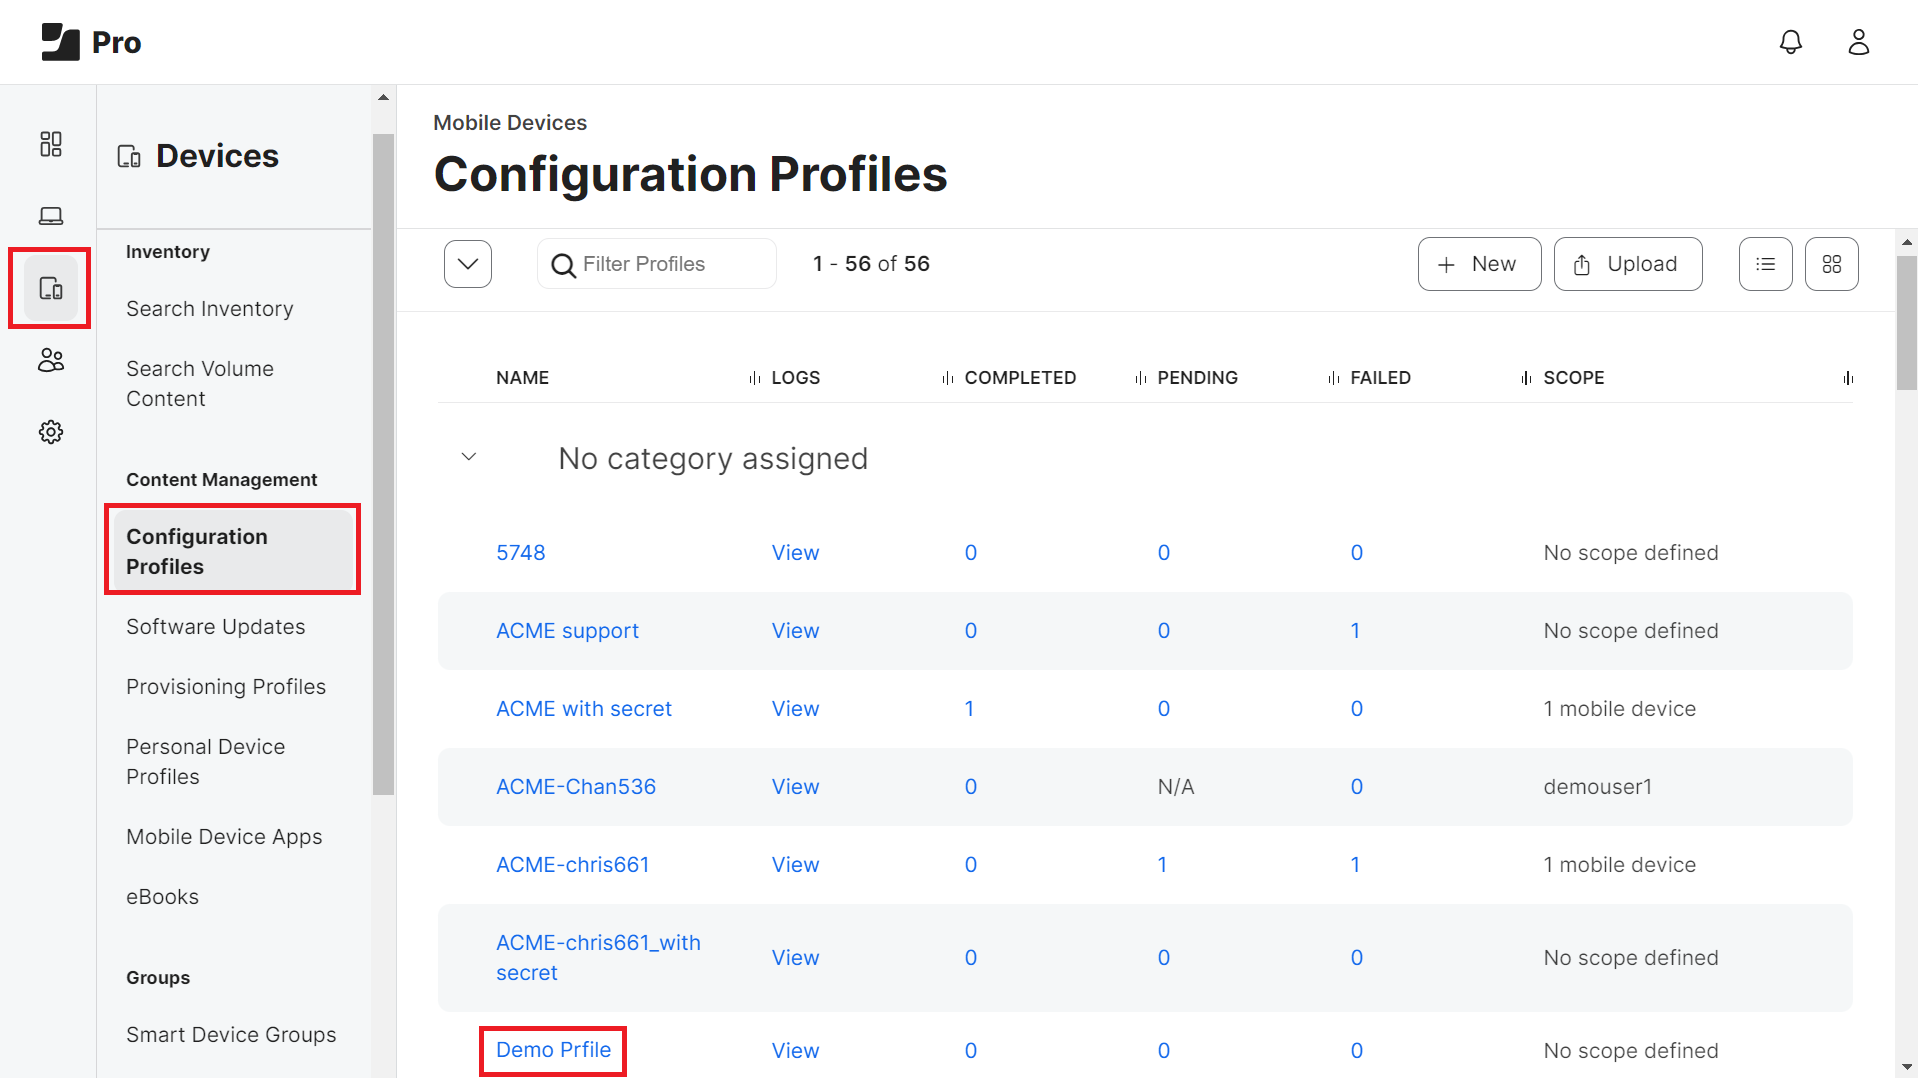
Navigate to Computers > Configuration Profiles.
Computers > Configuration Profiles
3
On the Configuration Profiles page, select the profile for updating the new Root CA.
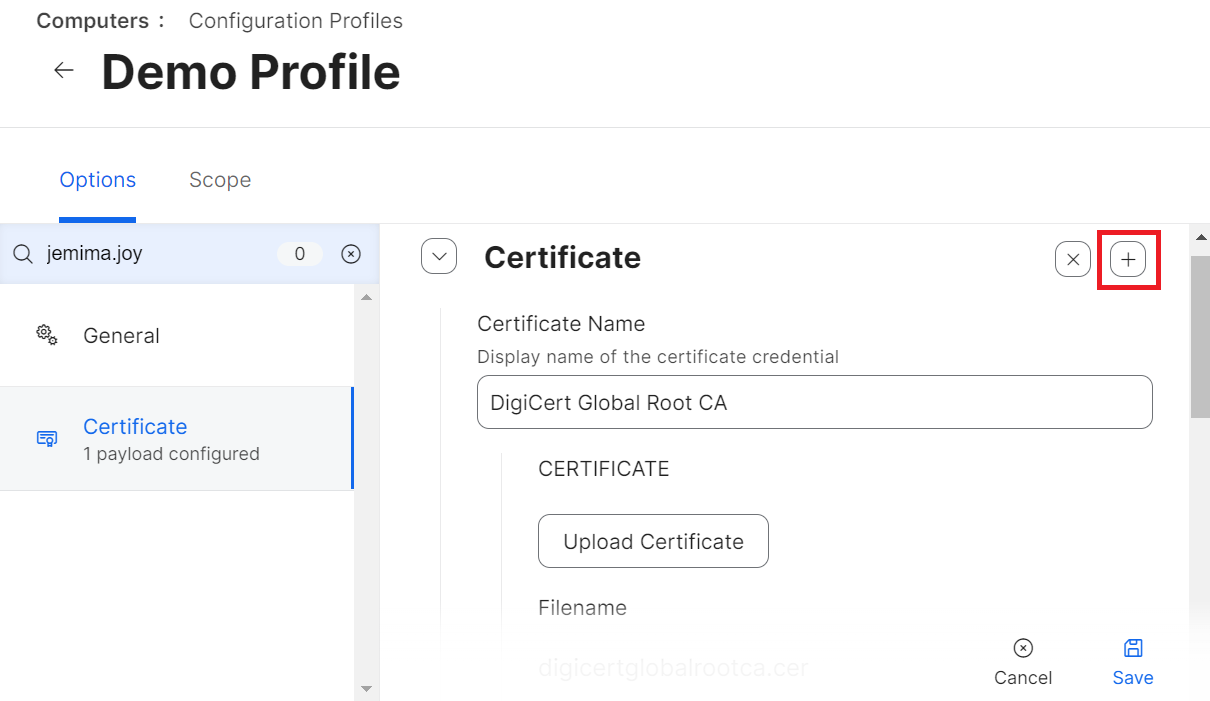
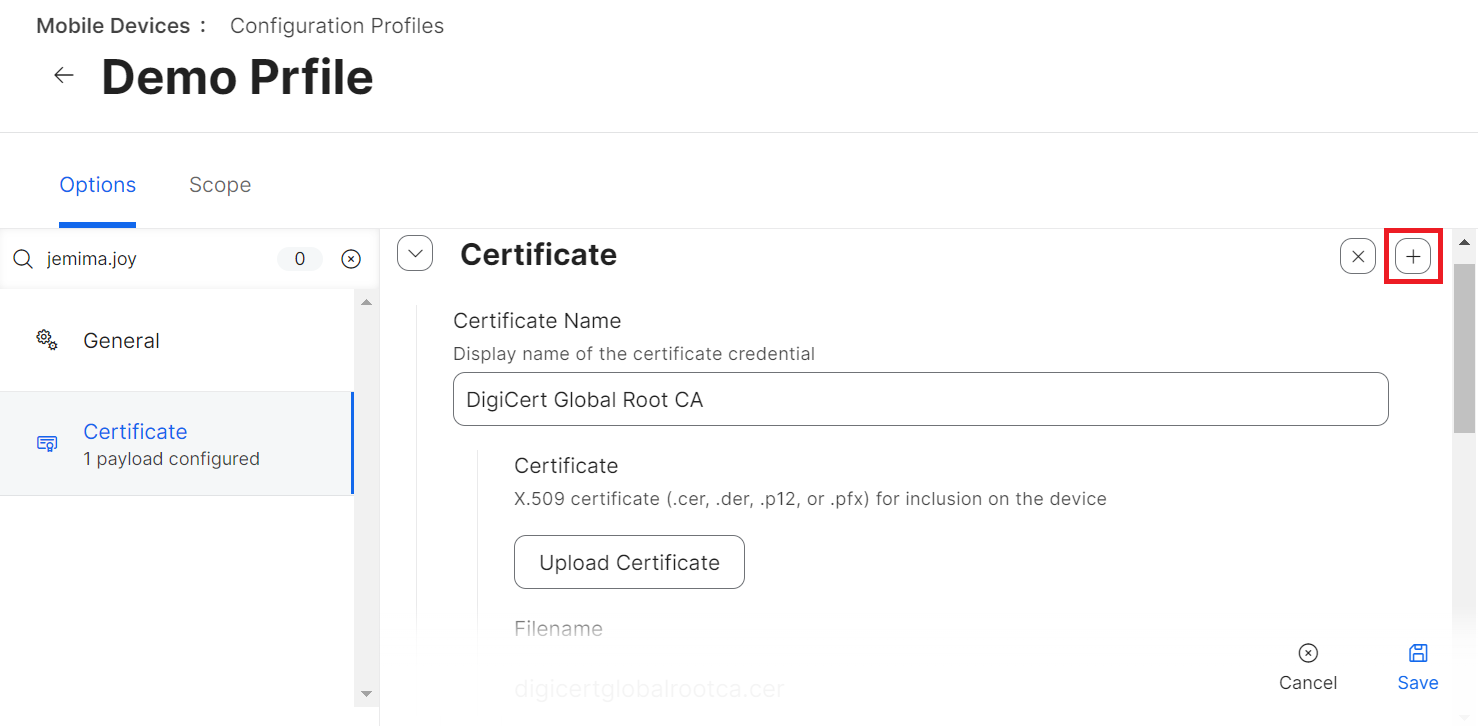
Under the Certificate section, click the + button.
6
Scroll to the newly added Certificate section and in the Certificate Name field, enter the name of the certificate.
7
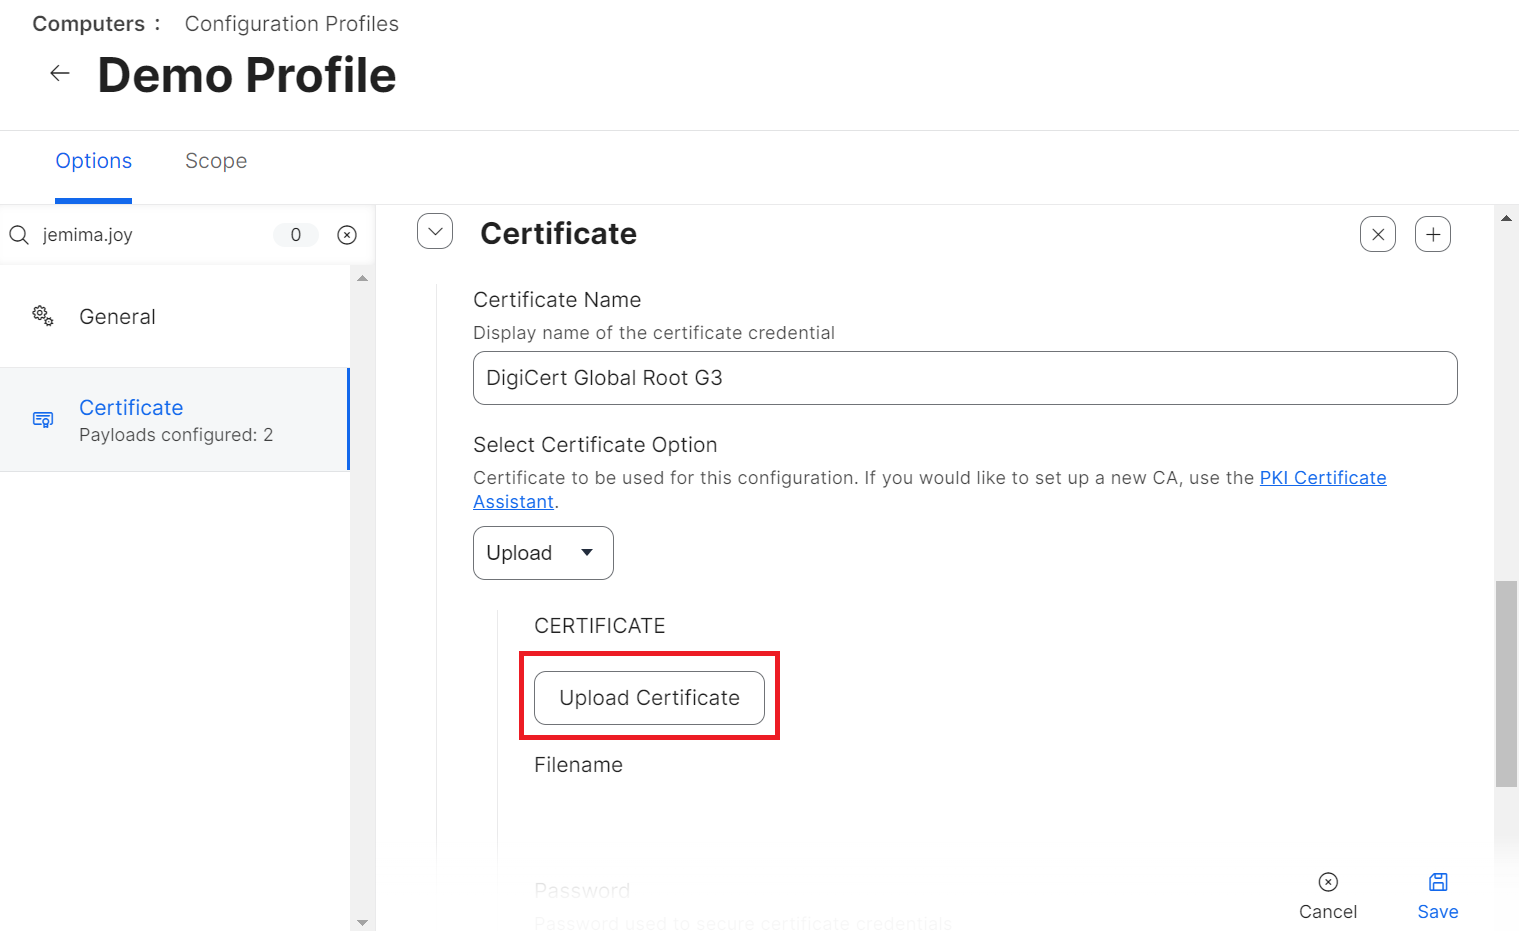
From the Select Certificate Option drop-down list, select Upload.
Certificate Name field and Select Certificate Option: Upload
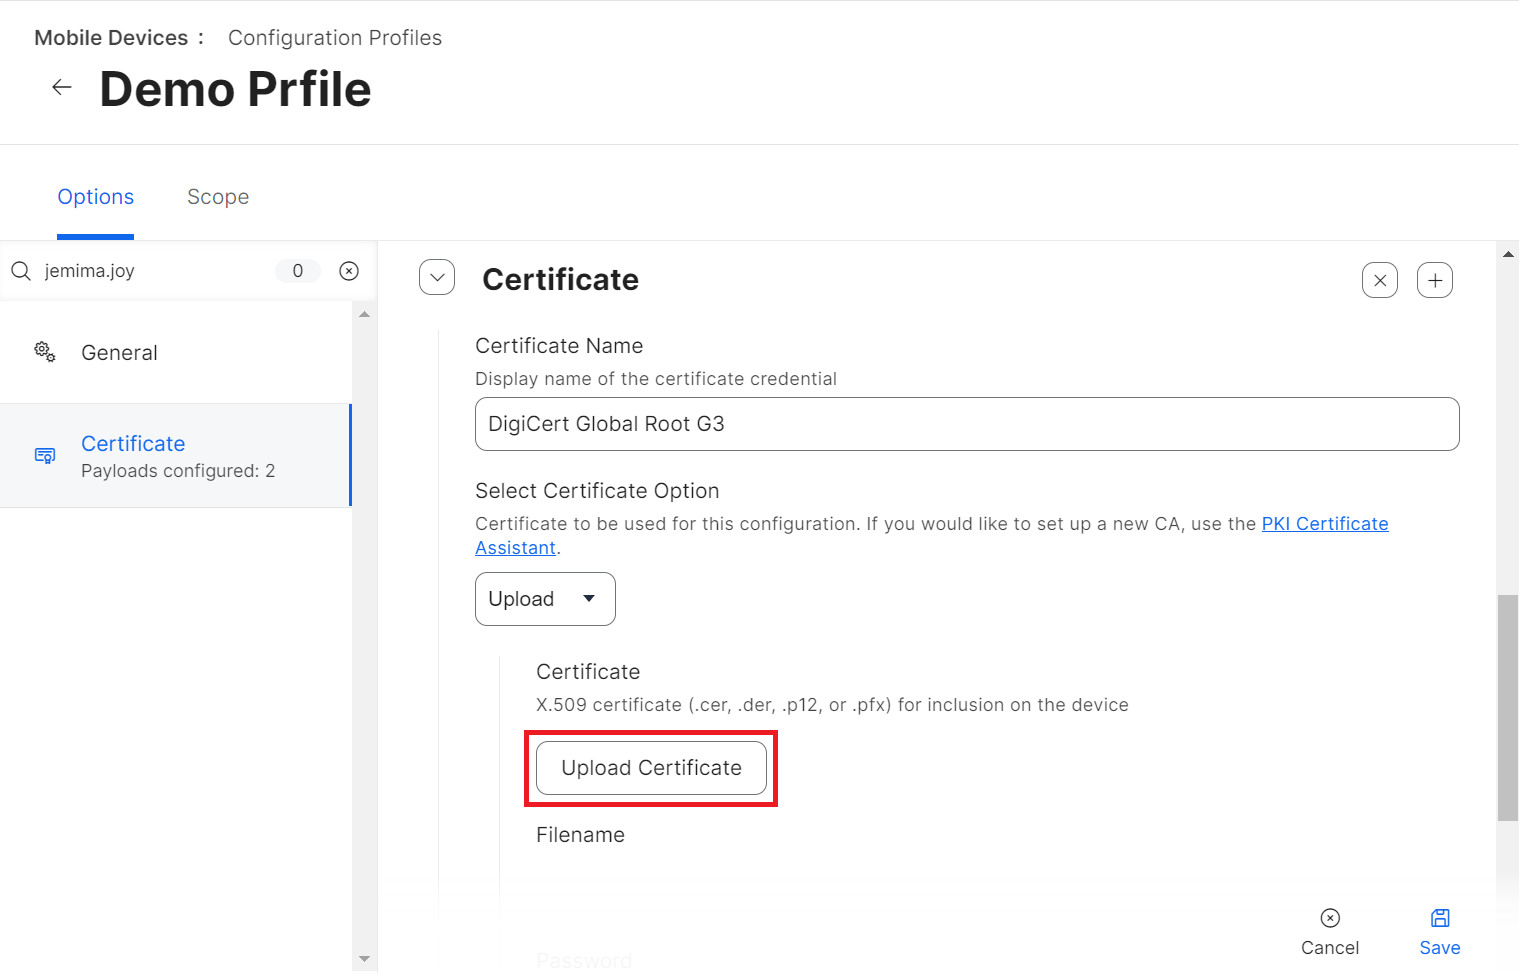
8
Click Upload Certificate.
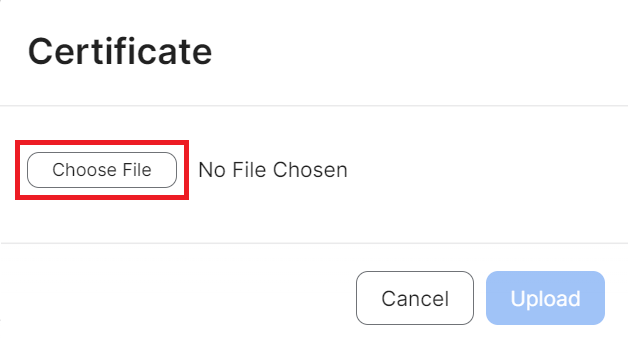
9
In the Certificate pop-up window, click Choose File and select the new Root CA certificate you want to upload.
Upload Certificate dialog — Choose File
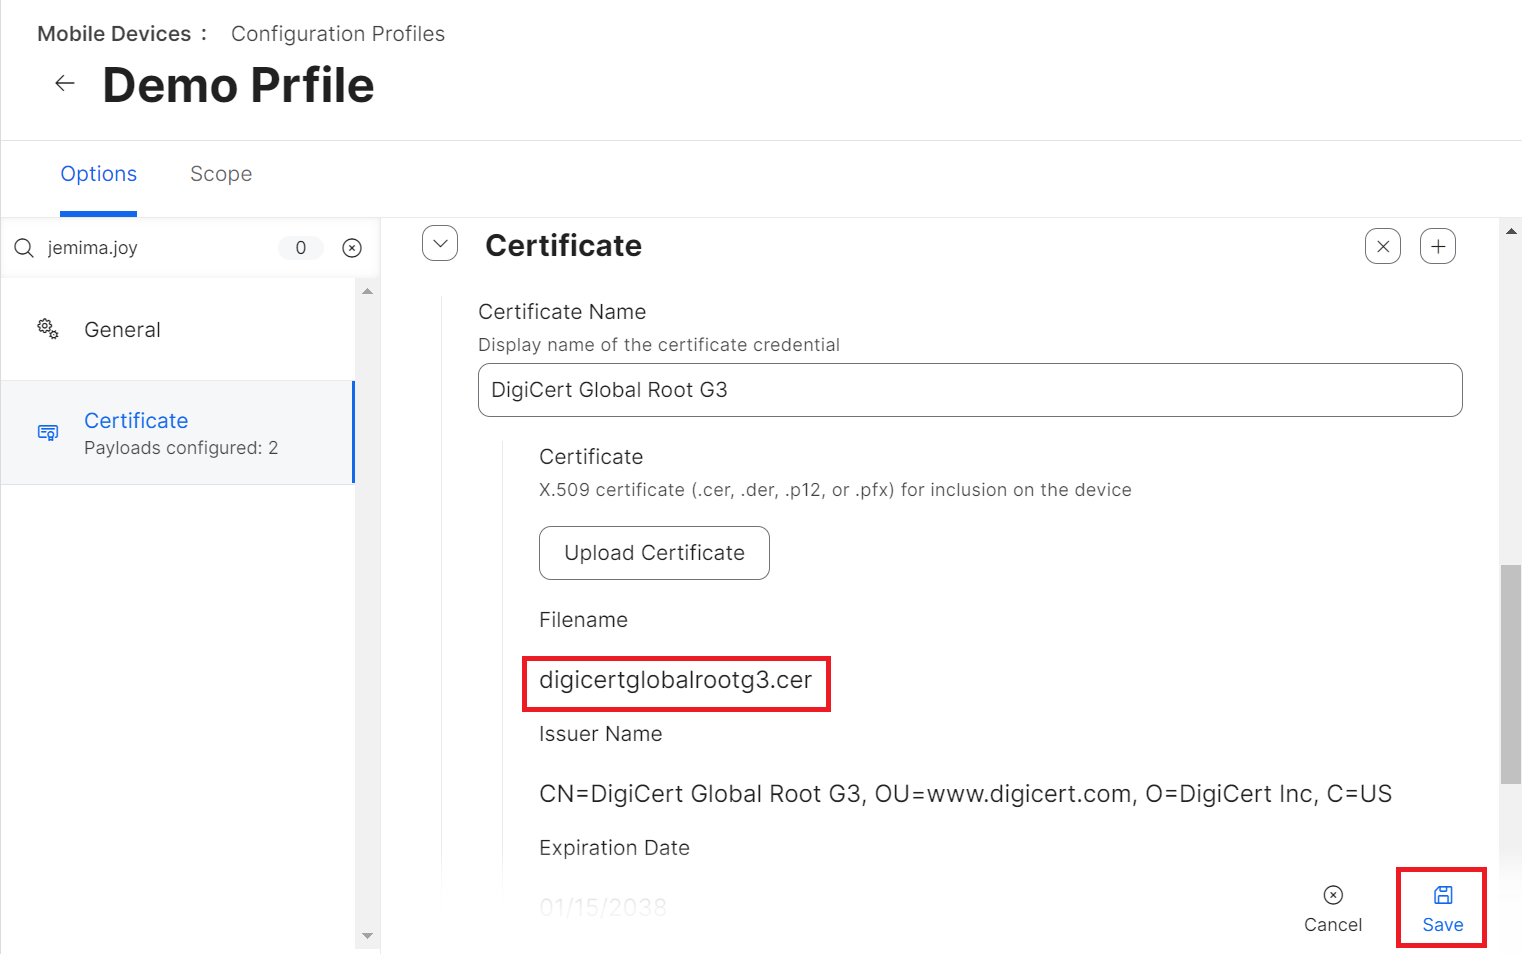
10
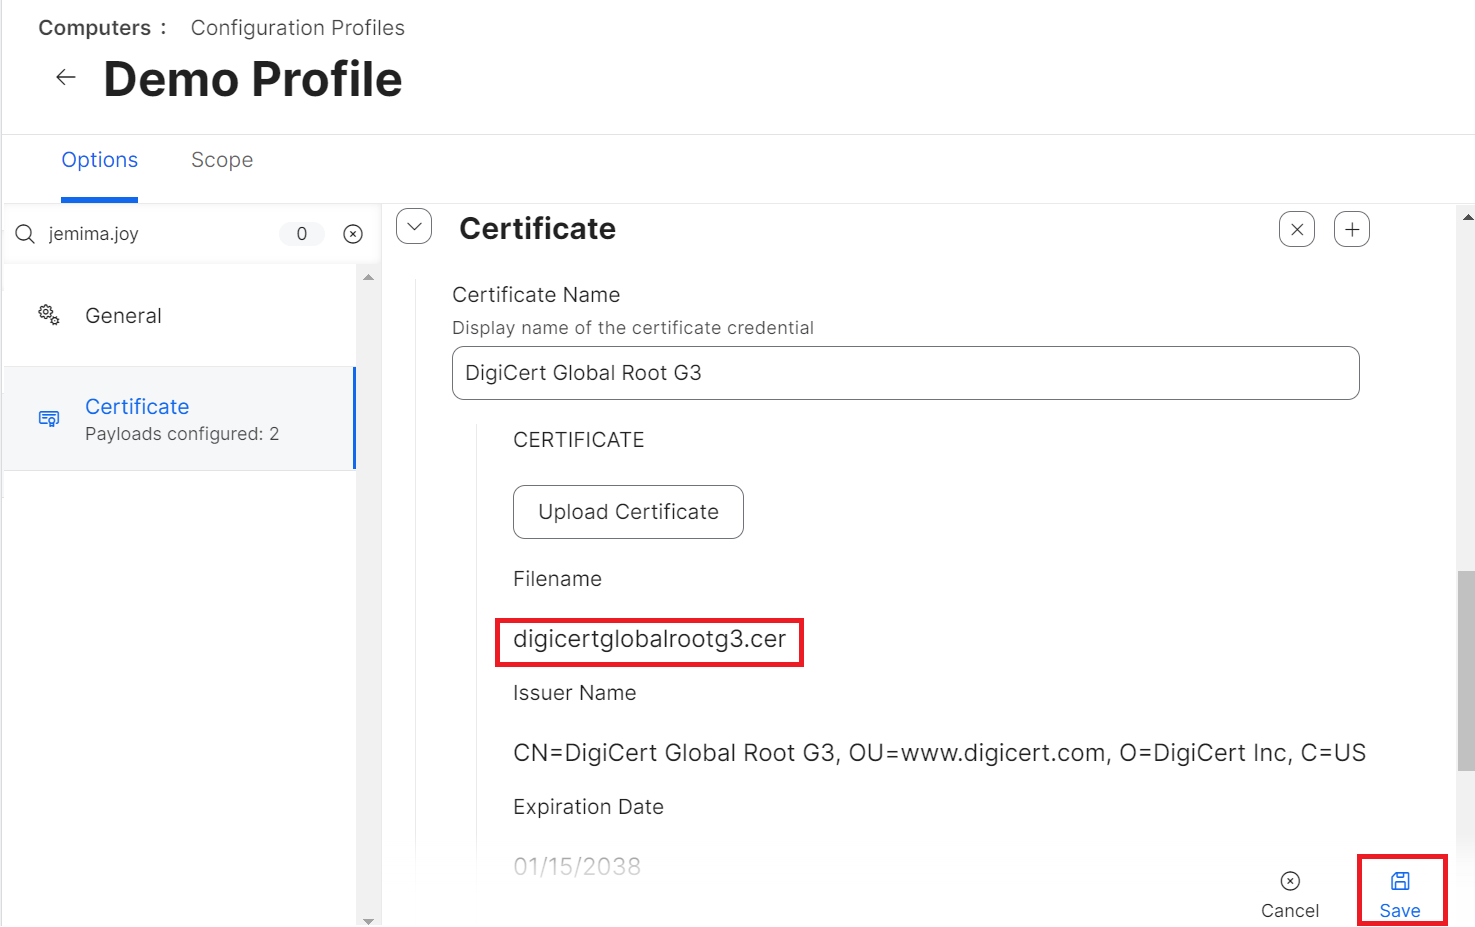
Click Upload.
11
Click Save.
Save — certificate added to profile
Part B macOS — Configure Wi-Fi Profile
Configuring a Wi-Fi Profile for macOS
When renewing the server certificate for CloudRADIUS, you must also update the new Root CA for all existing customer Network profiles to enable Server Certificate Validation.
1
Sign in to the Jamf Pro Portal.
2
Navigate to Computers > Configuration Profiles.
3
On the Configuration Profiles page, select the profile for updating the new Root CA.
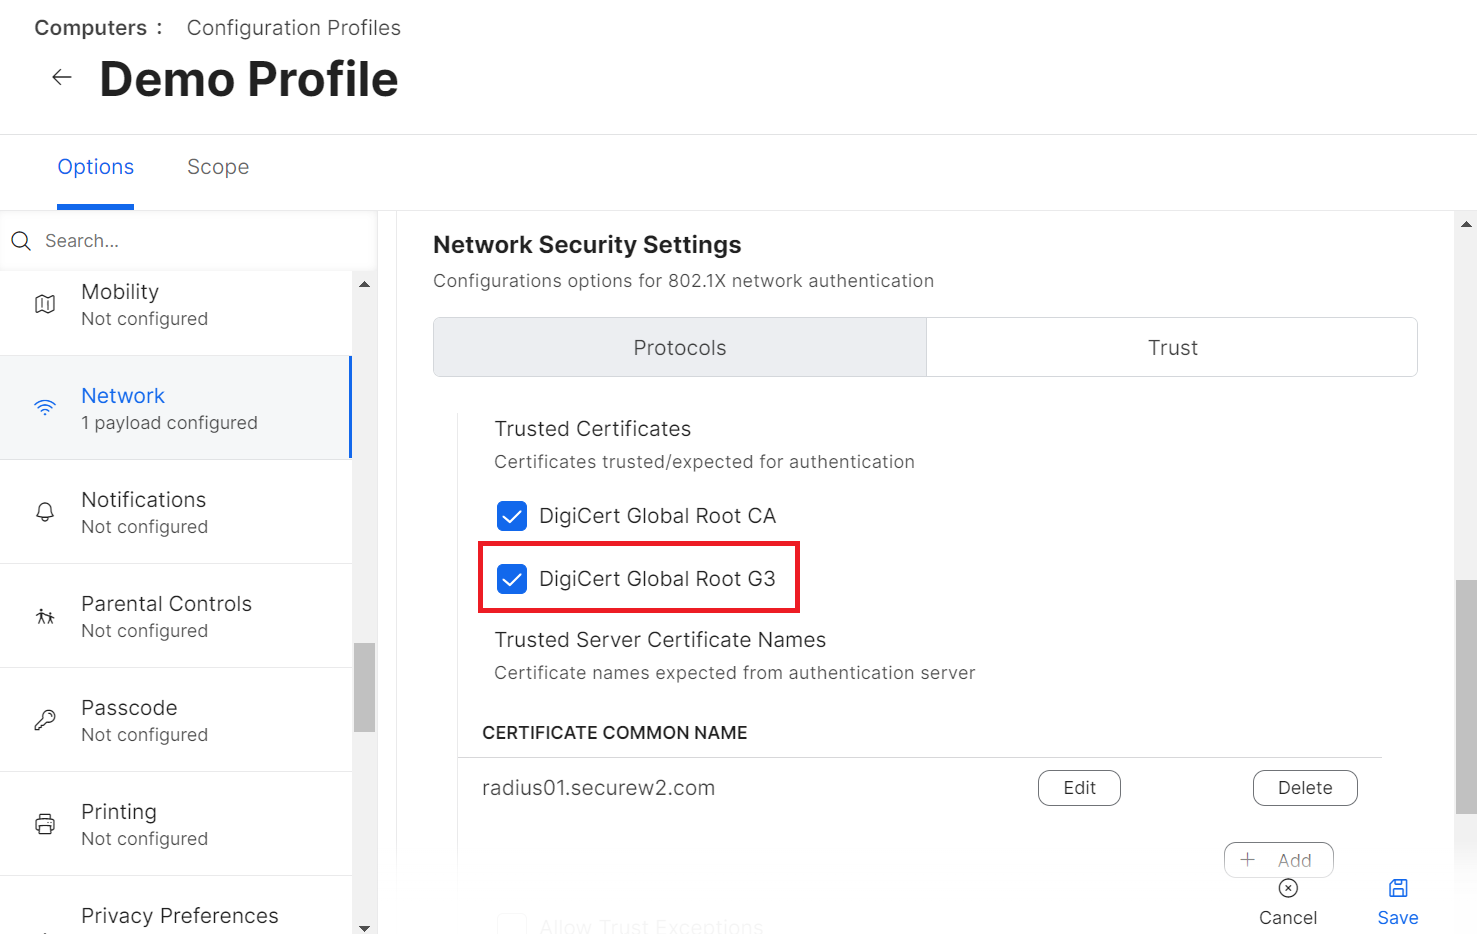
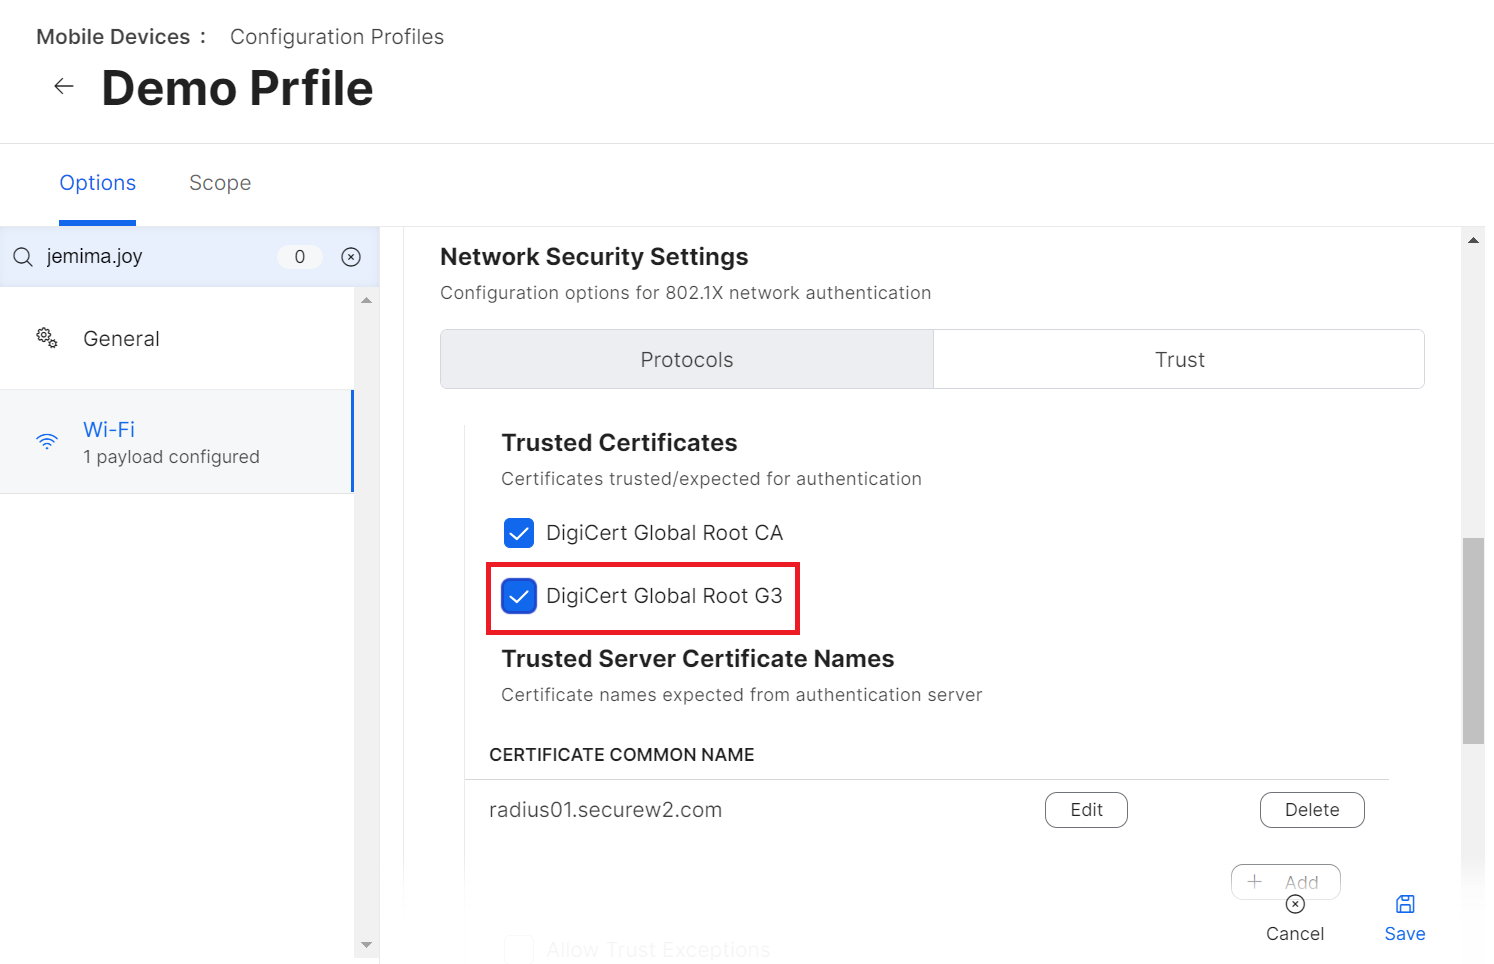
Under the Network section, scroll to Network Security Settings and select the Trust tab.
Network Security Settings — Trust tab with Trusted Certificates
6
Under the Trusted Certificates section, select the newly added Root CA.
Trusted Certificates — new Root CA selected
7
Click Save. A Redistribution Options pop-up window appears. Choose the Distribute to All radio button to push the configuration profile with the new Root CA to the existing computers.
Redistribution Options pop-up — Distribute to All
8
Click Save.
Part C iOS — Set Up New Root CA
Setting Up a New Root CA on the iOS Configuration Profile
1
Sign in to the Jamf Pro Portal.
2
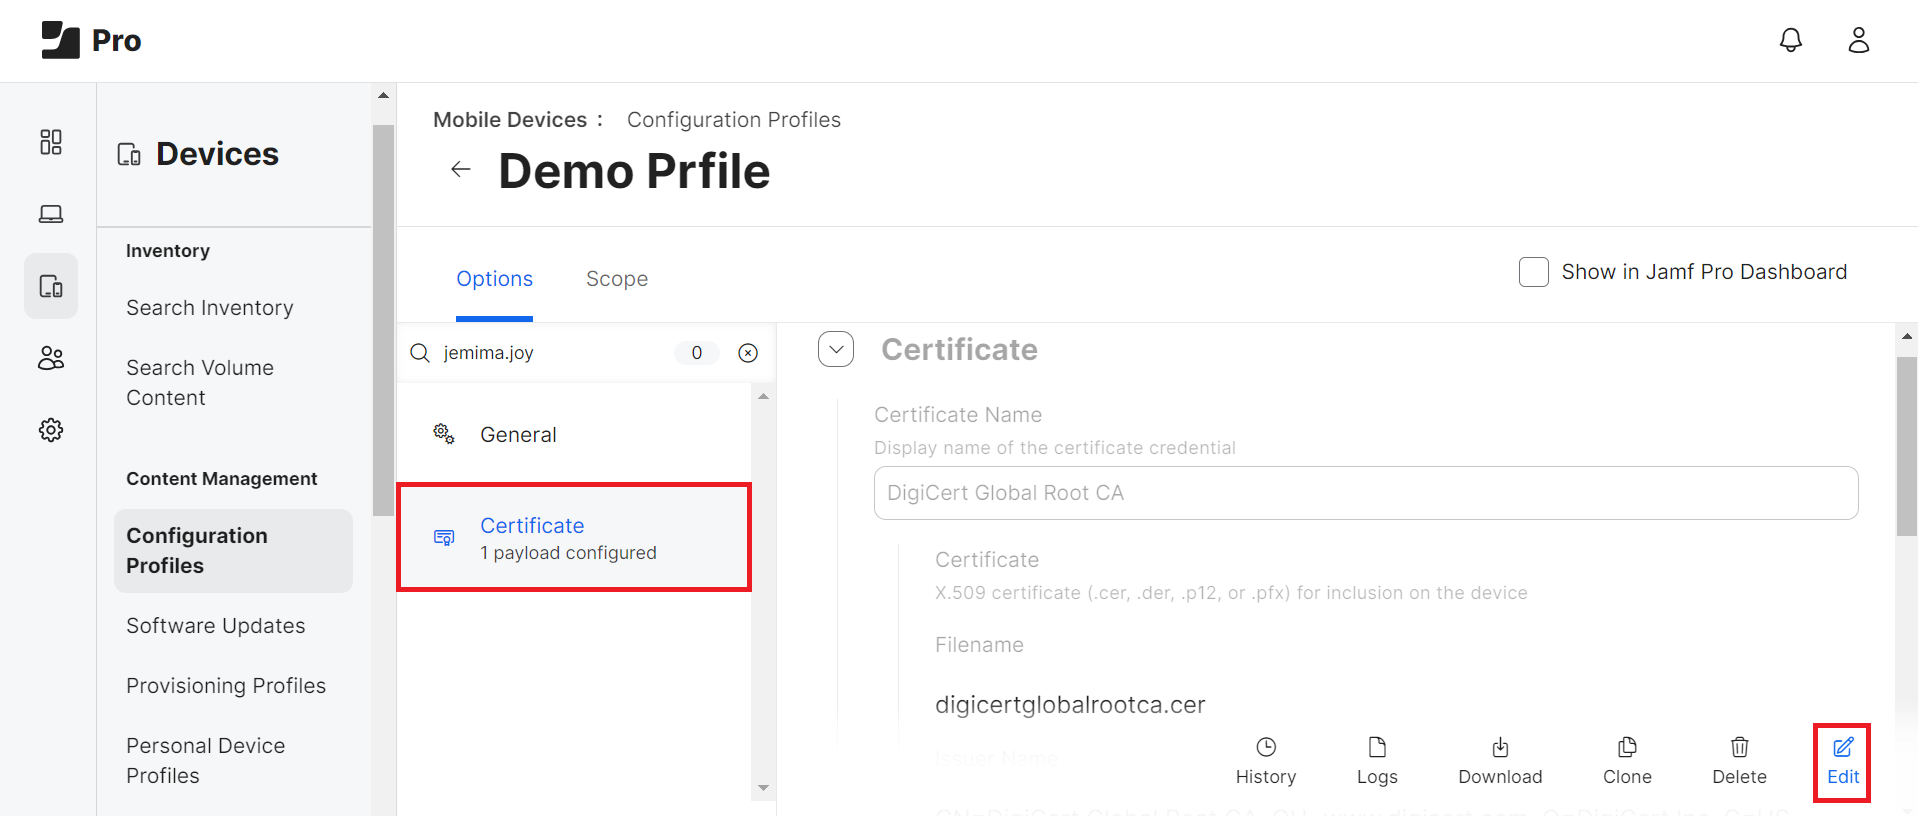
Navigate to Devices > Configuration Profiles.
Devices > Configuration Profiles
3
On the Configuration Profiles page, select the profile for updating the new Root CA.
Under the Wi-Fi section, scroll to Network Security Settings and select the Trust tab.
Network Security Settings — Trust tab
6
Under the Trusted Certificates section, select the newly added Root CA.
Trusted Certificates — new Root CA selected
7
Click Save. A Redistribution Options pop-up window appears. Choose the Distribute to All radio button to push the configuration profile with the new Root CA to the existing iOS devices.
Redistribution Options — Distribute to All iOS devices
8
Click Save.
Confirming success
Once the certificate is enrolled, the "Certificate issued" message is displayed on the Events page. Log in to the JoinNow Management Portal and navigate to Data and Monitoring > General Events.
Meraki
Prerequisites
Active subscription to the JoinNow Management Portal and CloudRADIUS
Active subscription with Cisco Meraki access point
Uploading a New Root CA on the Existing Profile
You need to create a custom .mobileconfig file with the new root CA and update it in the existing profile in Meraki. After the upload, you can deploy the updated profile to your managed devices.
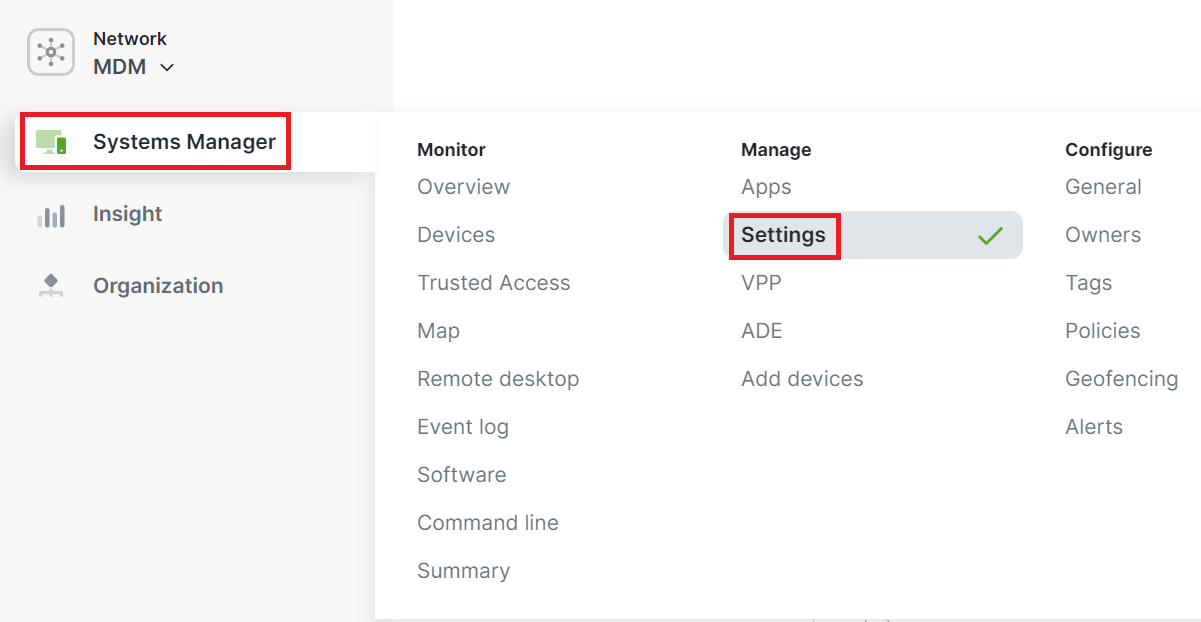
1
Log in to the Meraki portal.
2
Navigate to Systems Manager > Settings.
Systems Manager > Settings — Profiles list
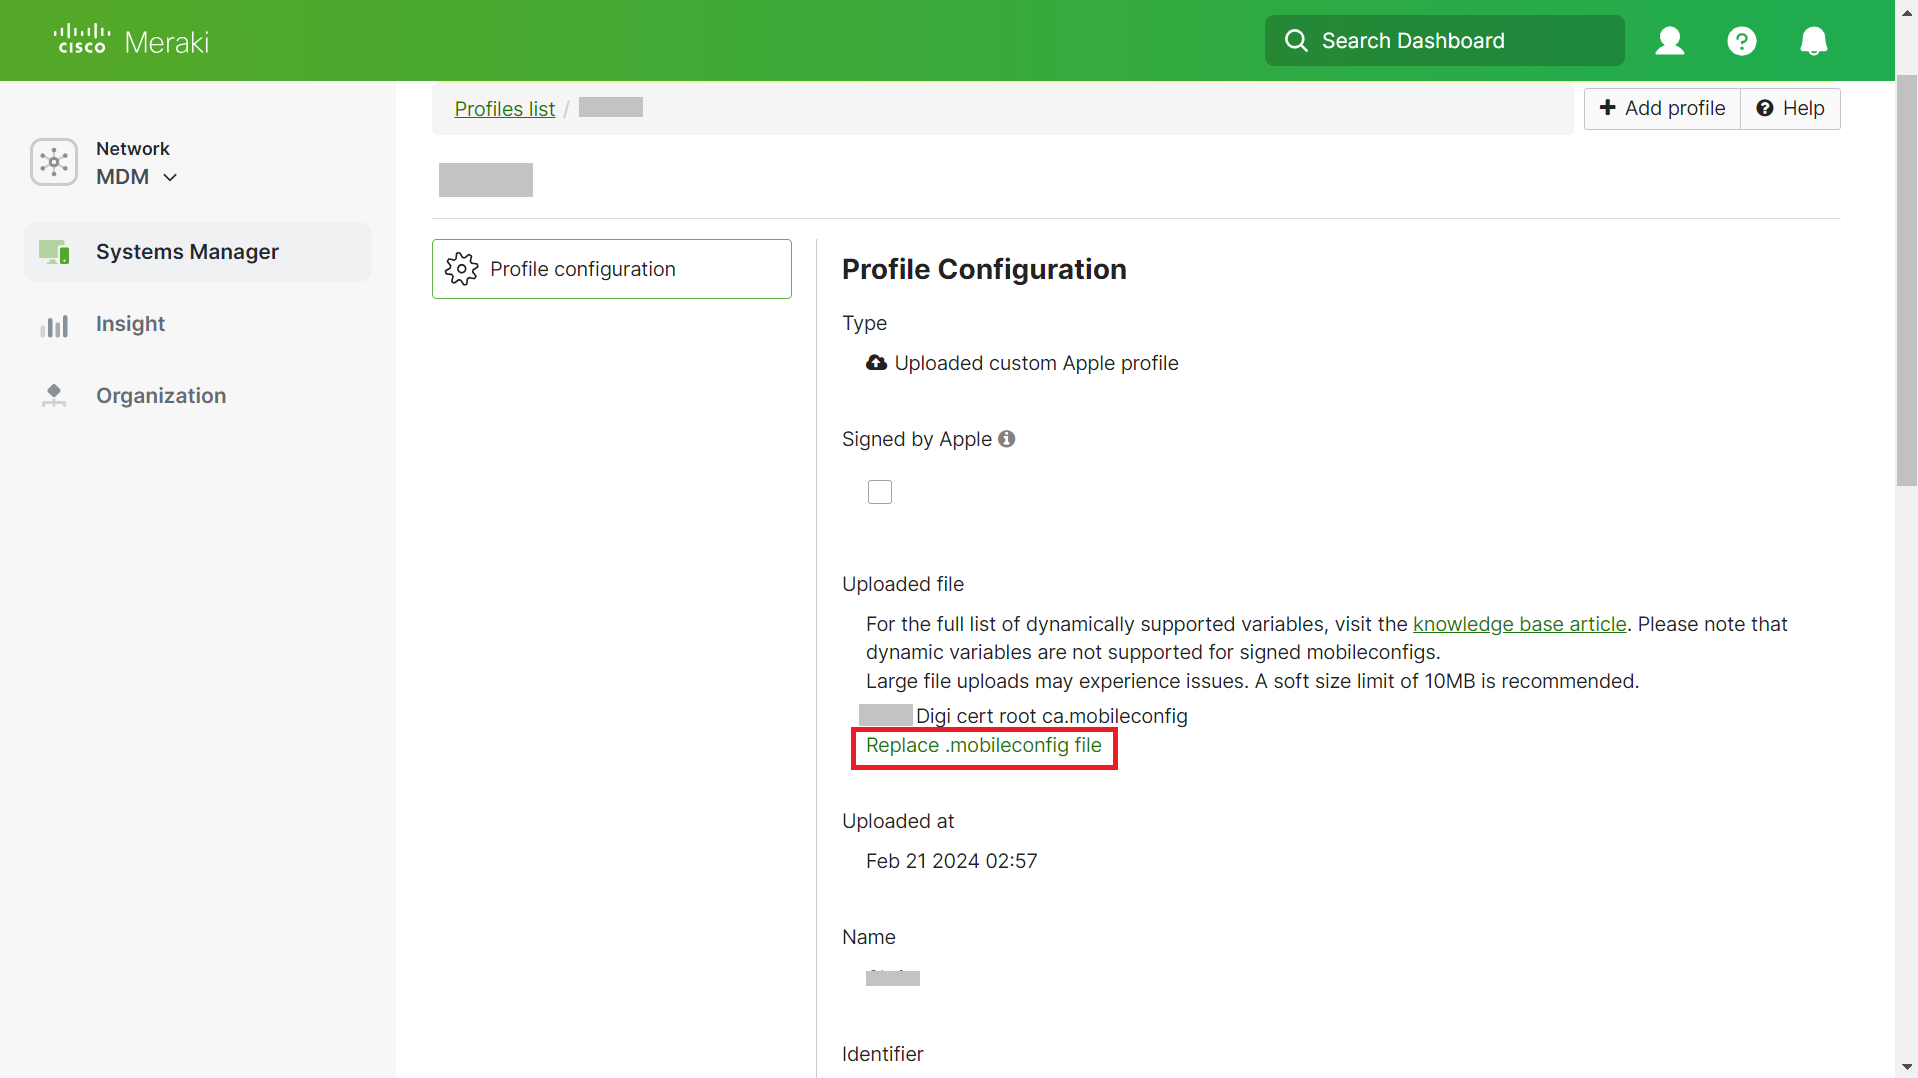
3
On the Profiles list page, select the profile for updating the new Root CA.
Profile Configuration page selected
4
On the Profile Configuration page, click the Replace .mobileconfig file link.
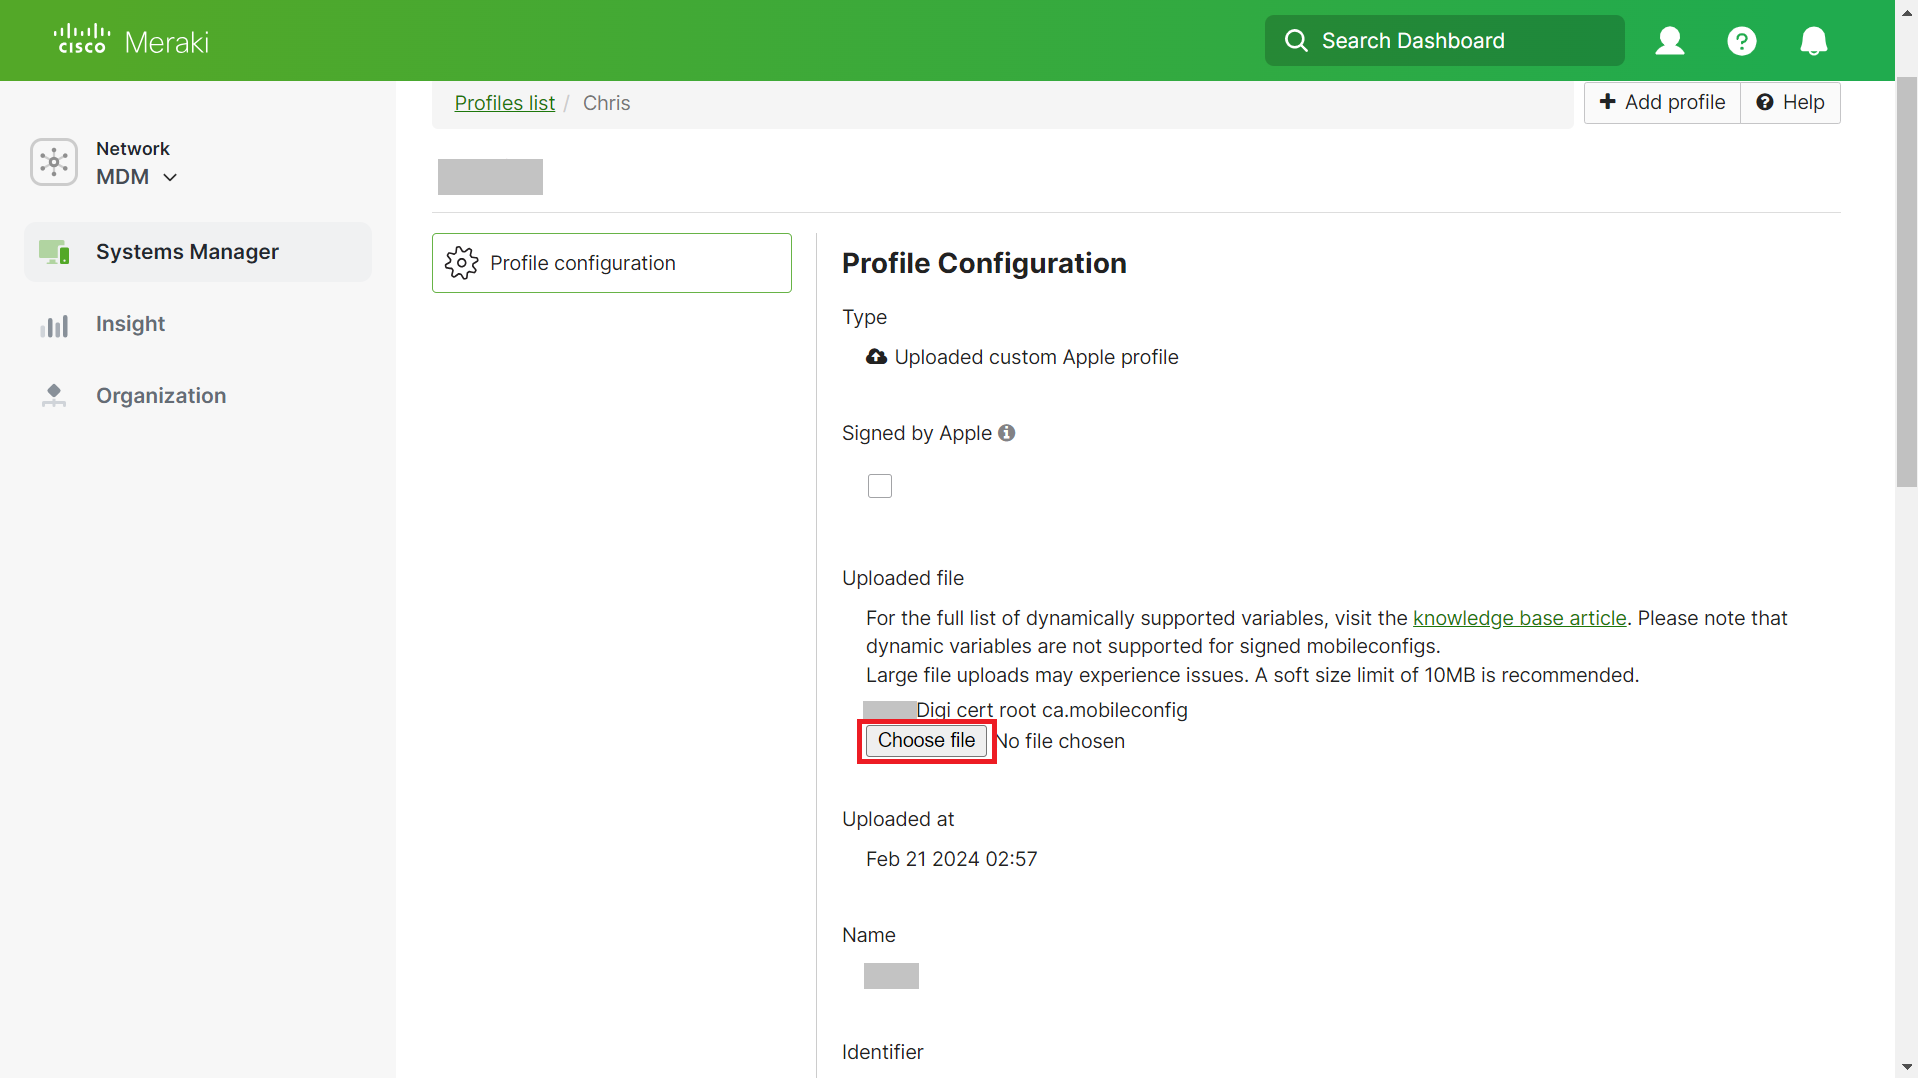
5
Click the Choose file button and select the .mobileconfig file with the new root CA.
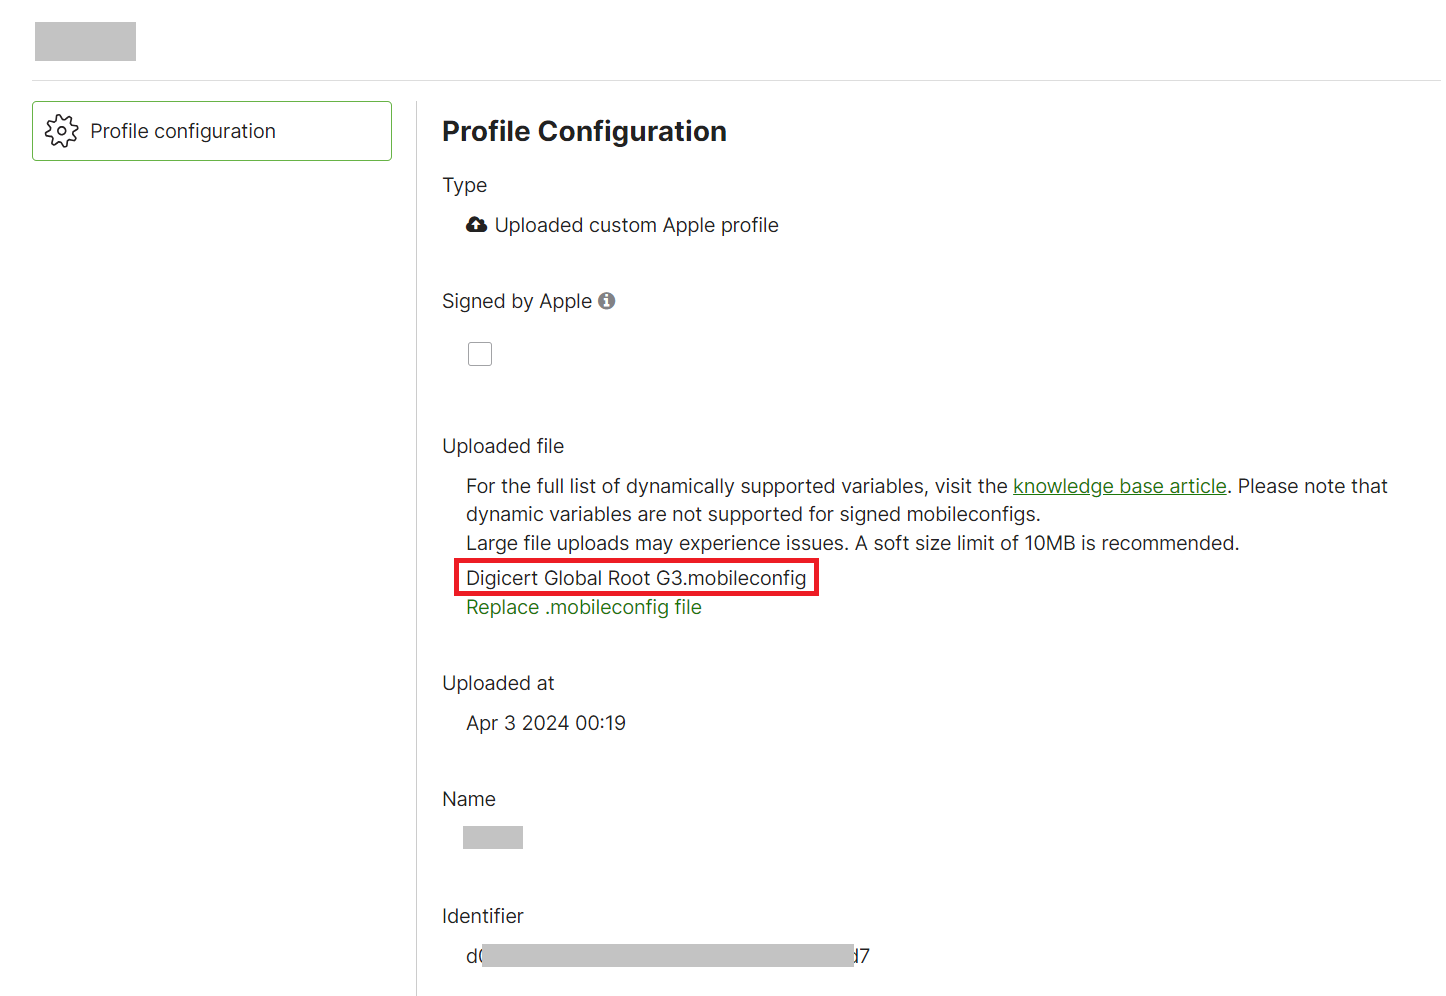
Selecting the .mobileconfig file with DigiCert Global Root G3
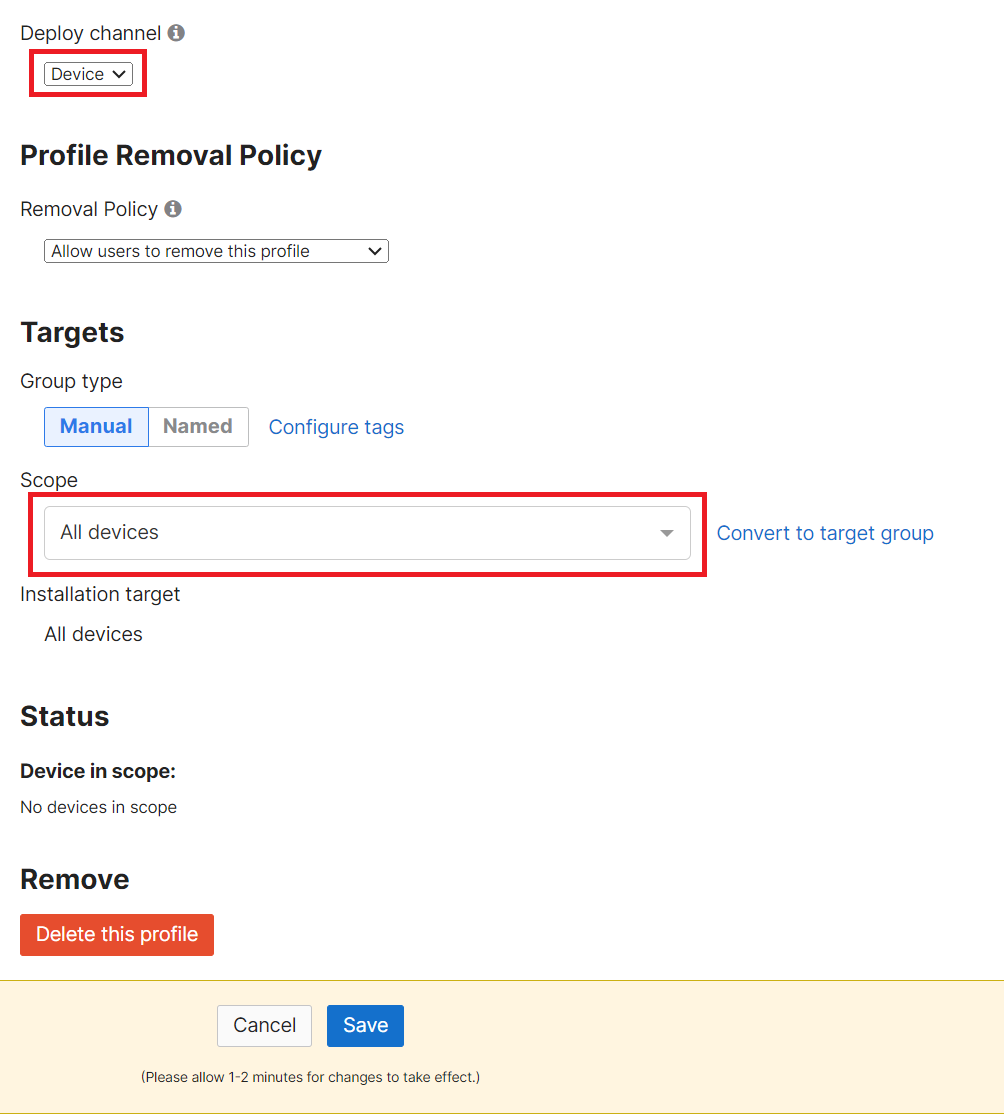
6
From the Deploy channel drop-down list, select Device.
Deploy channel: Device; Scope: All Devices
7
From the Scope drop-down list, select All Devices.
8
Click Save.
Profile saved and deployed to all devices
Confirming success
Once the certificate is enrolled, the "Certificate issued" message is displayed on the Events page. Log in to the JoinNow Management Portal and navigate to Data and Monitoring > General Events.
VMware Workspace ONE
Prerequisites
Active subscription to the JoinNow Management Portal and CloudRADIUS
On the Profiles page, select the WiFi Profile and add the new Root CA.
4
Click the ADD VERSION button.
WiFi Profile — ADD VERSION button
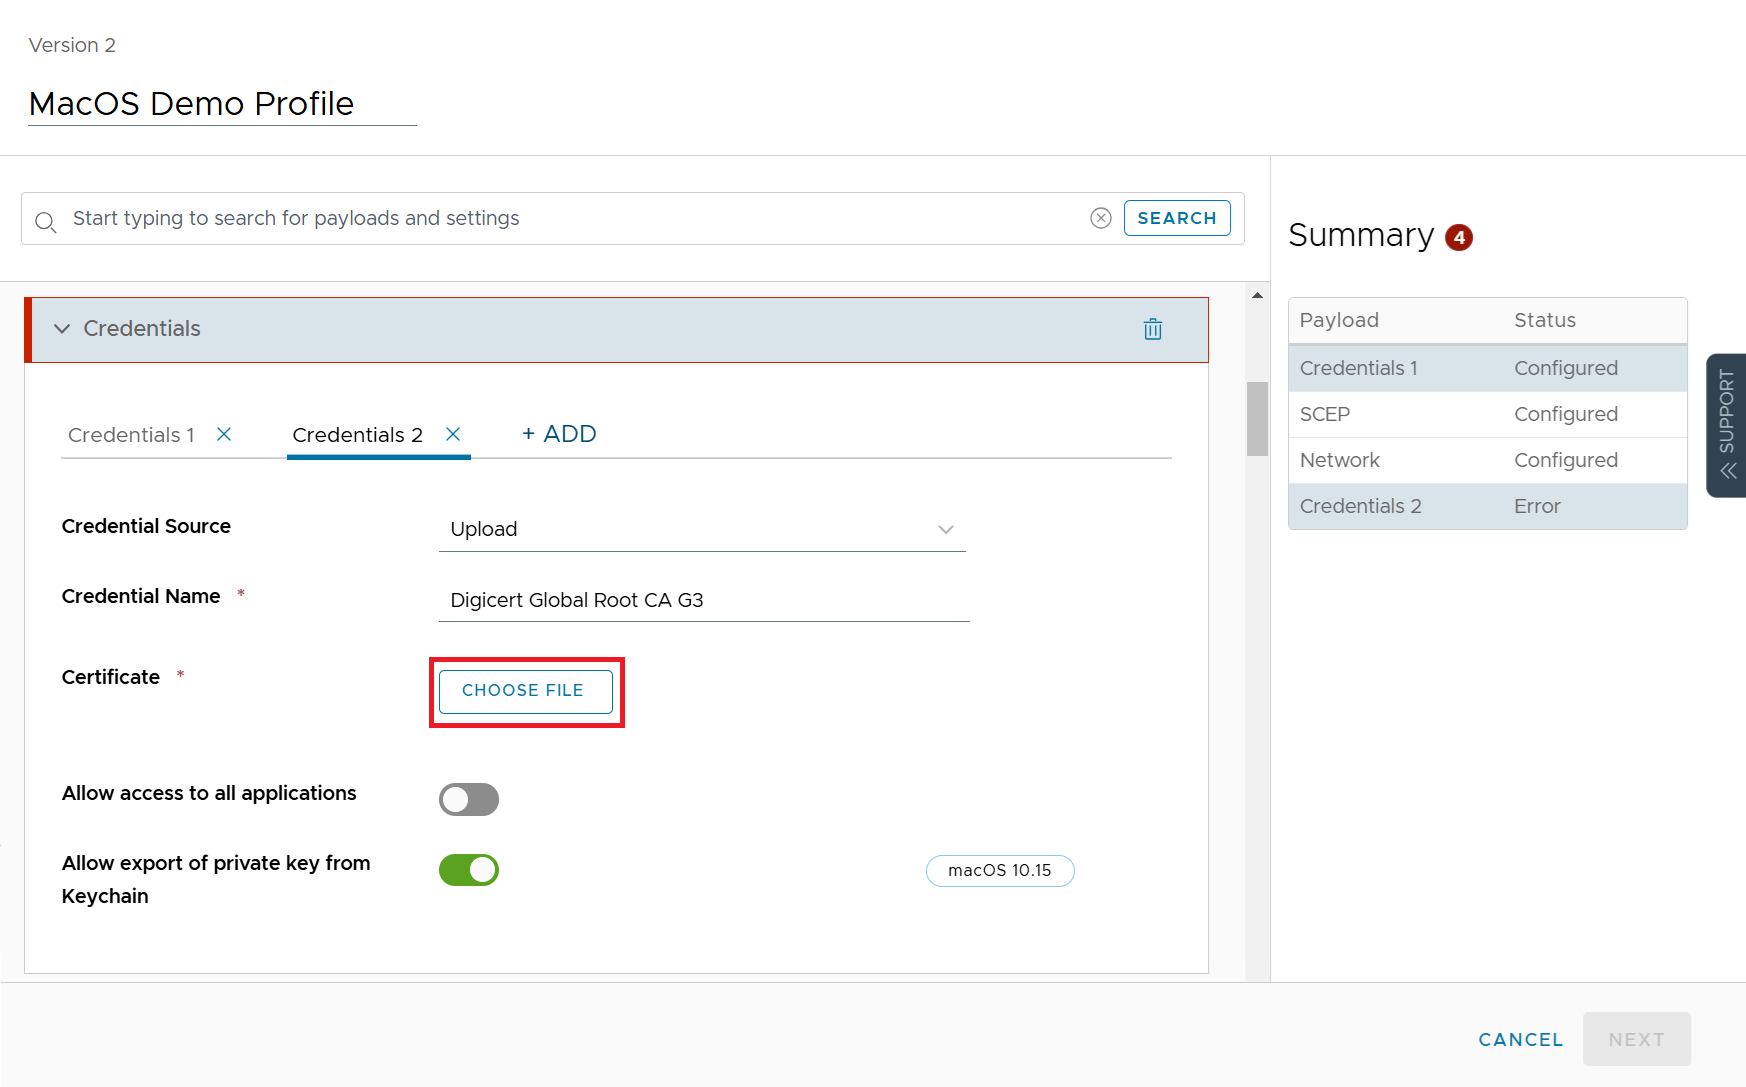
5
Select the Credentials payload and click the + ADD button to upload a new Root CA along with the existing Root CA.
Credentials payload — + ADD alongside existing CA
6
In the newly added Credentials 2 section, from the Credential Source drop-down list, select Upload.
7
In the Credential Name field, enter the name of the Certificate.
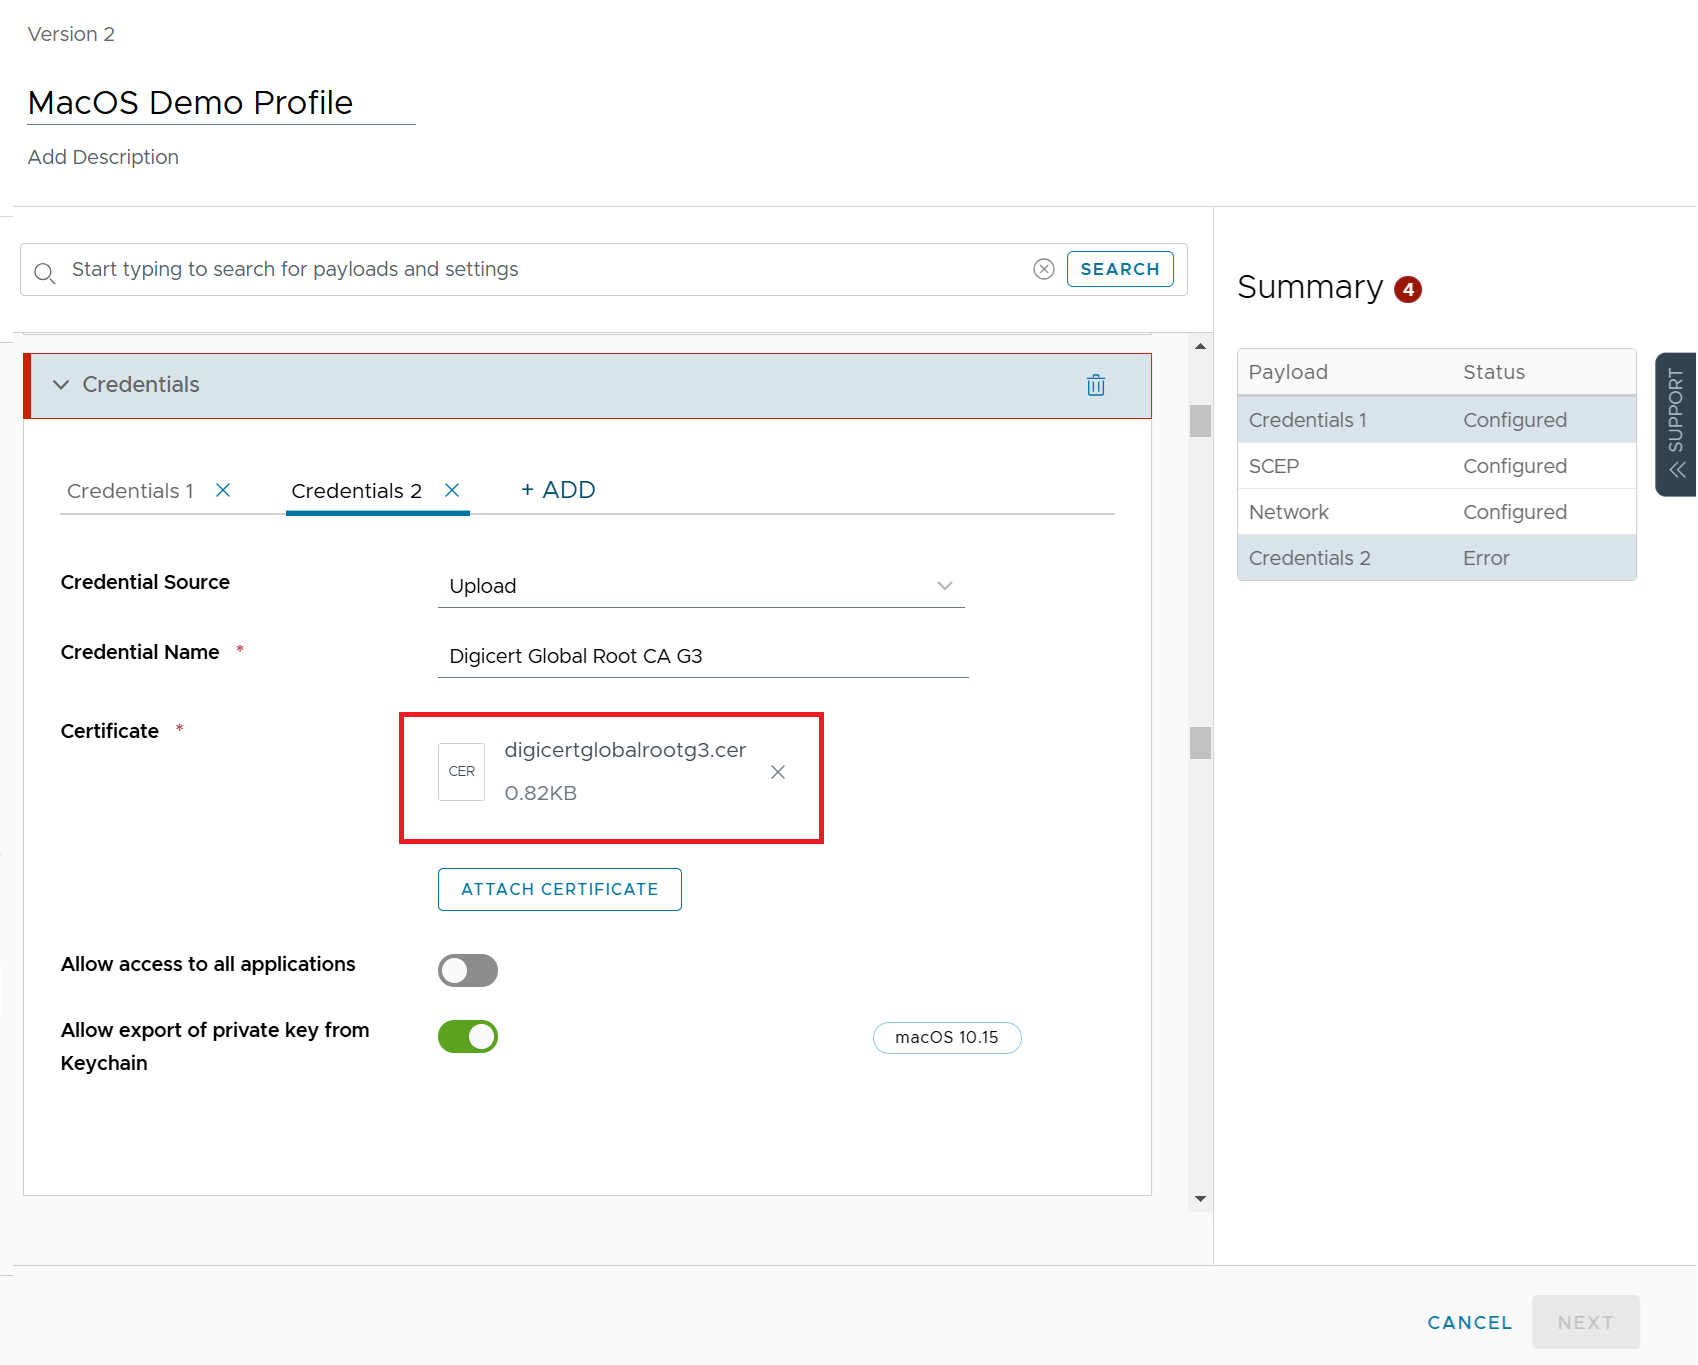
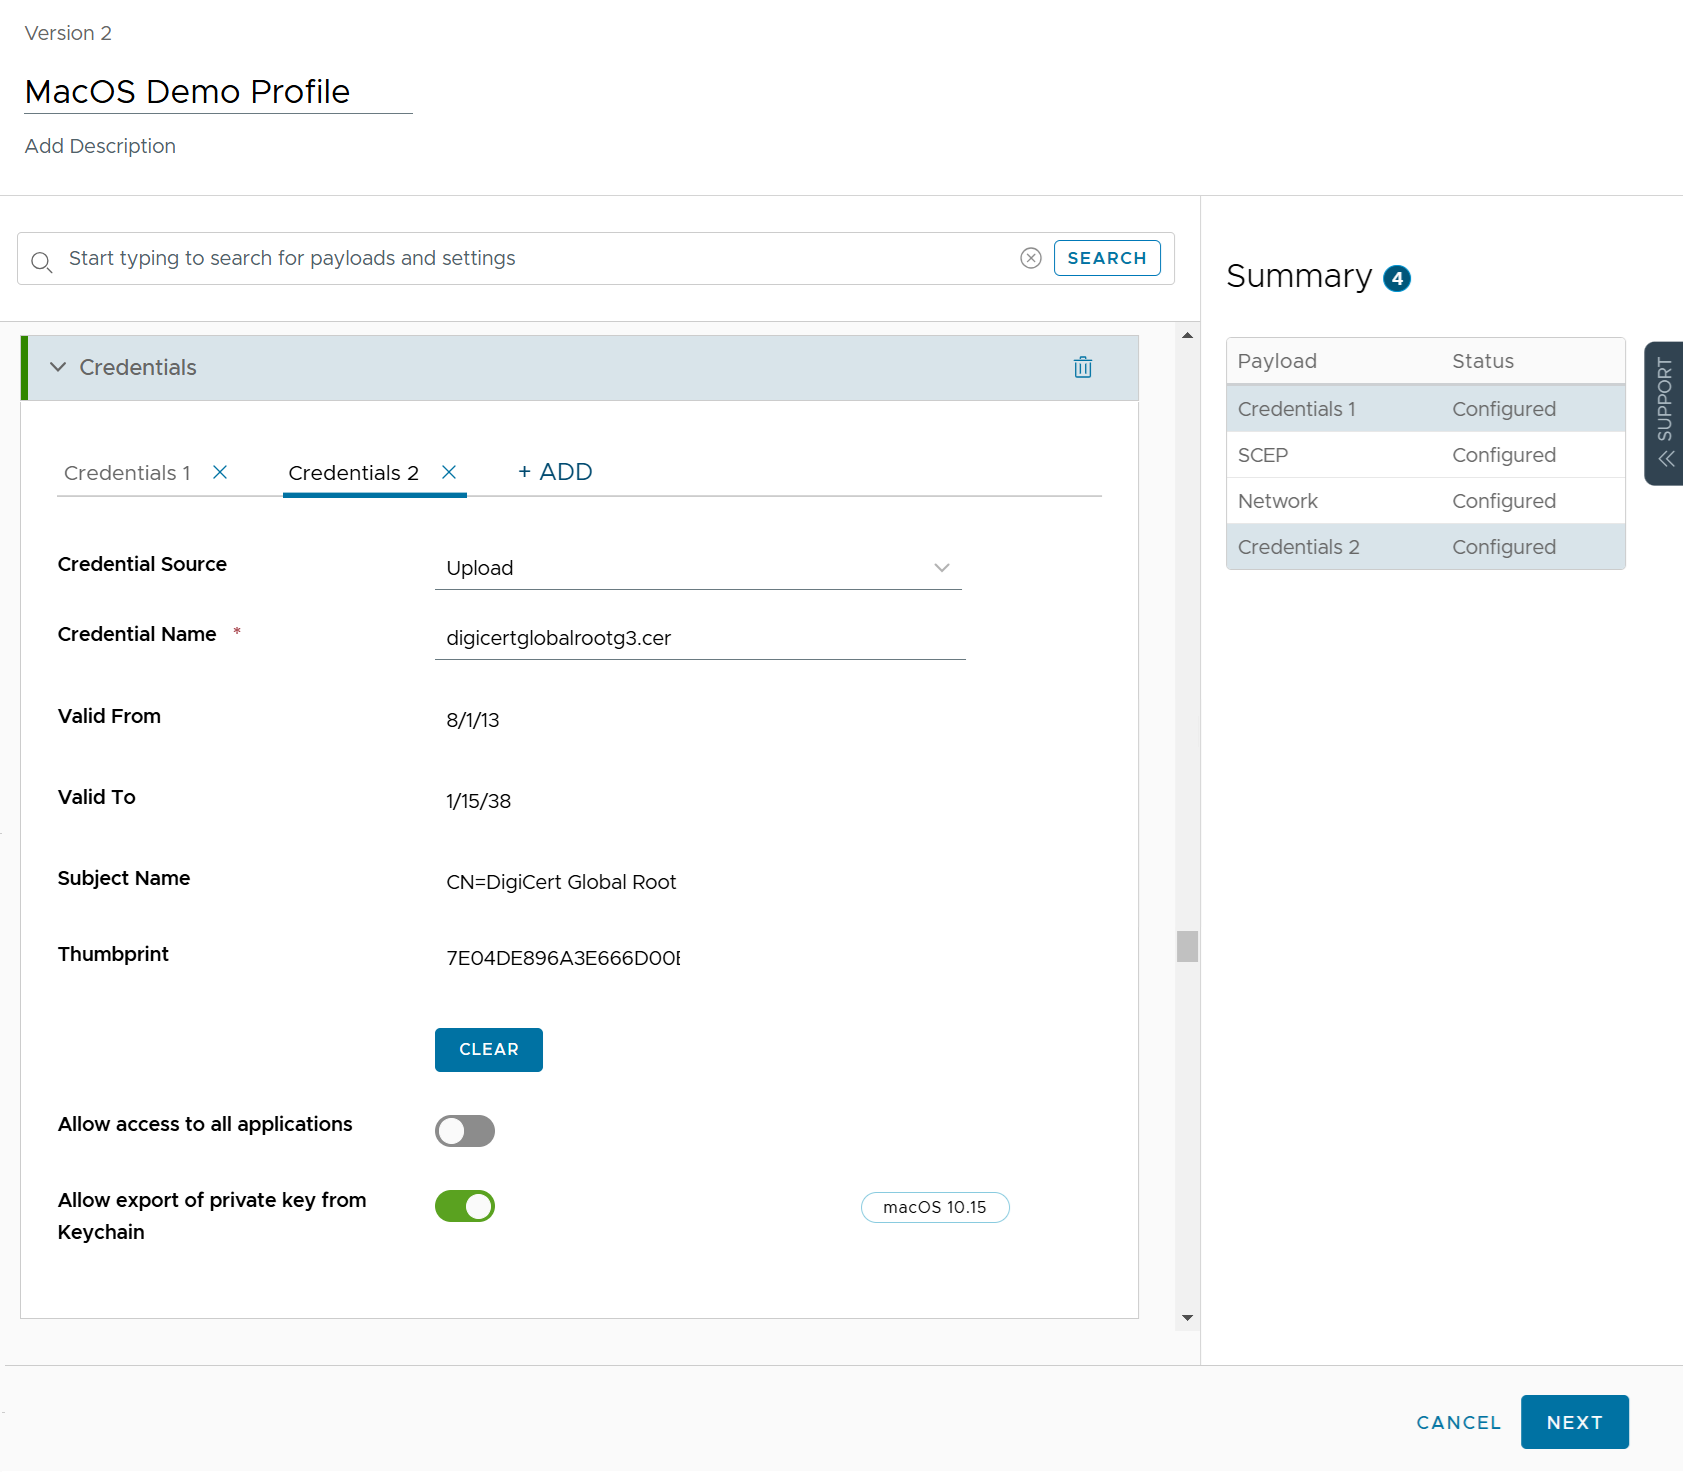
8
In the Certificate field, click the CHOOSE FILE button and select the new Root CA certificate you want to upload.
Credentials 2 — CHOOSE FILE for DigiCert Global Root G3
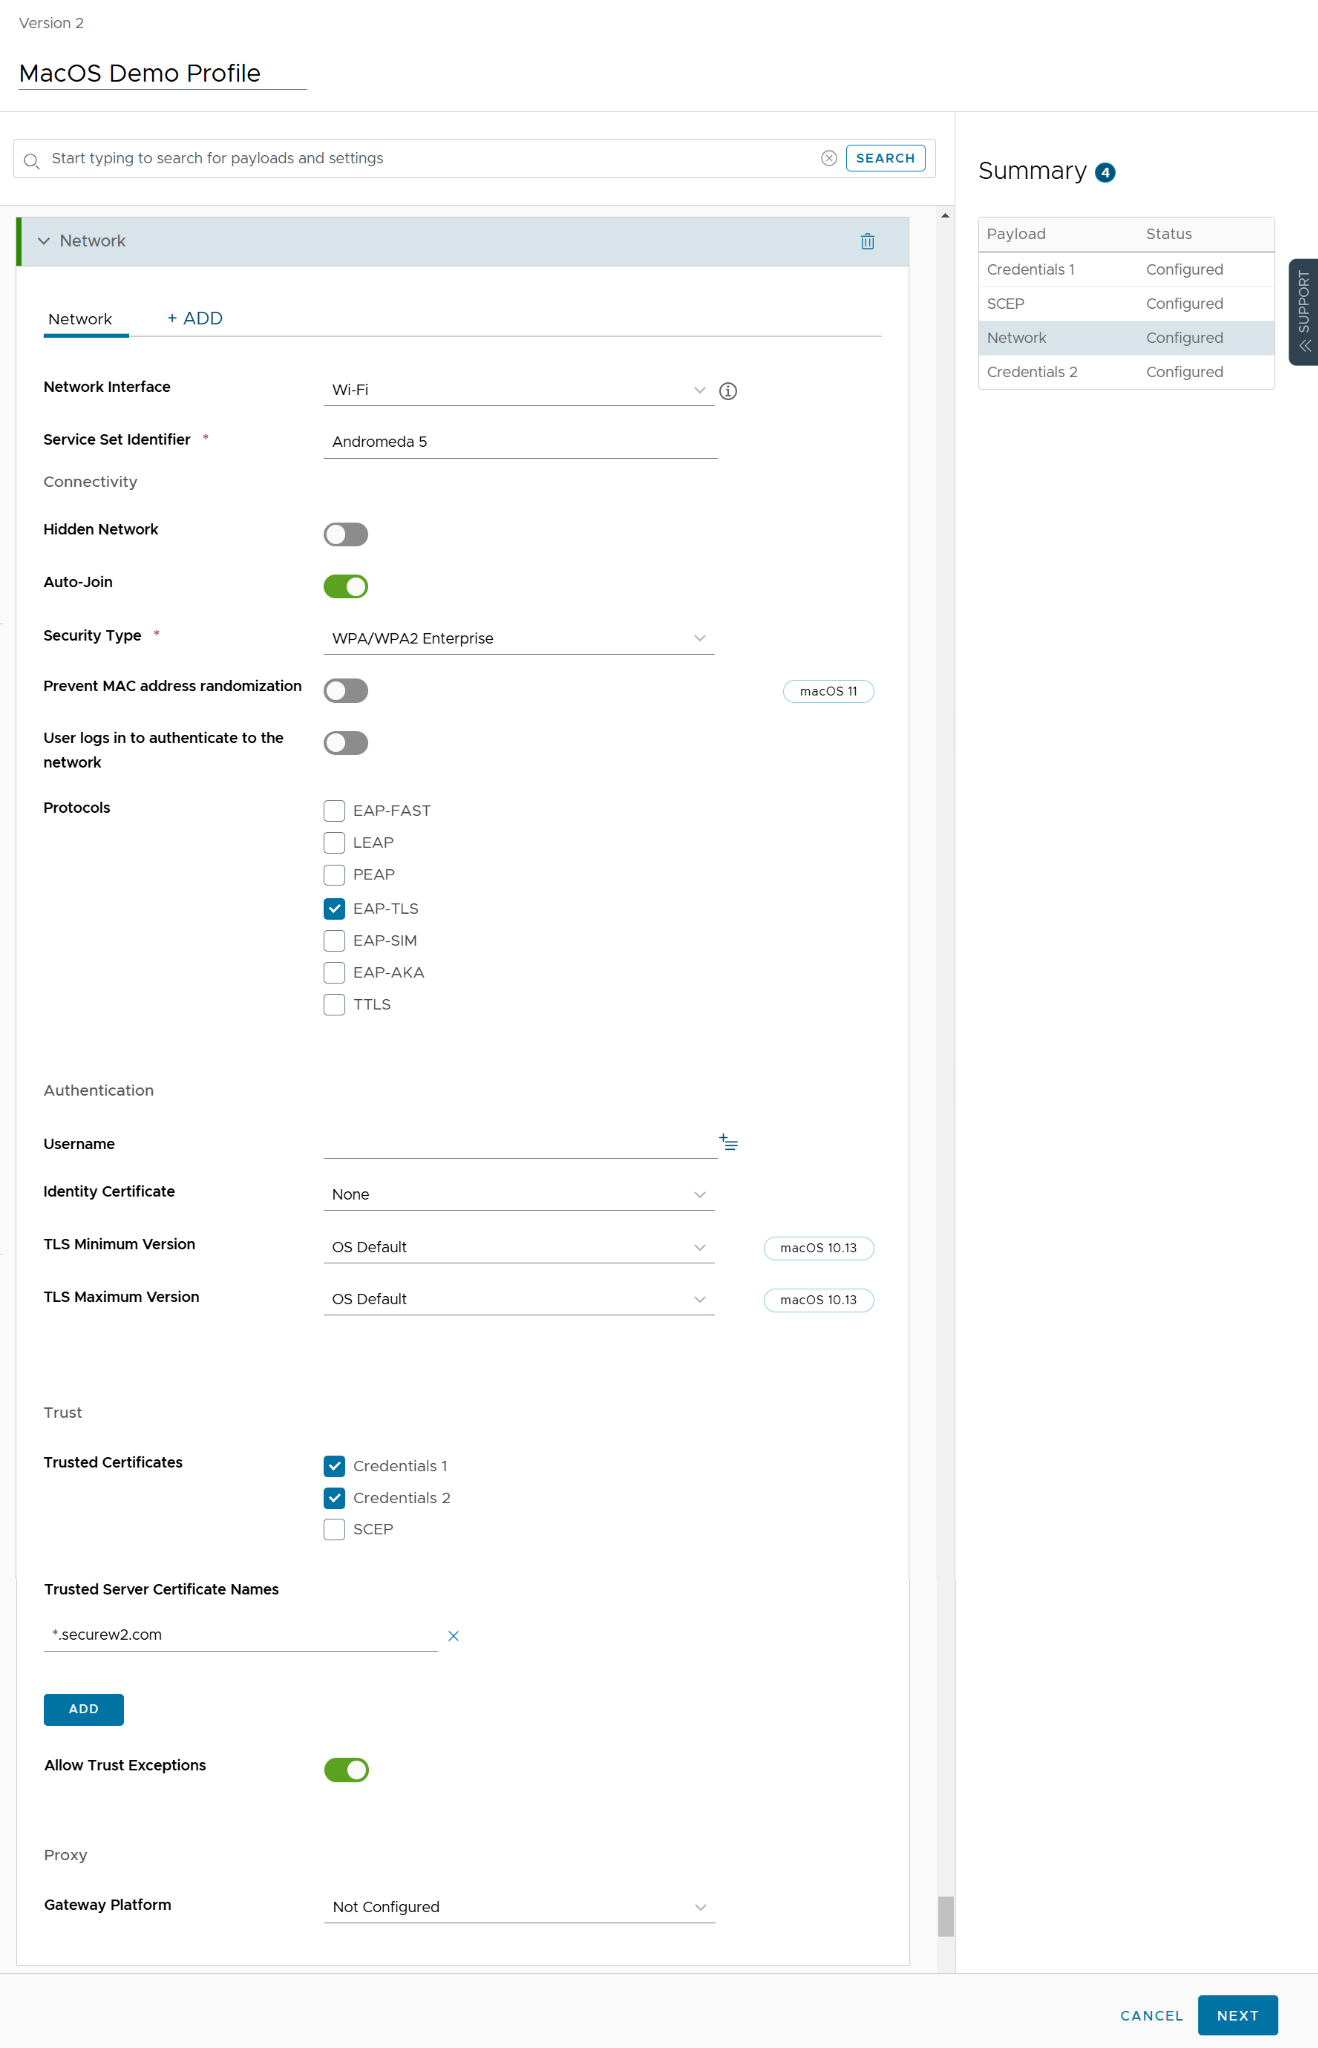
Under the Trusted Certificates section, select both the Credentials 1 (old root CA certificate) and Credentials 2 (new root CA certificate) checkboxes.
Network payload — Credentials 1 and Credentials 2 both checked
12
Click the NEXT button.
13
Click SAVE & PUBLISH.
SAVE & PUBLISH
Part B Windows Configuration
1
Log in to the Workspace ONE UEM portal.
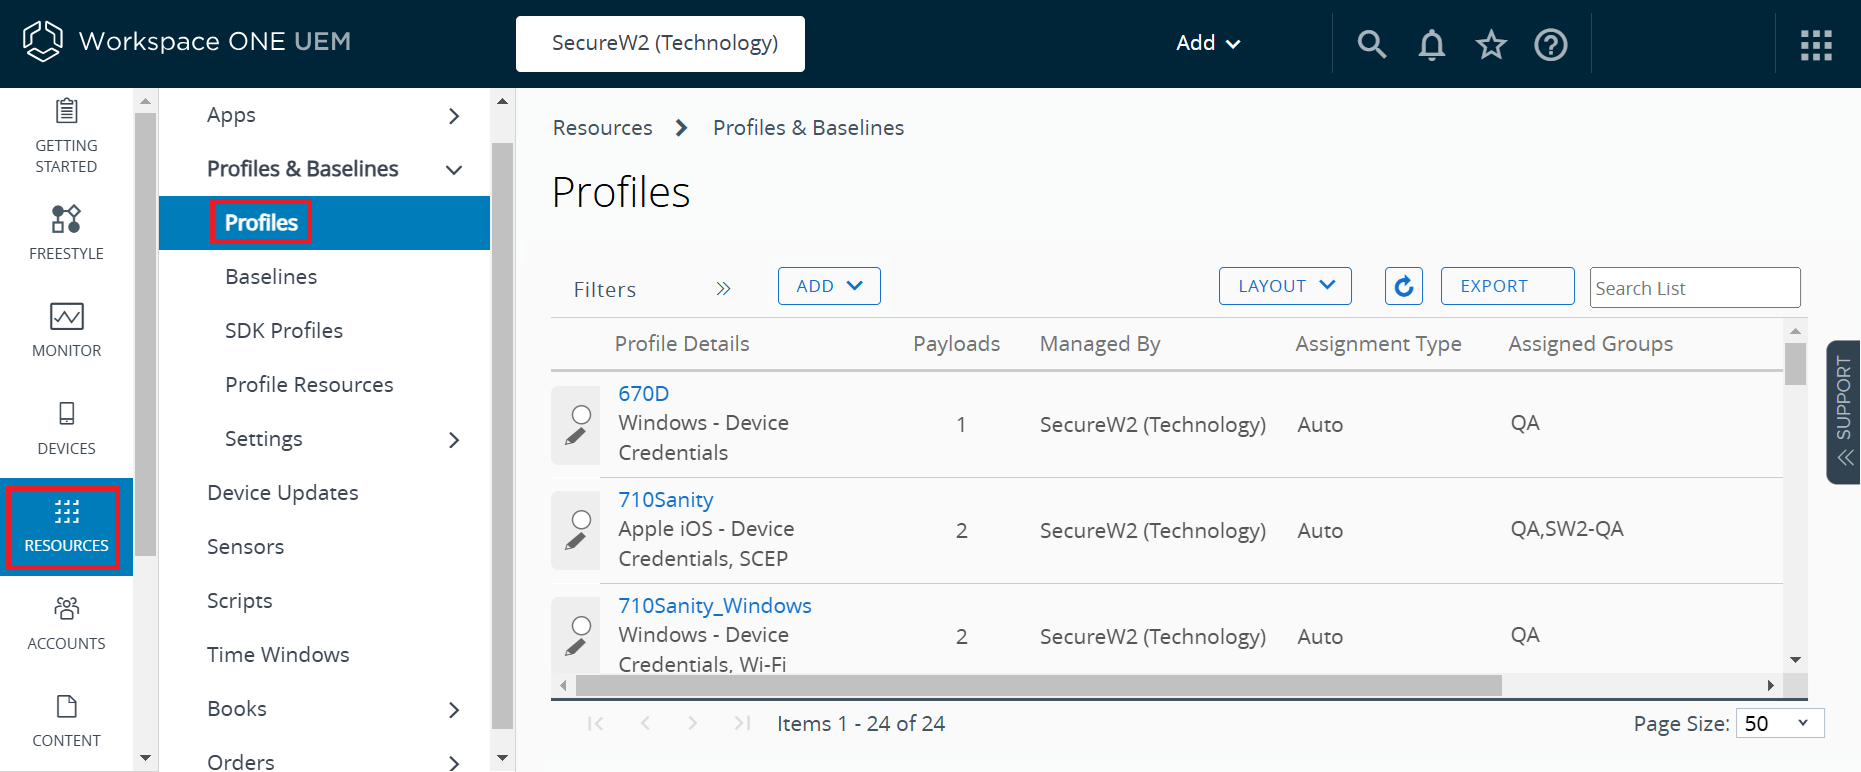
2
Navigate to Resources > Profiles & Baselines > Profiles.
Resources > Profiles — Windows WiFi Profile
3
On the Profiles page, select the WiFi Profile and add the new Root CA.
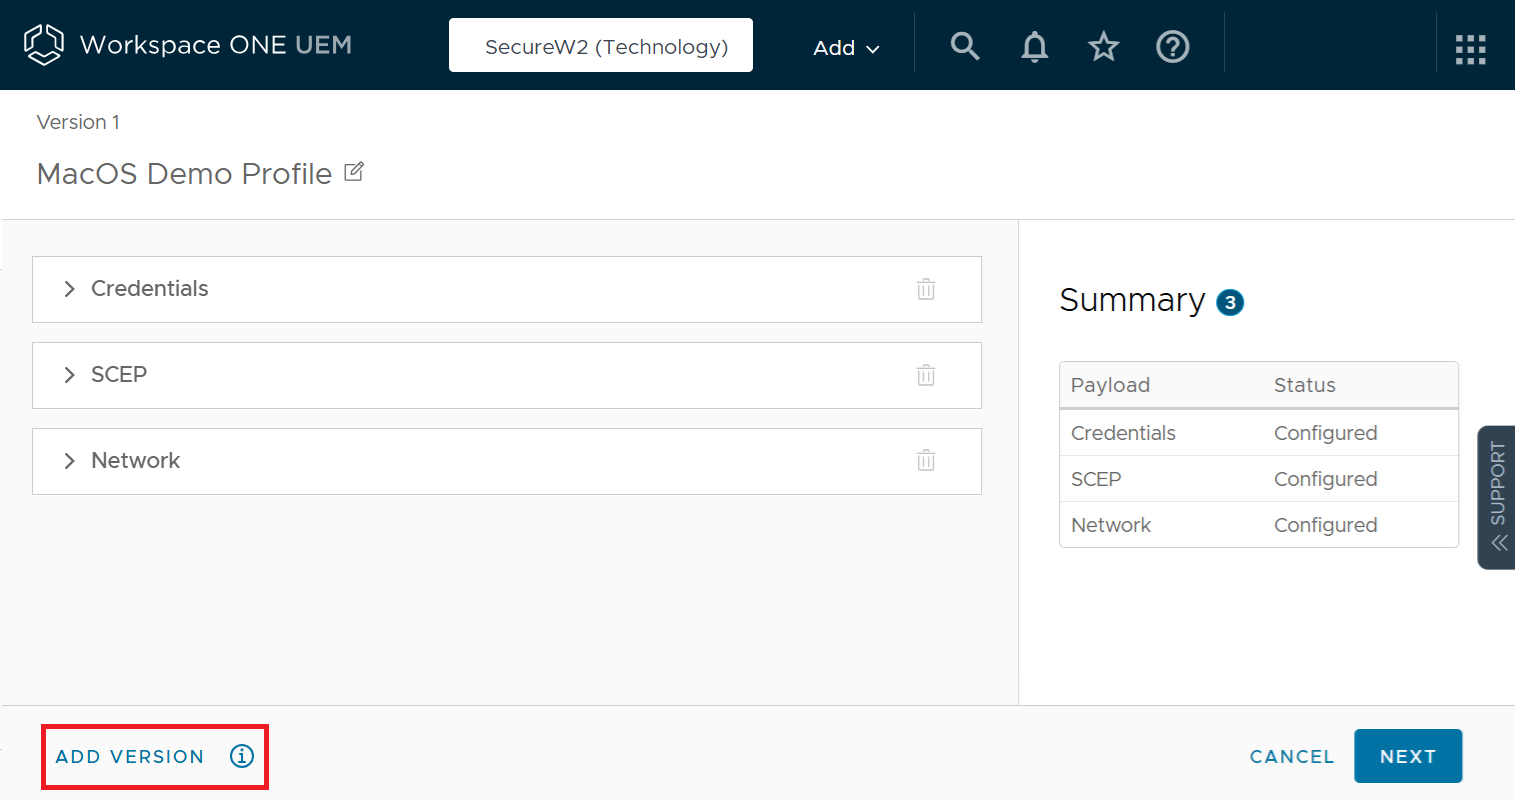
4
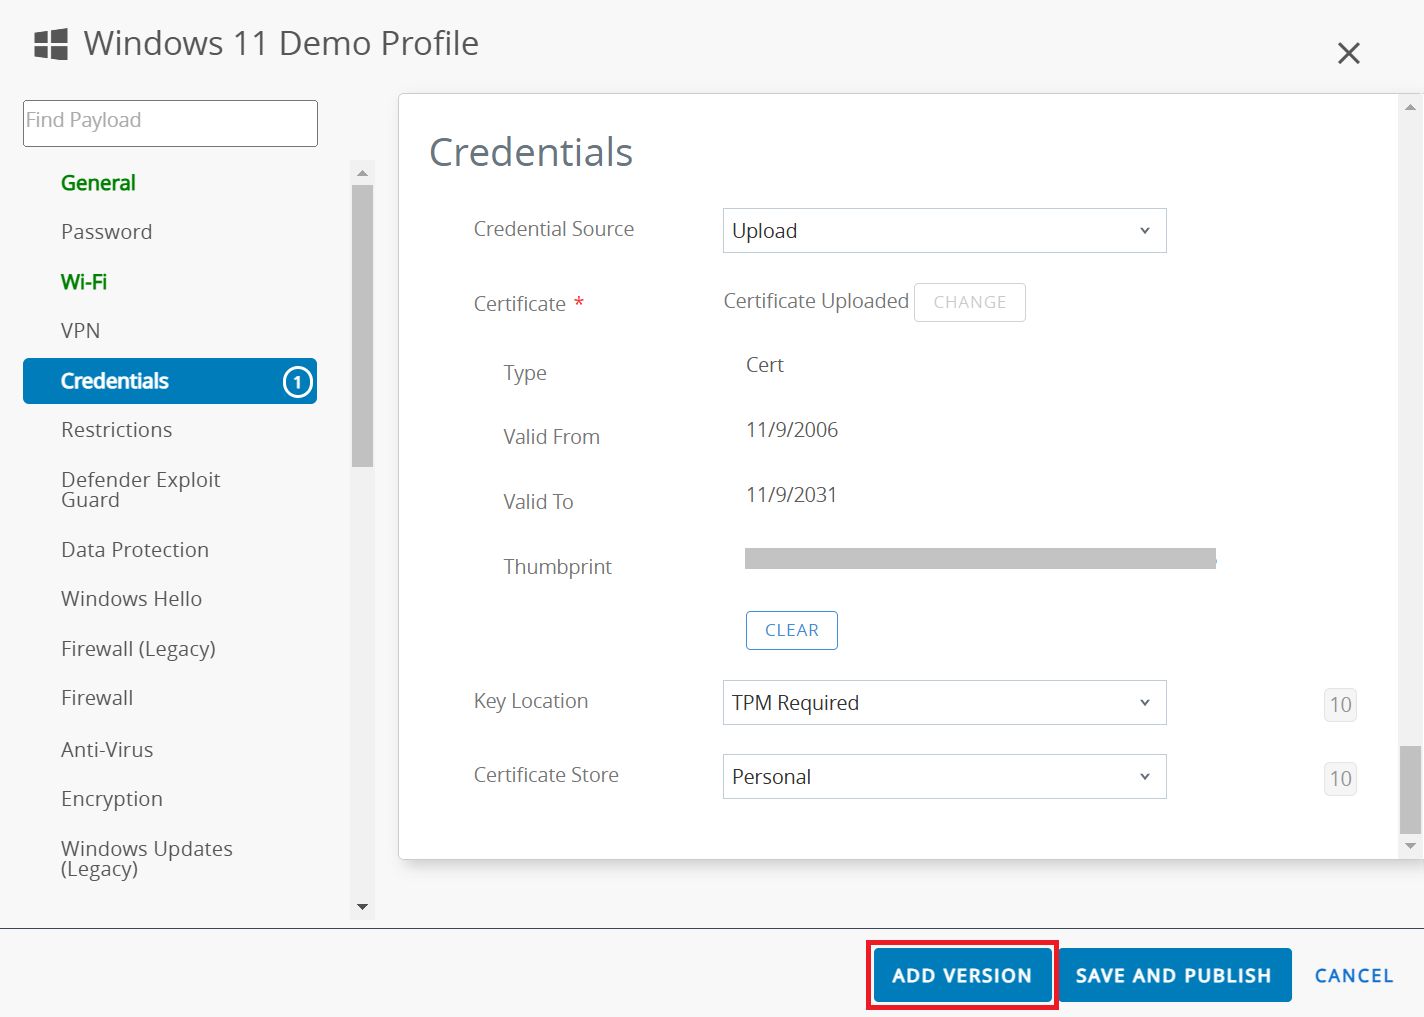
Select the Credentials payload and click the ADD VERSION button.
5
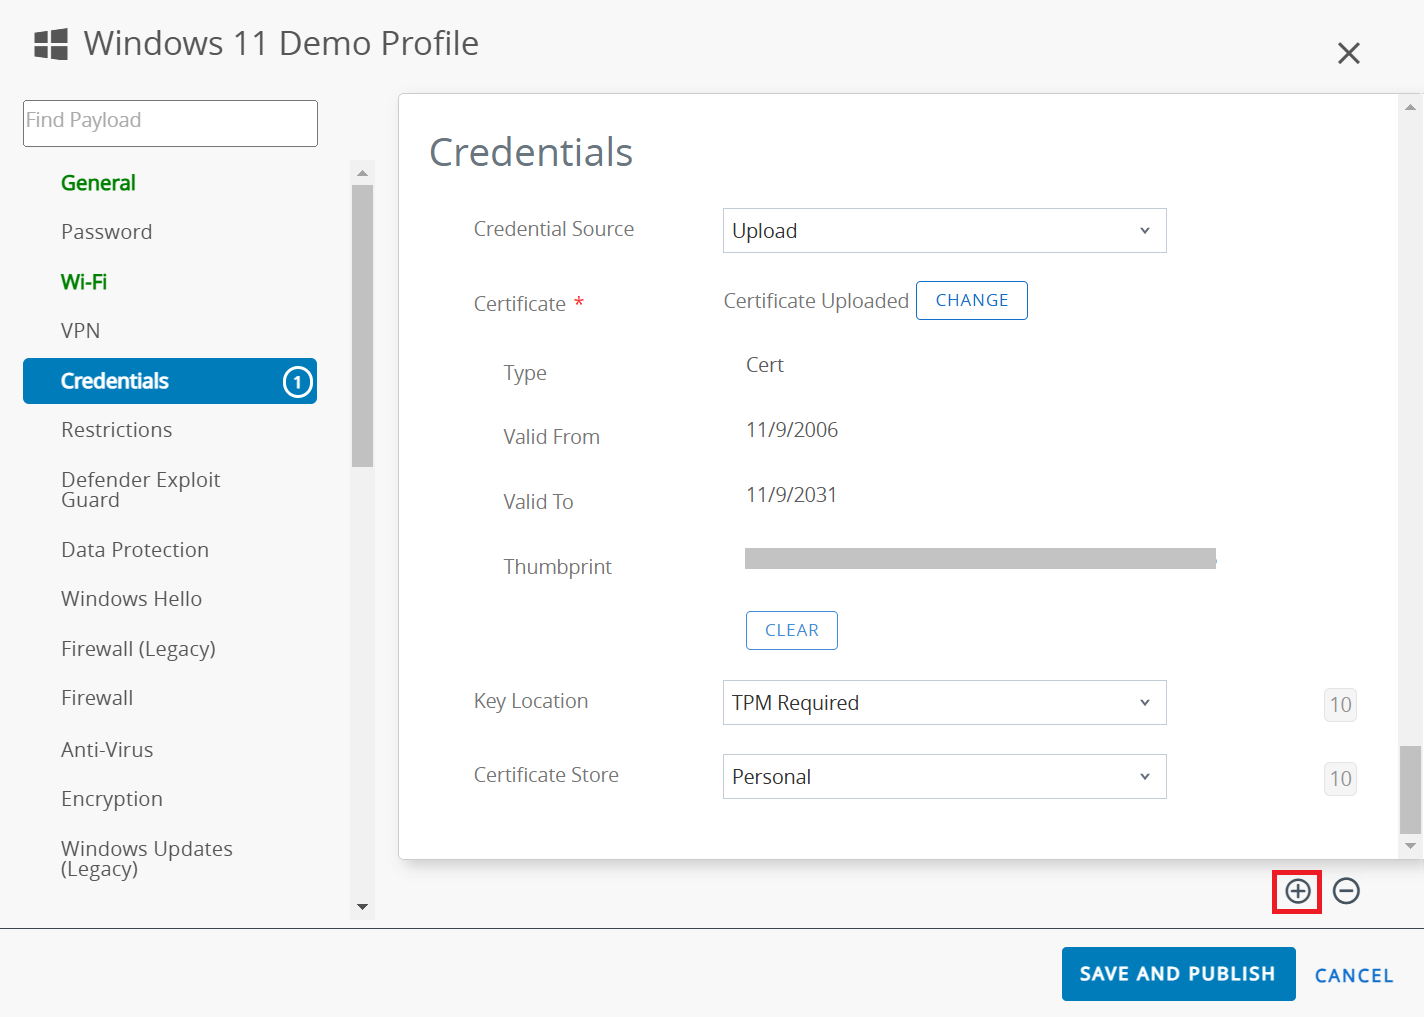
Click the + button to upload a new Root CA along with the existing Root CA.
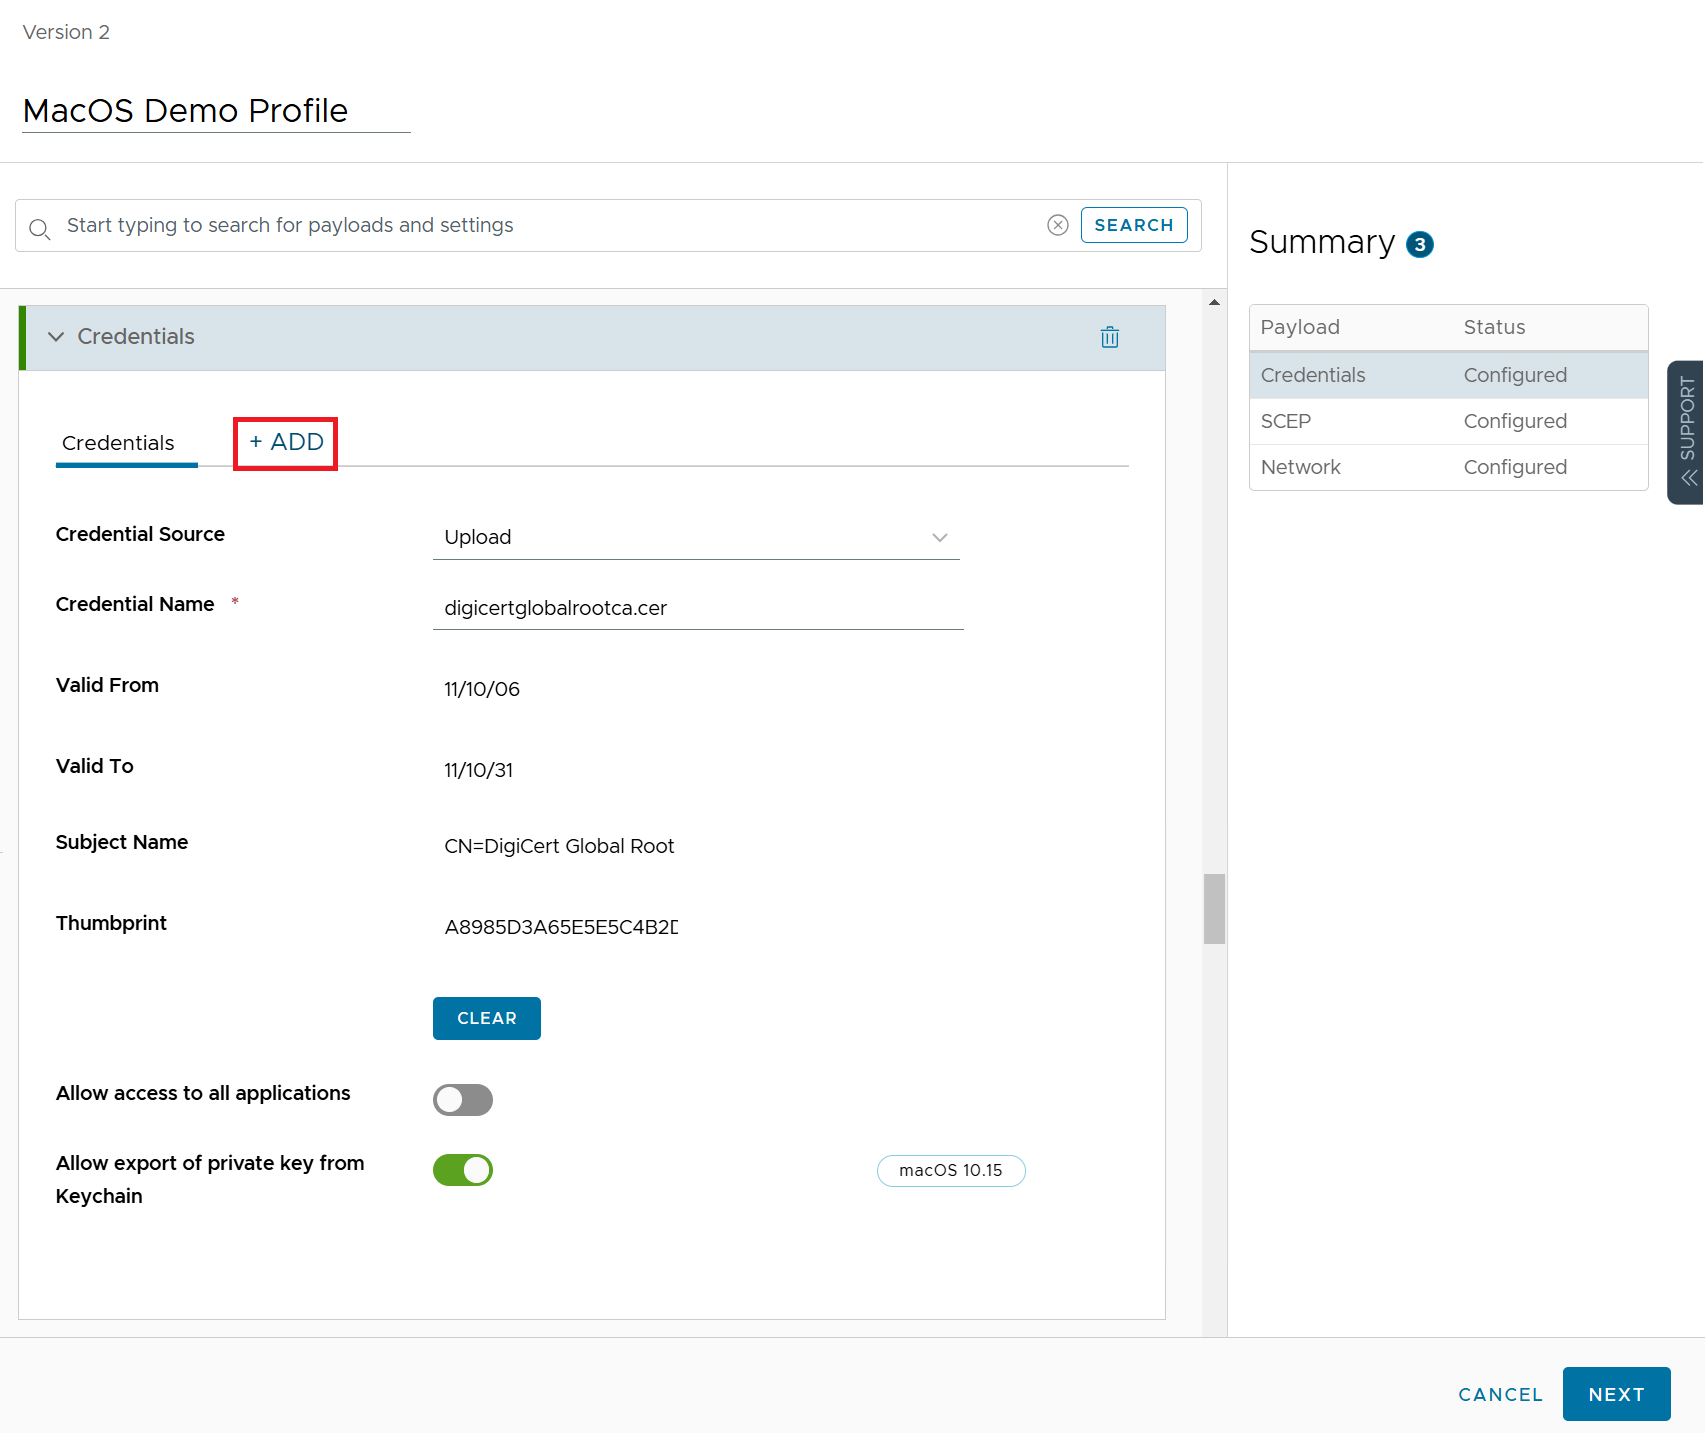
6
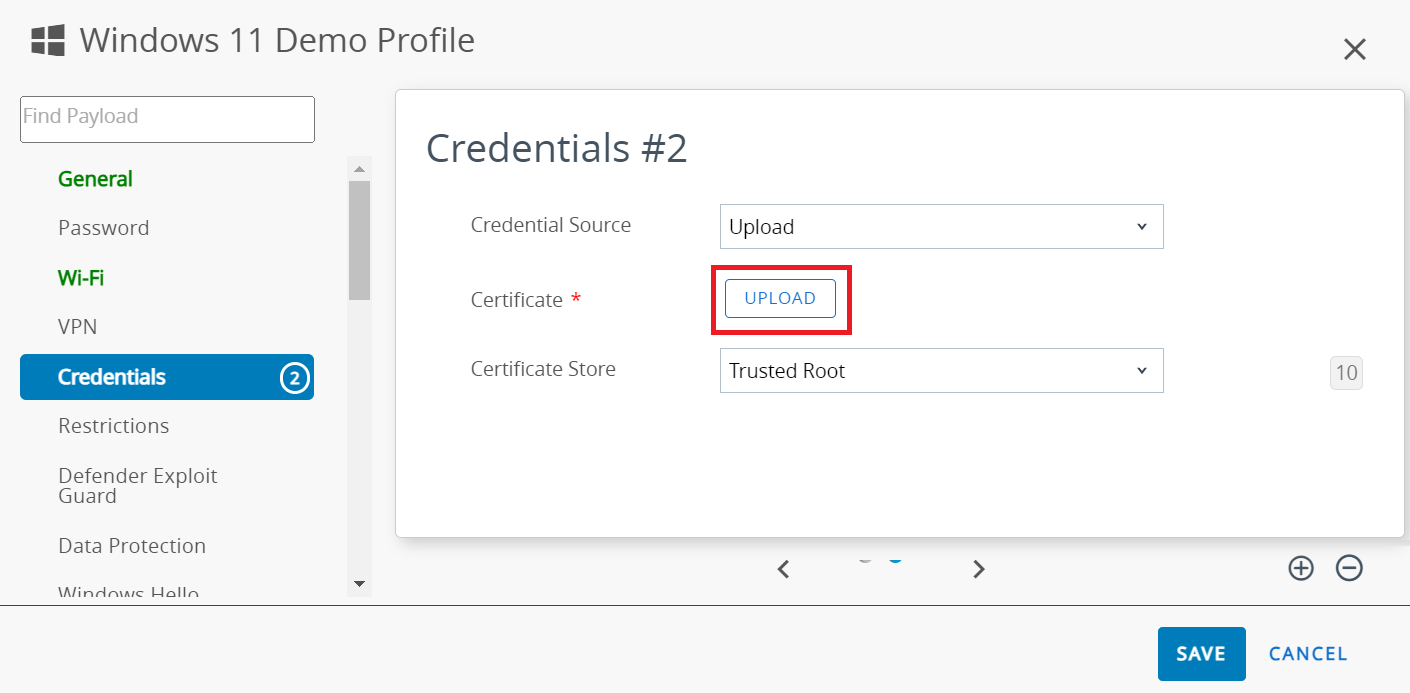
In the newly added Credentials #2 section, from the Credential Source drop-down list, select Upload.
Credentials #2 — Credential Source: Upload, Certificate Store: Trusted Root
7
From the Certificate Store drop-down list, select the Trusted Root option.
8
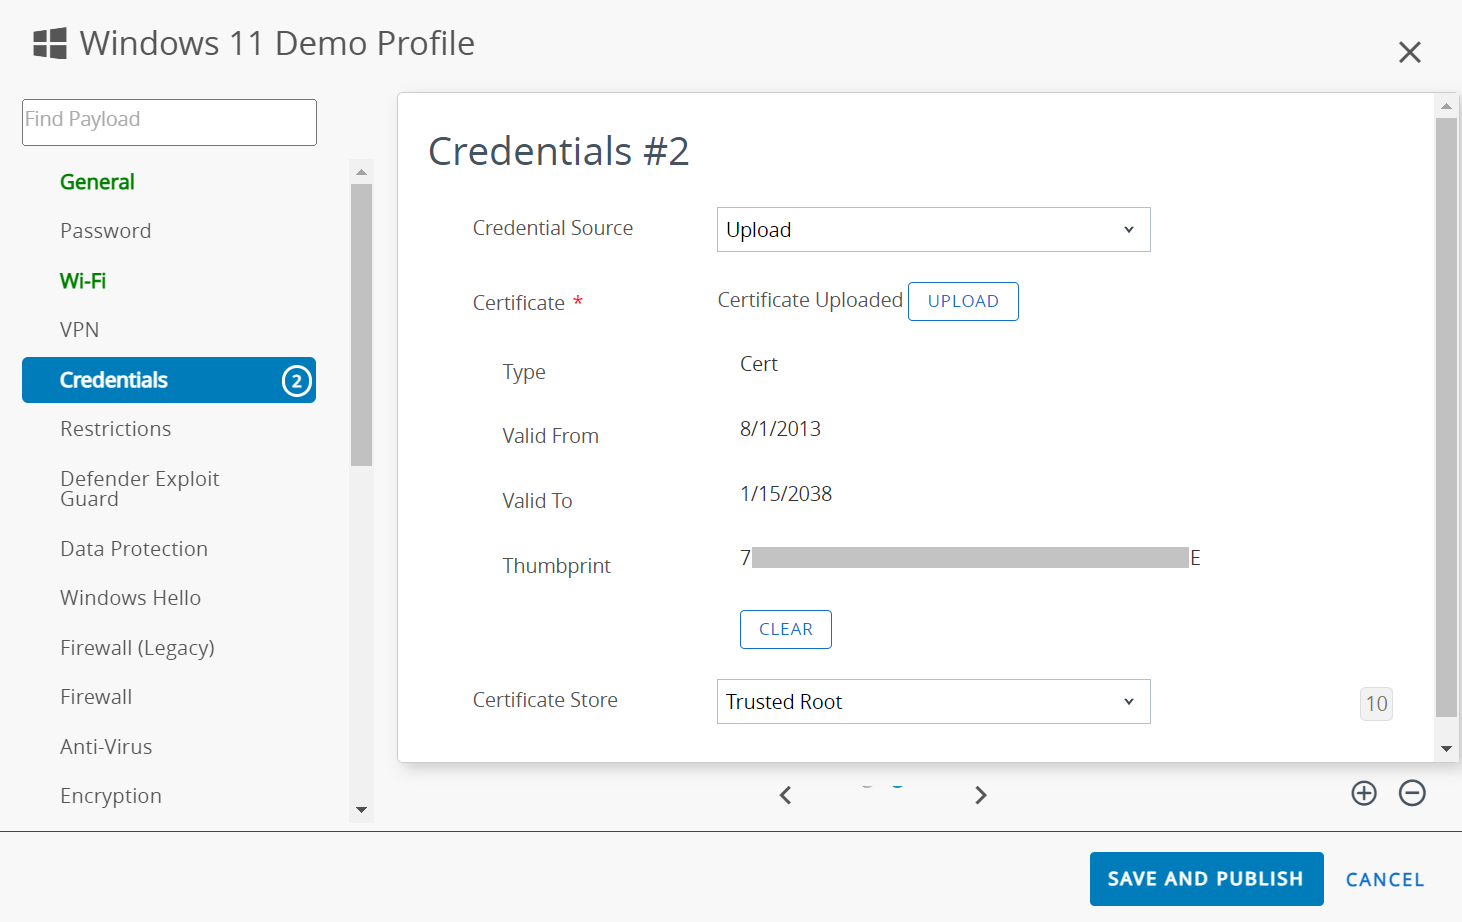
In the Certificate field, click UPLOAD.
9
On the Add pop-up window, click Choose file and select the new Root CA certificate you want to upload.
Add dialog — Choose file for DigiCert Global Root G3
10
Click SAVE.
11
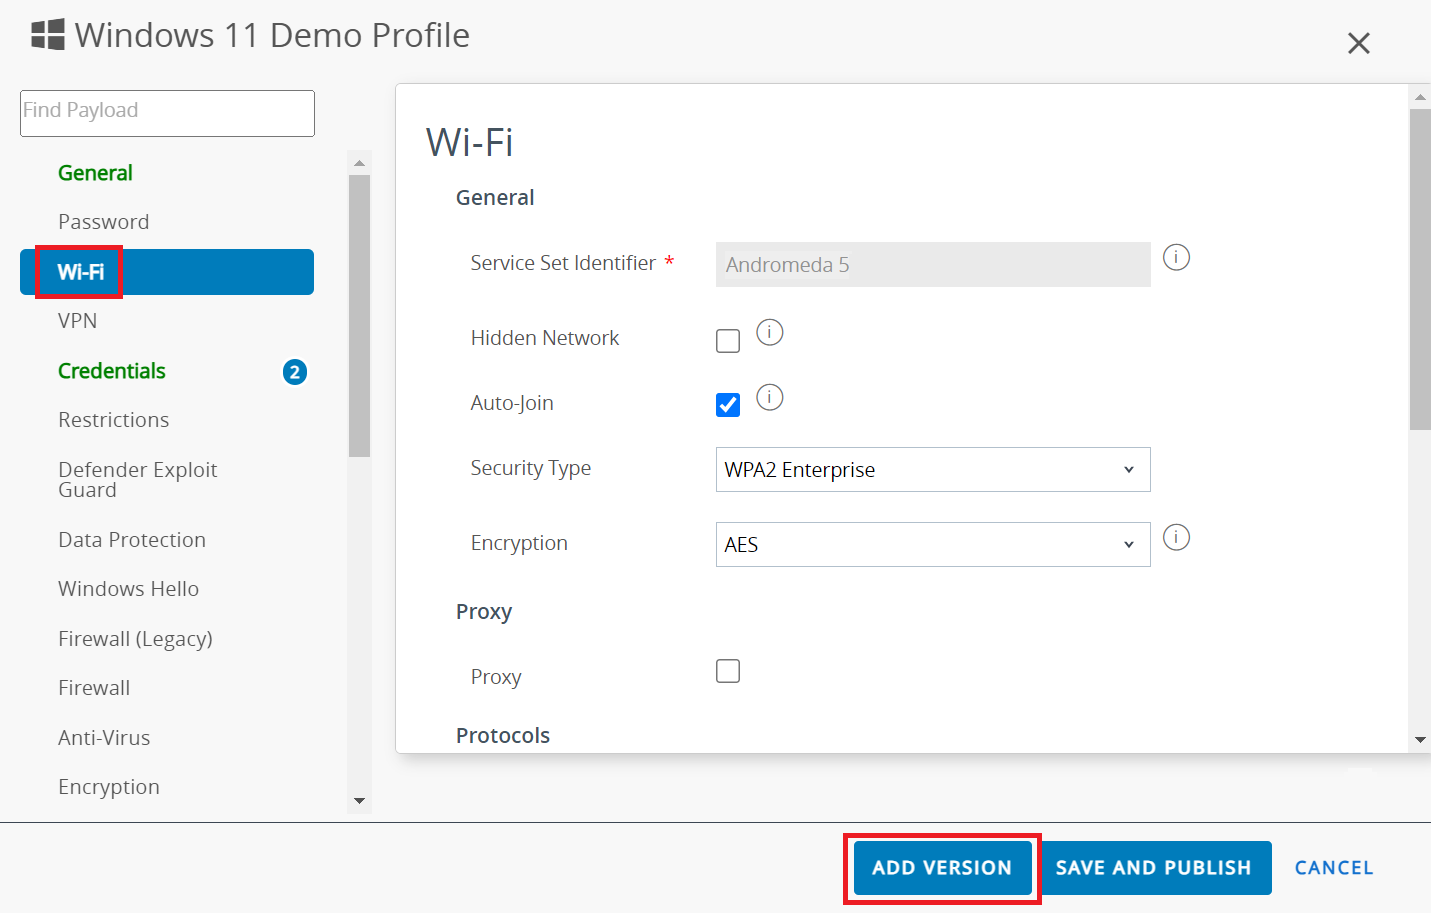
Select the Wi-Fi payload.
Wi-Fi payload — selecting to configure
12
Click the ADD VERSION button to configure the existing Wi-Fi profile.
13
Under the Authentication section, from the Identity Certificate drop-down list, select the Certificate #1 option (old root CA).
14
Under the Trust section, in the Trusted Certificates field, select the Certificate #2 checkbox (new root CA).
Trust section — Certificate #2 (new Root CA) selected
15
Click SAVE AND PUBLISH.
SAVE AND PUBLISH
Confirming success
Following an update to the WiFi profile, Workspace ONE deploys the revised profile to all managed devices, initiating a re-enrollment process. The "Certificate Issued" event can be observed in the JoinNow Management Portal under Data and Monitoring > General Events.
Mosyle
Prerequisites
Active subscription to the JoinNow Management Portal and CloudRADIUS
An active subscription to the Mosyle Portal
Configuring the New Root CA in the Multi-Cert Profile
1
Log in to the Mosyle portal.
2
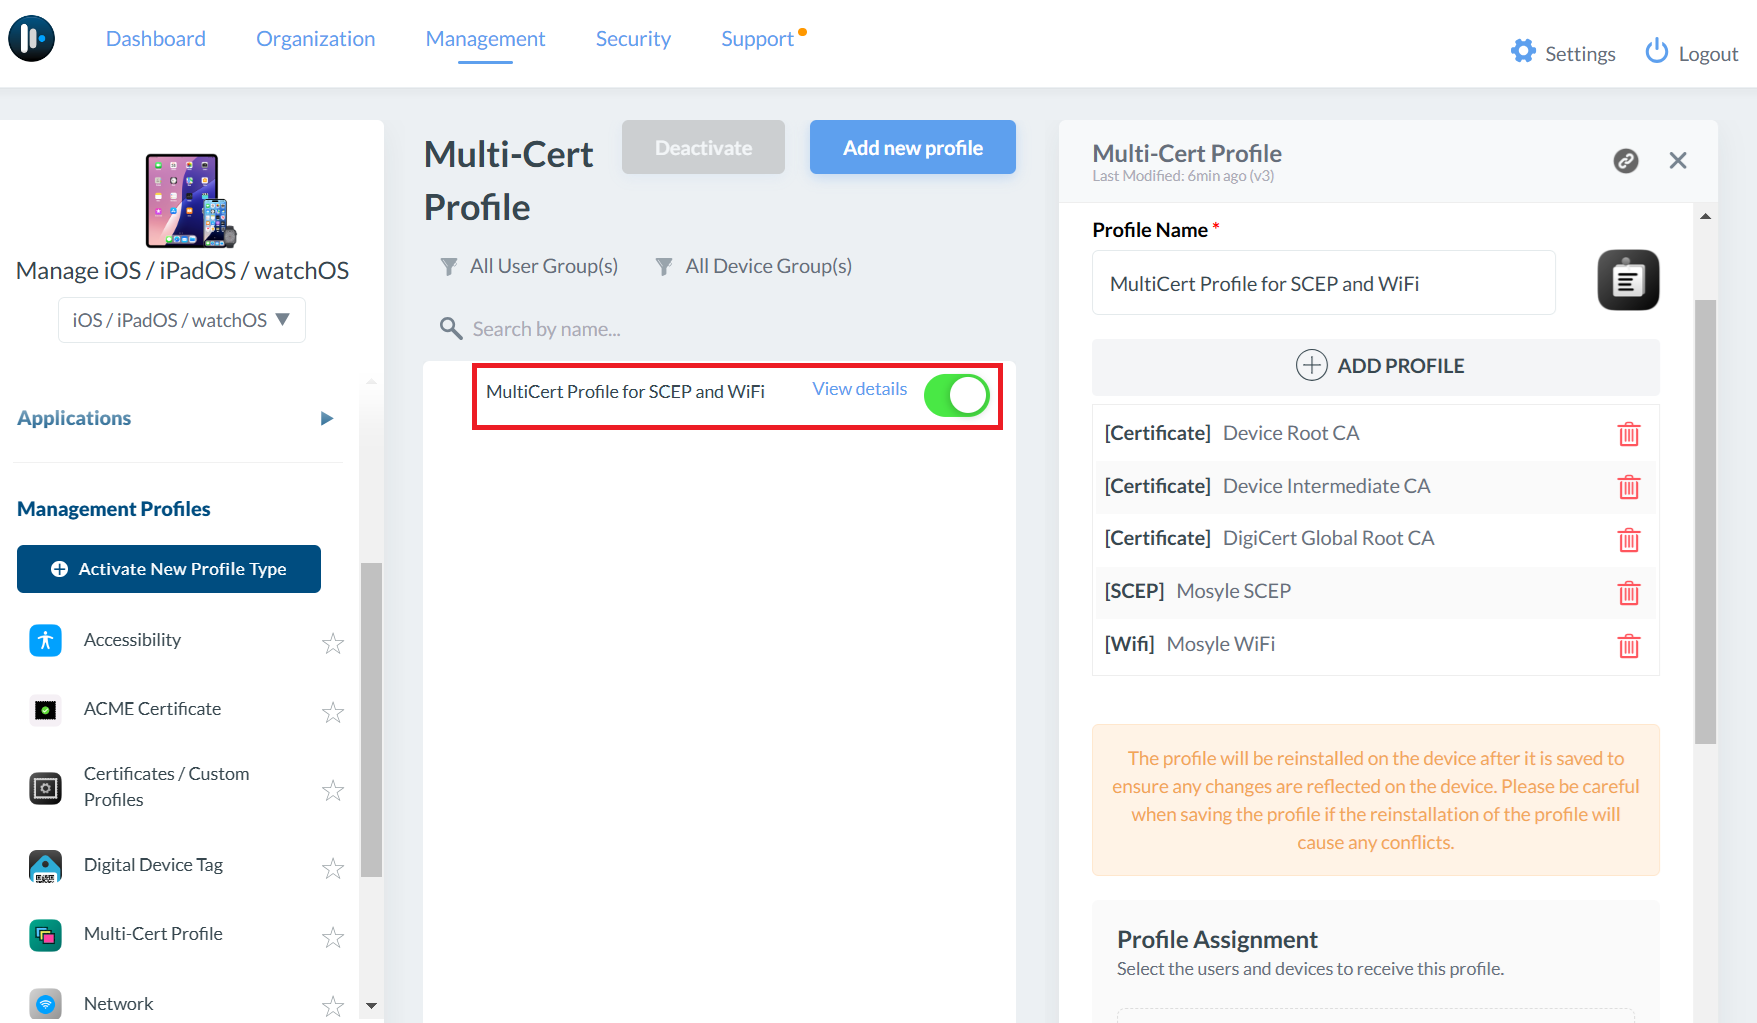
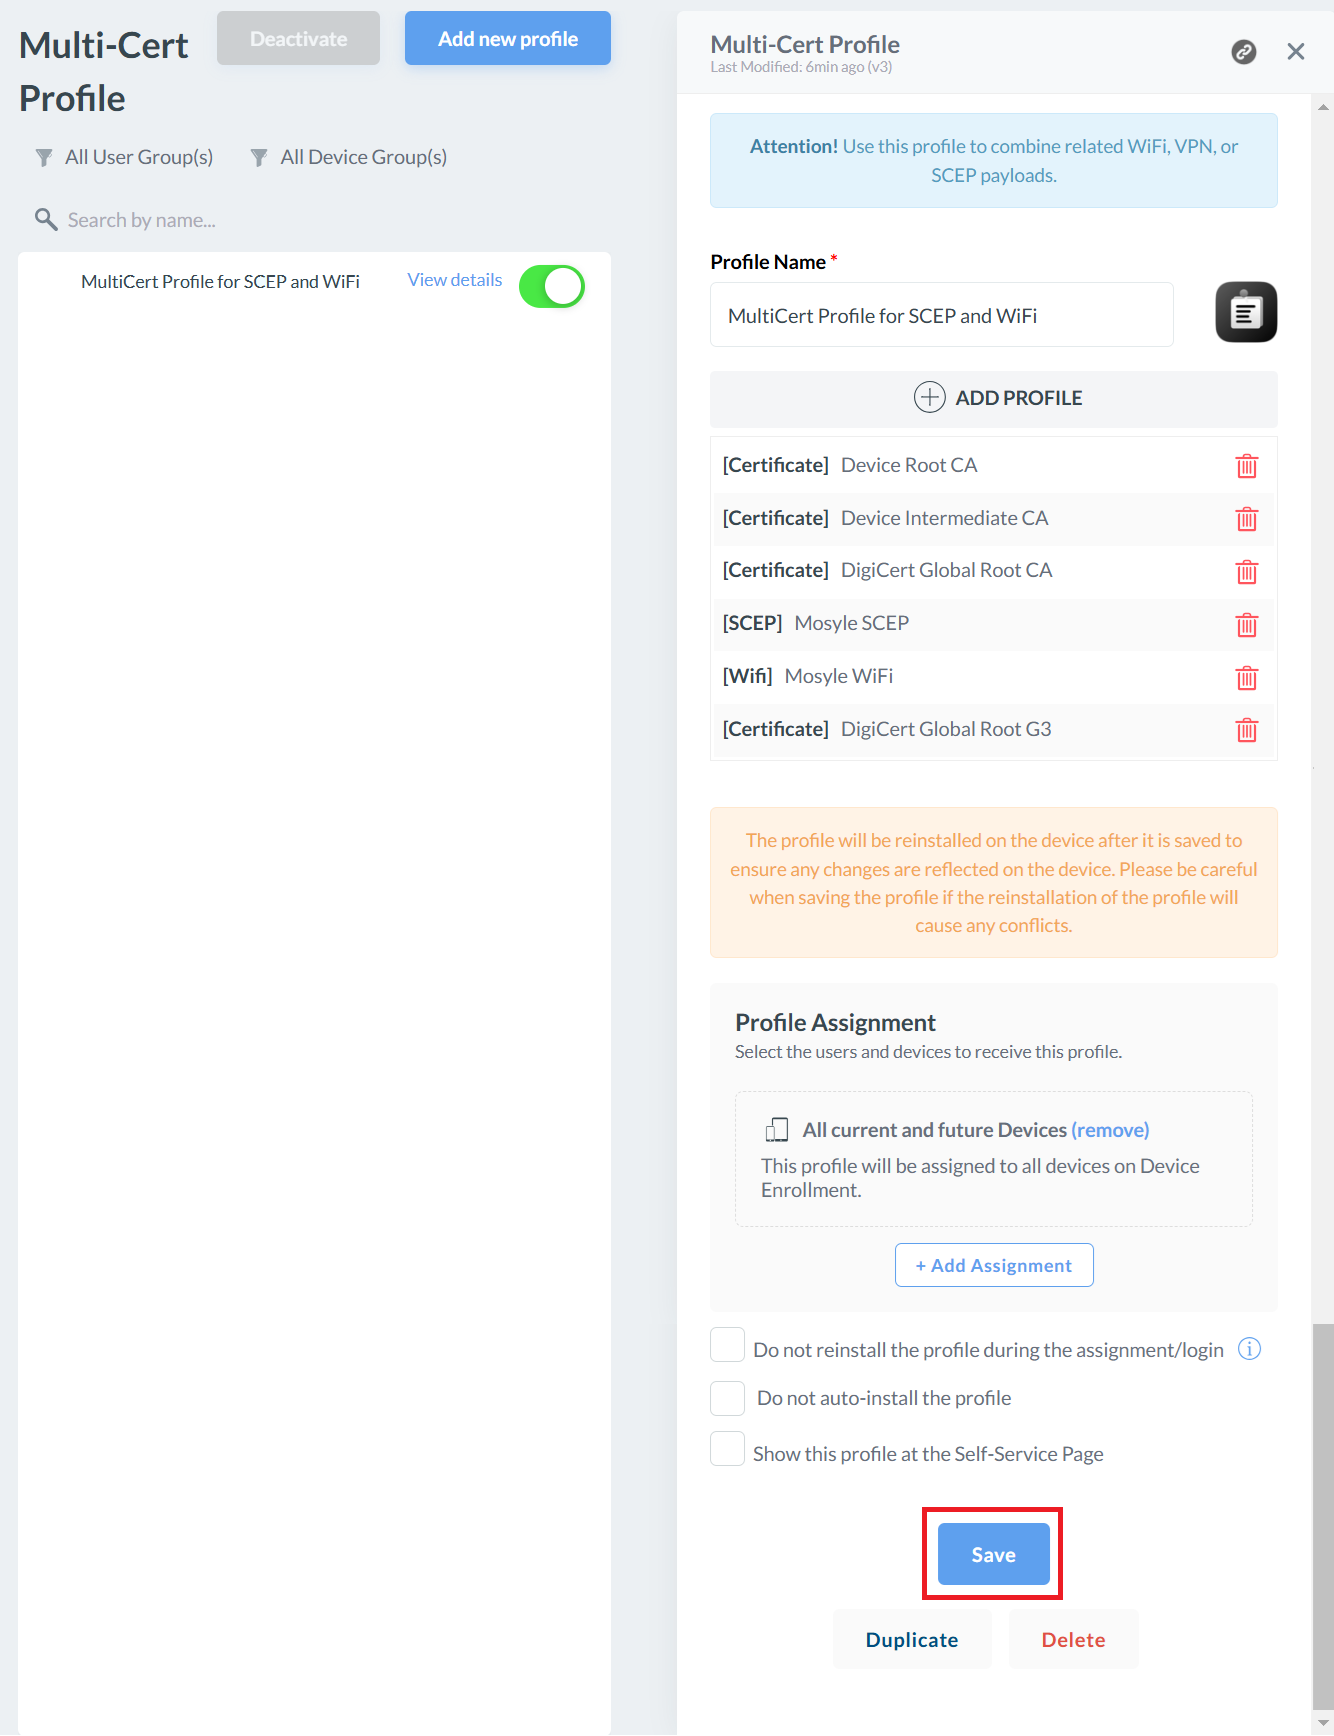
Navigate to Management > Management Profiles and select Multi-Cert Profile.
Management > Management Profiles — Multi-Cert Profile
3
On the Multi-Cert Profile page, select the WiFi Profile (which configures network configuration for devices) and add the new Root CA.
Multi-Cert Profile — WiFi Profile selected
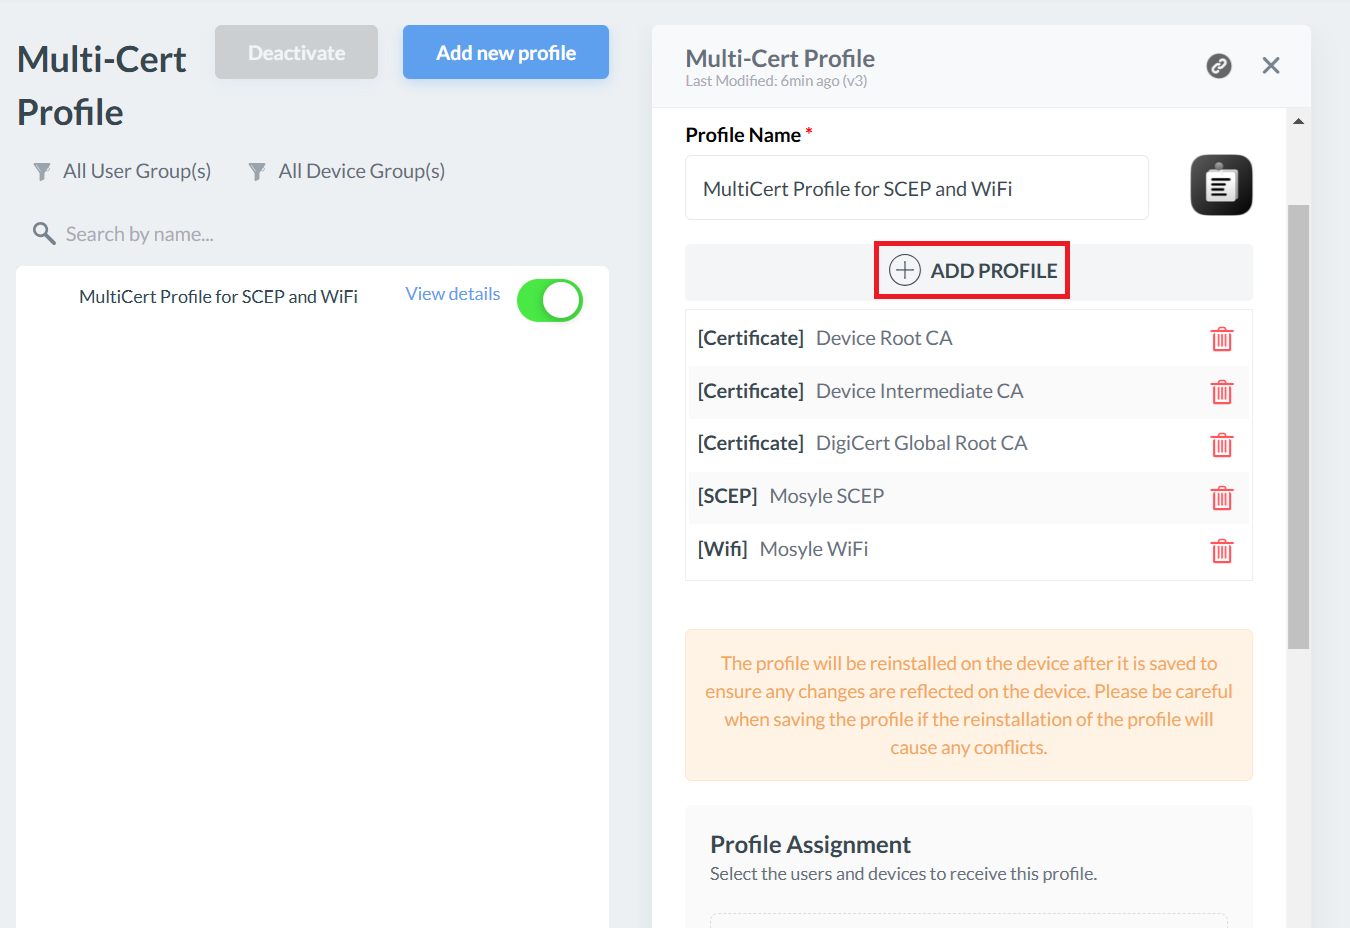
4
Click + ADD PROFILE.
5
Click Add Certificate profile.
6
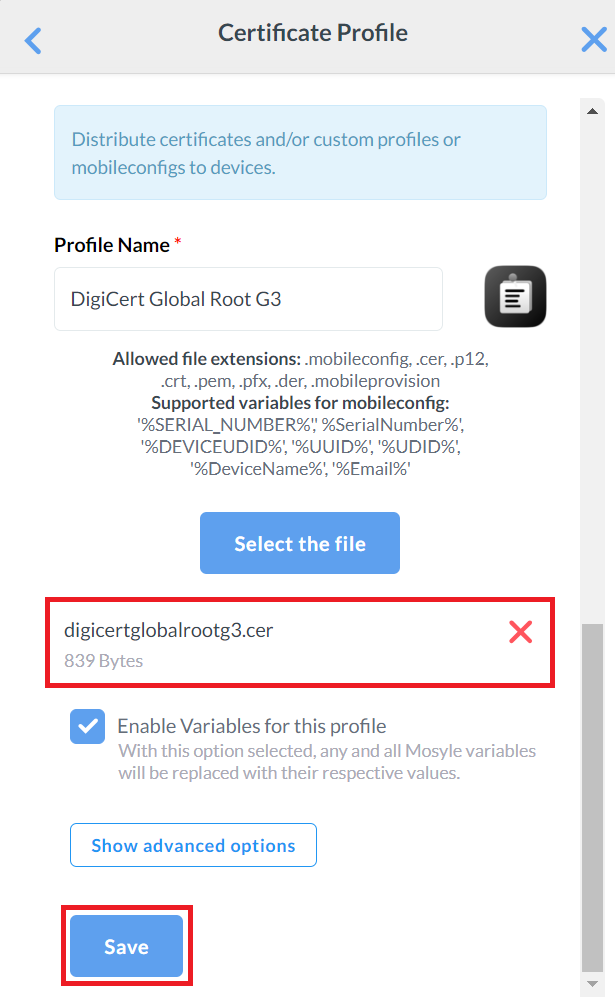
On the Certificate Profile pop-up window, enter a name in the Profile name field for your new Root CA profile.
Certificate Profile — Profile name field
7
Click Select the file and upload the new root CA.
Selecting the new Root CA file
8
Click Save.
9
Click Save again to apply the changes and reinstall the profile on the device.
Save — profile reinstalled on all devices
Confirming success
Following an update to the WiFi profile, Mosyle deploys the revised profile to all managed devices and installs the updated CloudRADIUS Root CA. The "Certificate Issued" event can be observed in the JoinNow Management Portal under Data and Monitoring > General Events.
Kandji
Prerequisites
Active subscription to the JoinNow Management Portal and CloudRADIUS
An active subscription to the Kandji Portal
Configuring the New Root CA in the macOS Wi-Fi Profile
1
Log in to the Kandji portal.
2
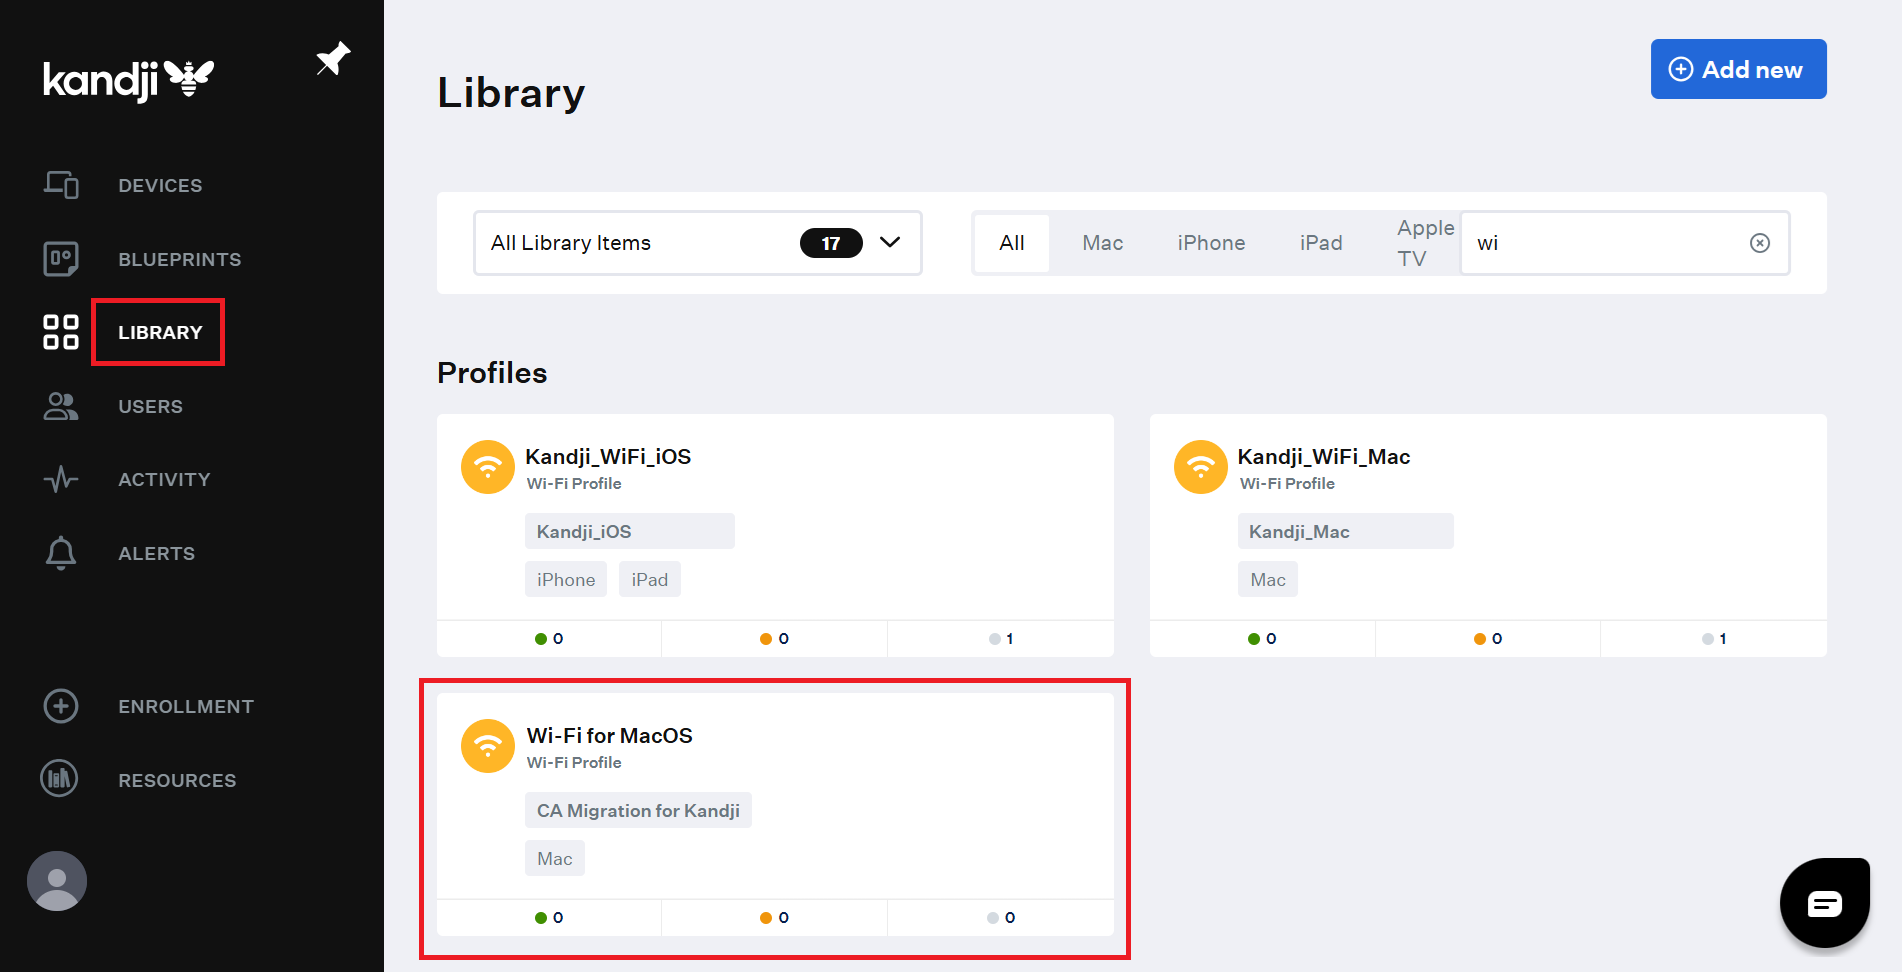
On the left pane, click LIBRARY.
Kandji — LIBRARY > selecting the Wi-Fi profile
3
On the Library page, select the profile for updating the new Root CA.
4
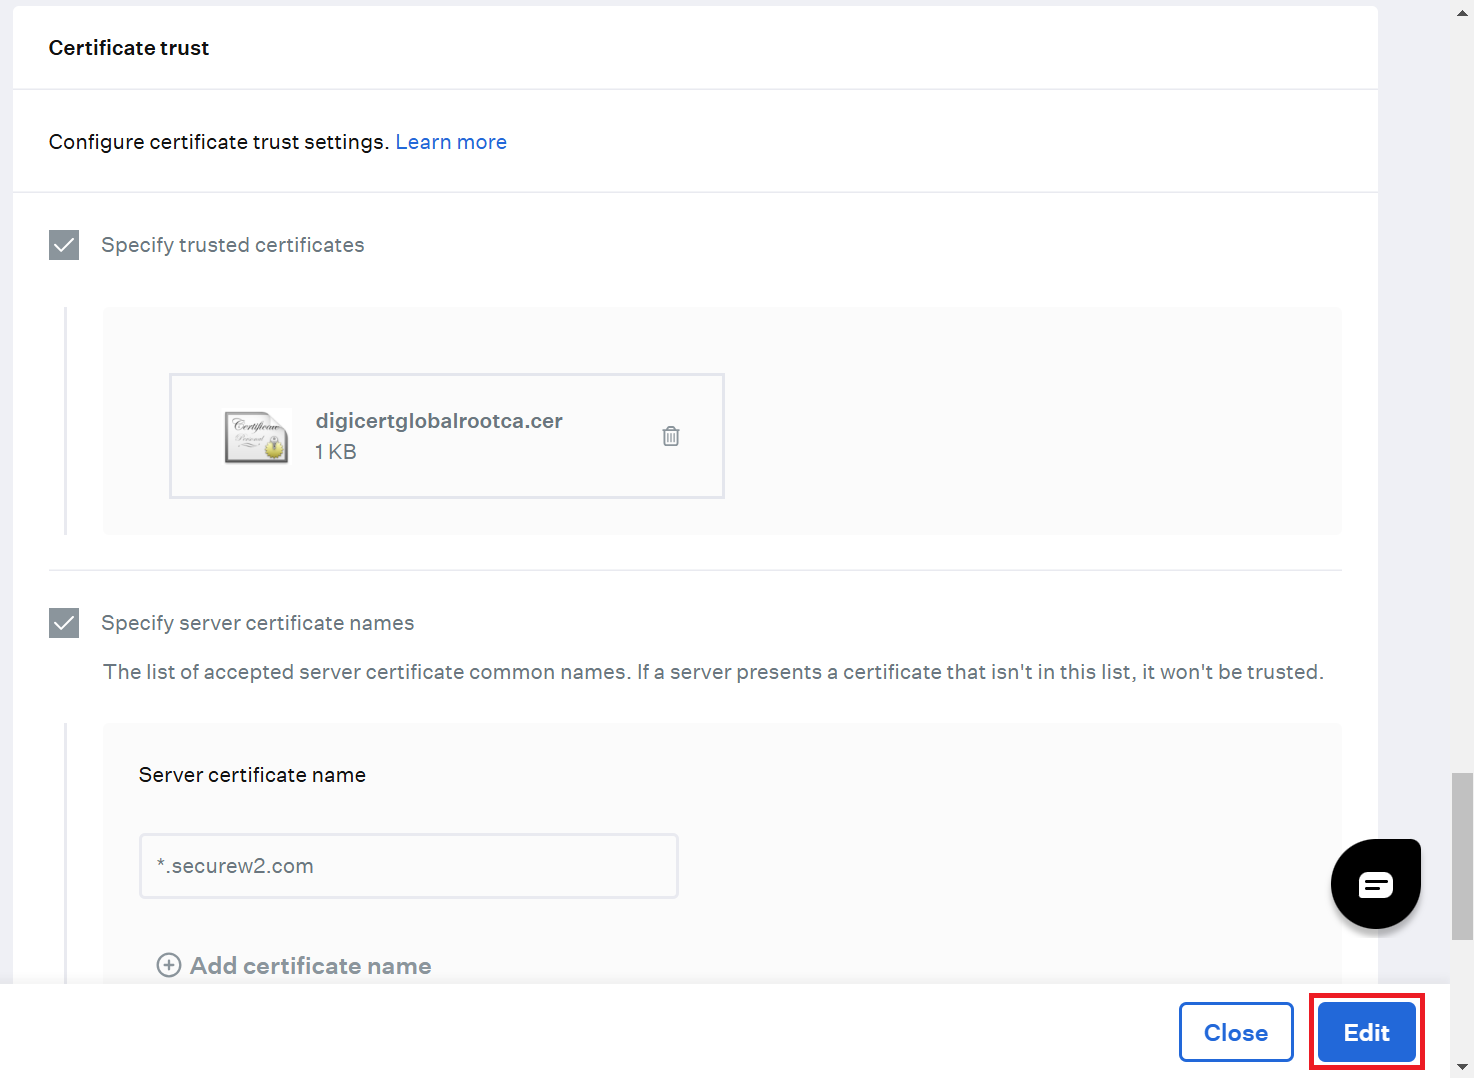
On the Wi-Fi Profile page, scroll to the Certificate trust section and click the Edit button.
Certificate trust section > Edit button
5
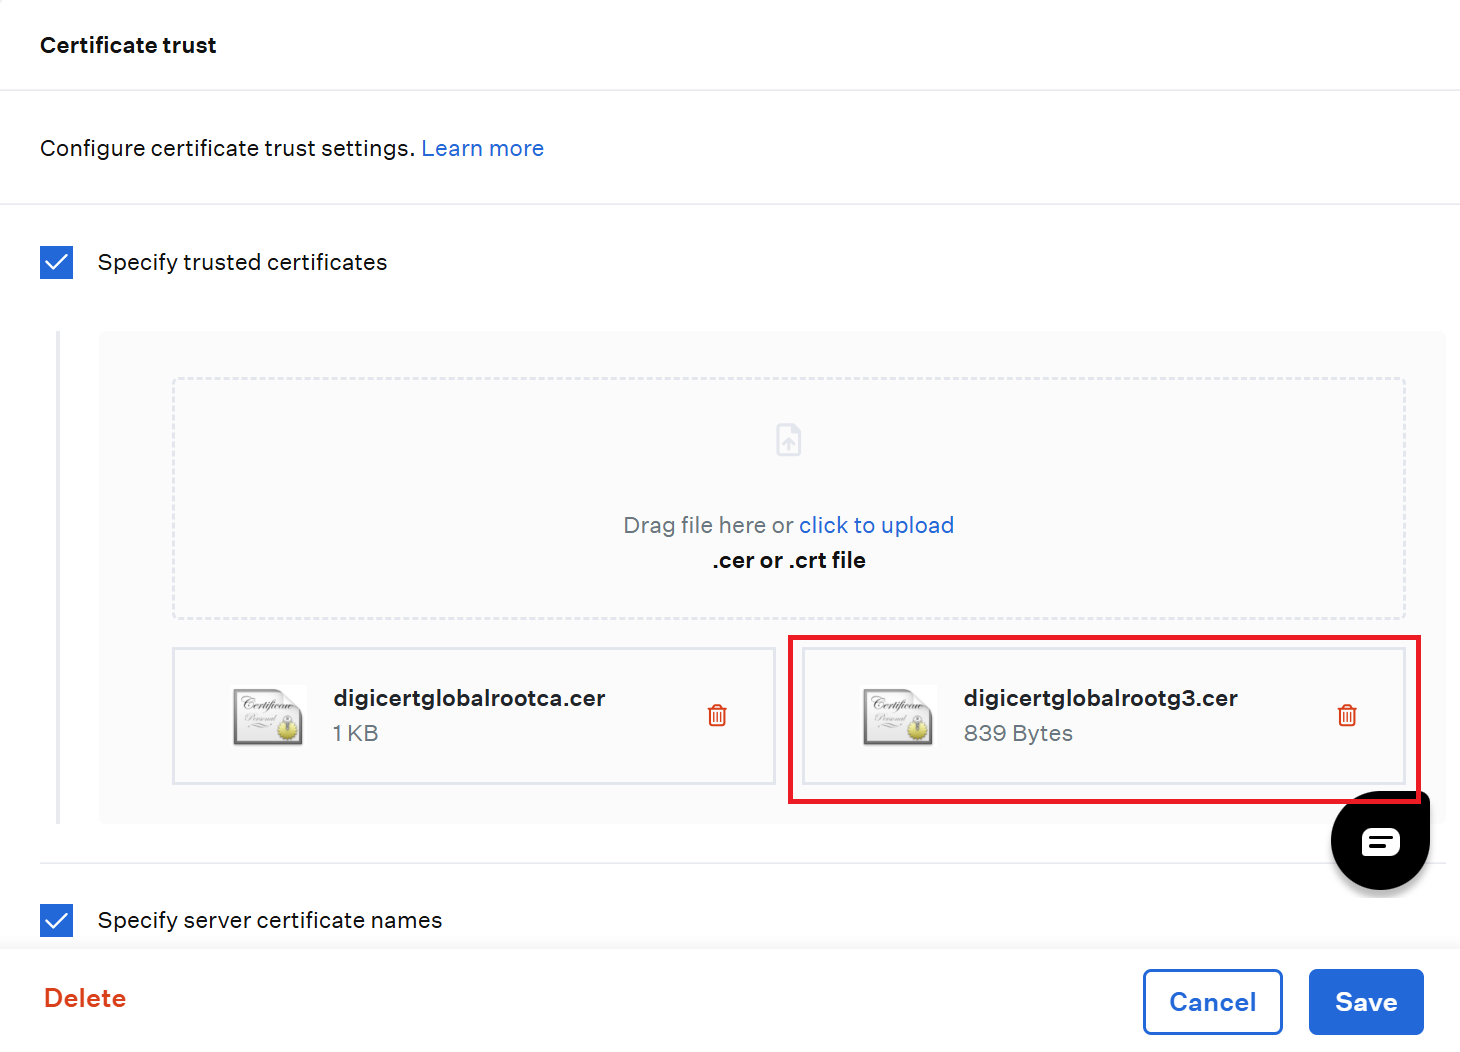
Click the click to upload link or drag and drop the new Root CA to initiate the upload process.
Uploading DigiCert Global Root G3 — click to upload or drag and drop
6
After uploading the new Root CA file, click Save.
Confirming success
Following an update to the WiFi profile, Kandji deploys the revised profile to all managed devices and installs the updated CloudRADIUS Root CA. The "Certificate Issued" event can be observed in the JoinNow Management Portal under Data and Monitoring > General Events.
Google Verified Access
Prerequisites
Active subscription to the JoinNow Management Portal and CloudRADIUS
Active subscription to the Google Admin Console
Part A Configure the RADIUS Server Root CA Certificate
Configuring the New RADIUS Server Root CA Certificate
1
Log in to the Google Admin Console.
2
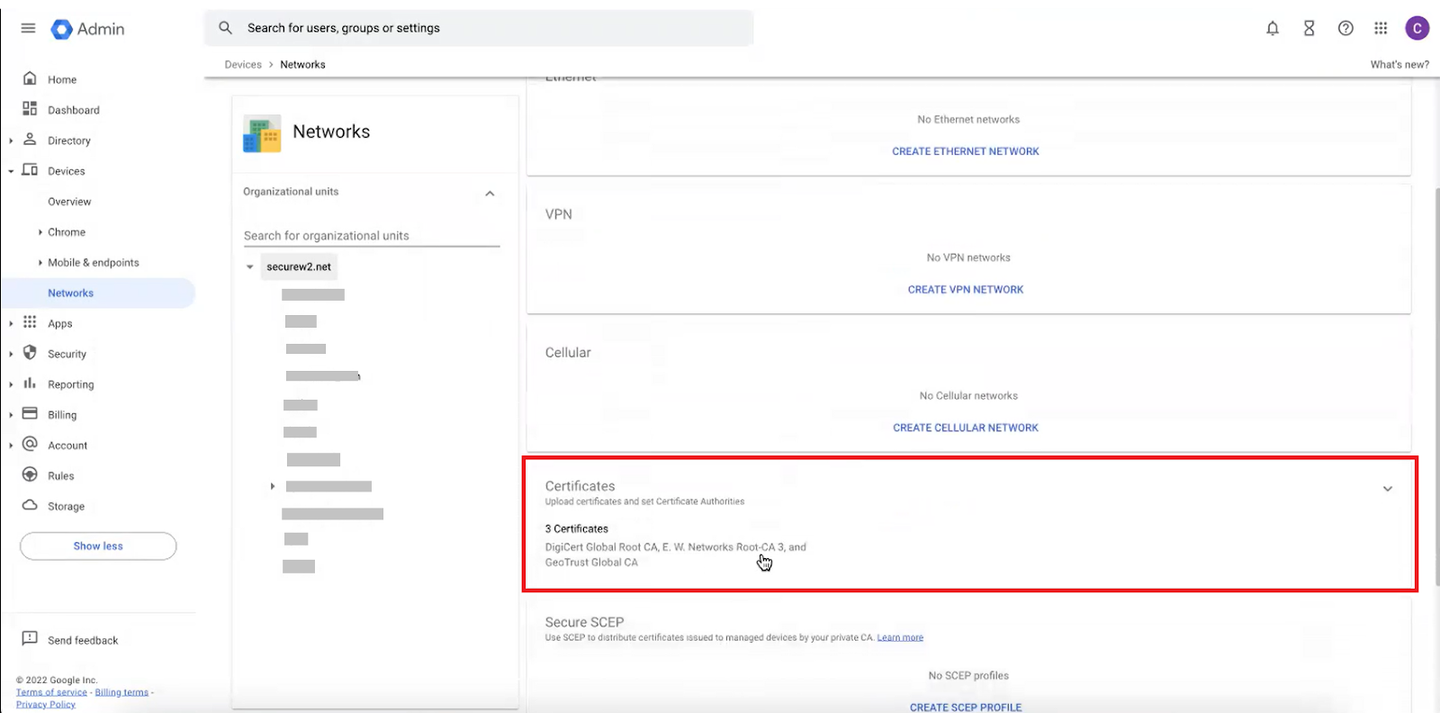
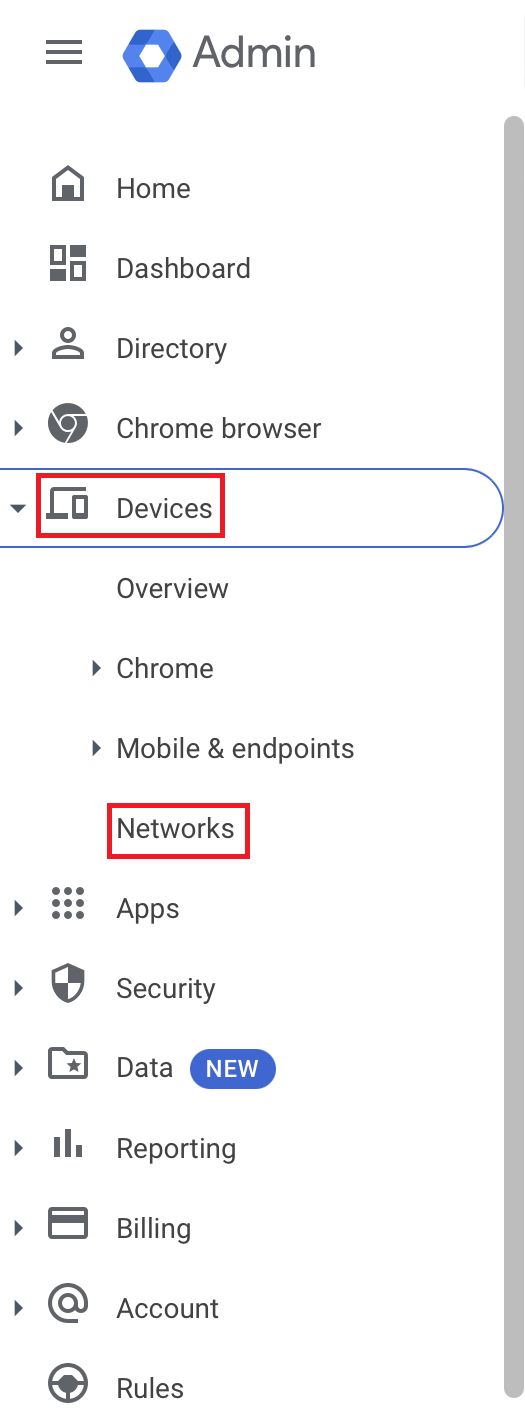
Navigate to Devices > Networks.
Devices > Networks
3
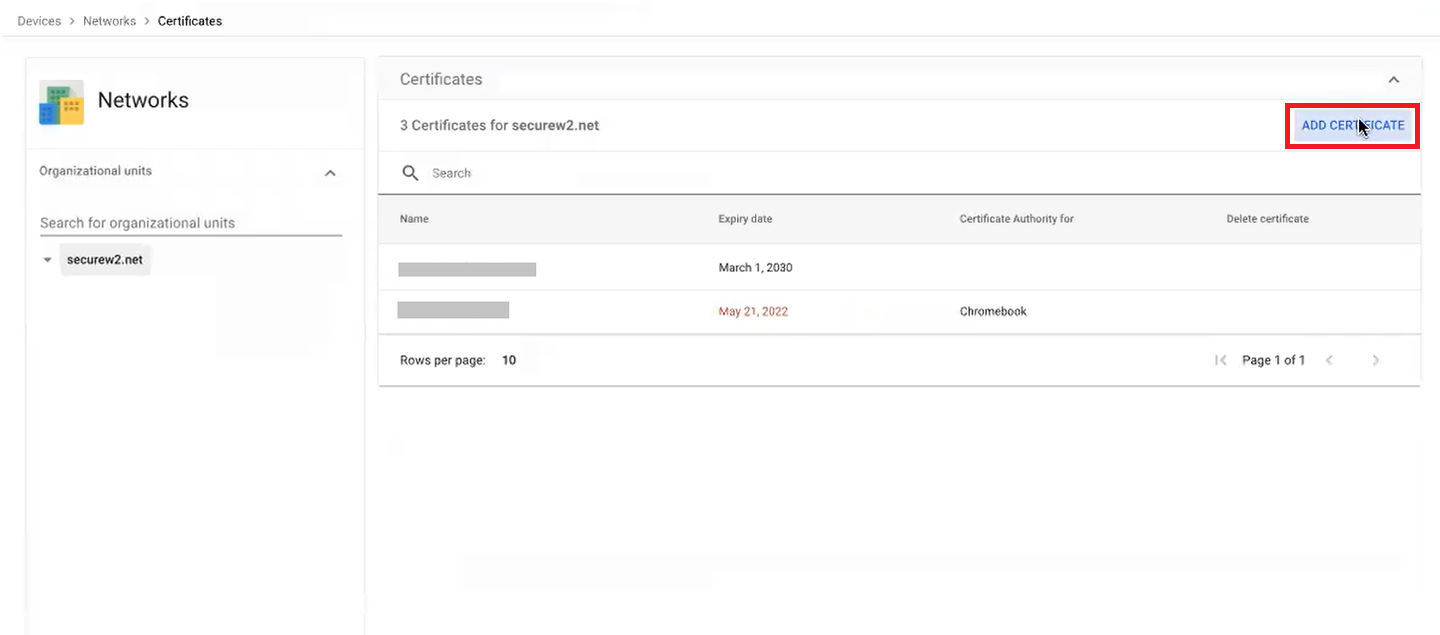
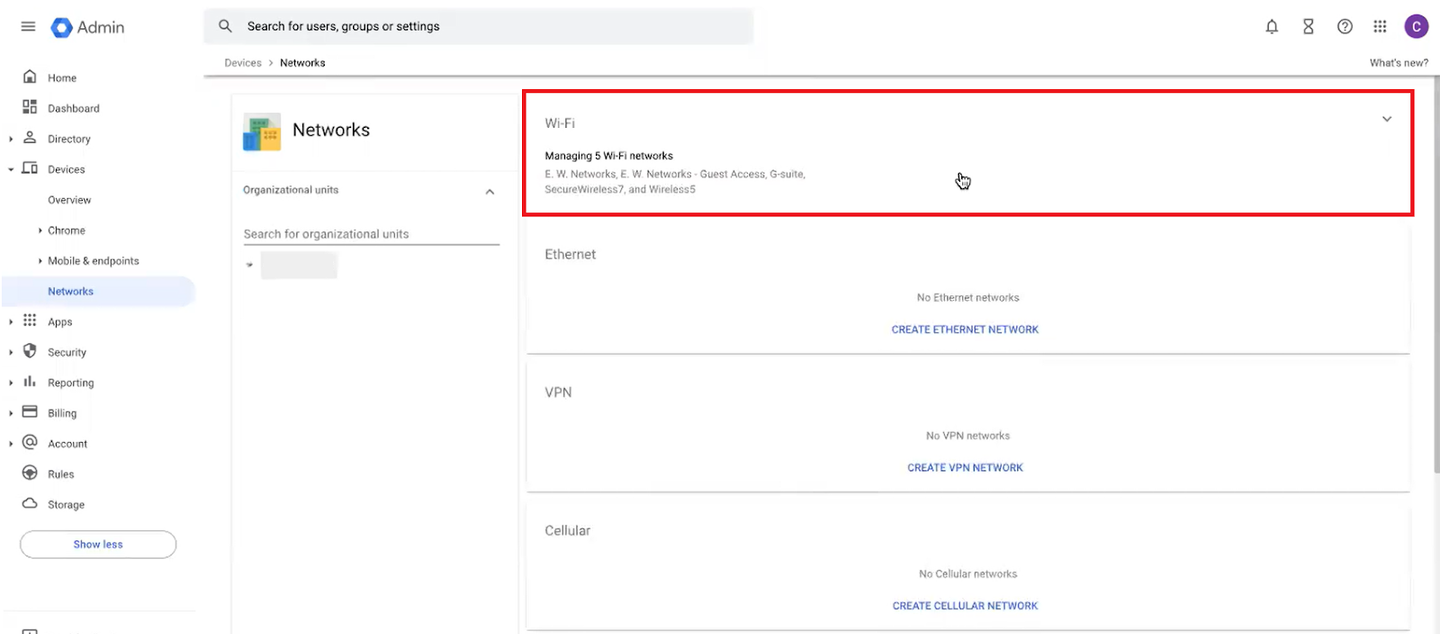
Scroll down and click Certificates.
4
On the Certificates page, click ADD CERTIFICATE.
Certificates page — ADD CERTIFICATE
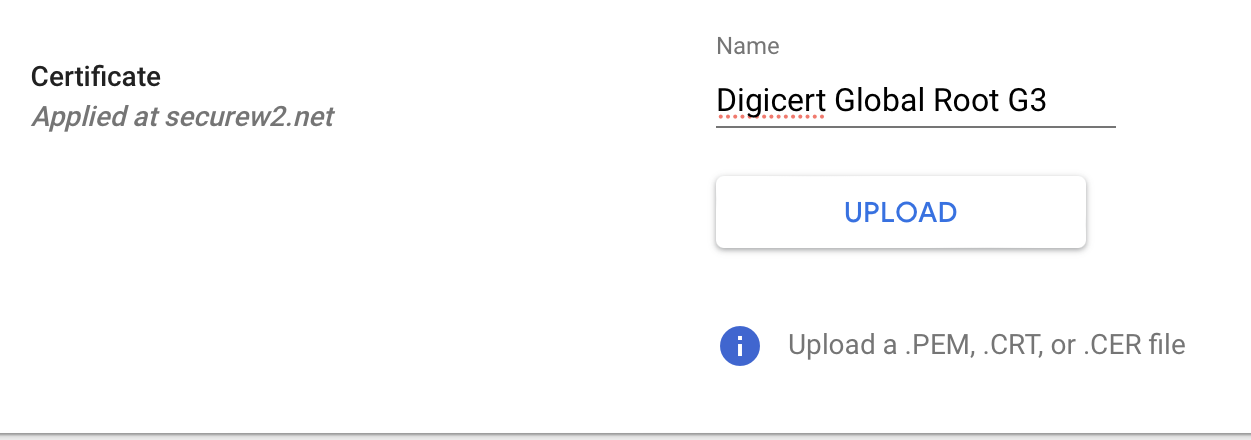
5
On the Add Certificate page, in the Certificate section, in the Name field, enter the name of the certificate.
6
Click the UPLOAD button to add the new Root CA along with the existing Root CA. This installs the new Root CA on the device, establishing trust and connection with the CloudRADIUS Server when migrating to the new Root CA.
Add Certificate — Name field and UPLOAD button
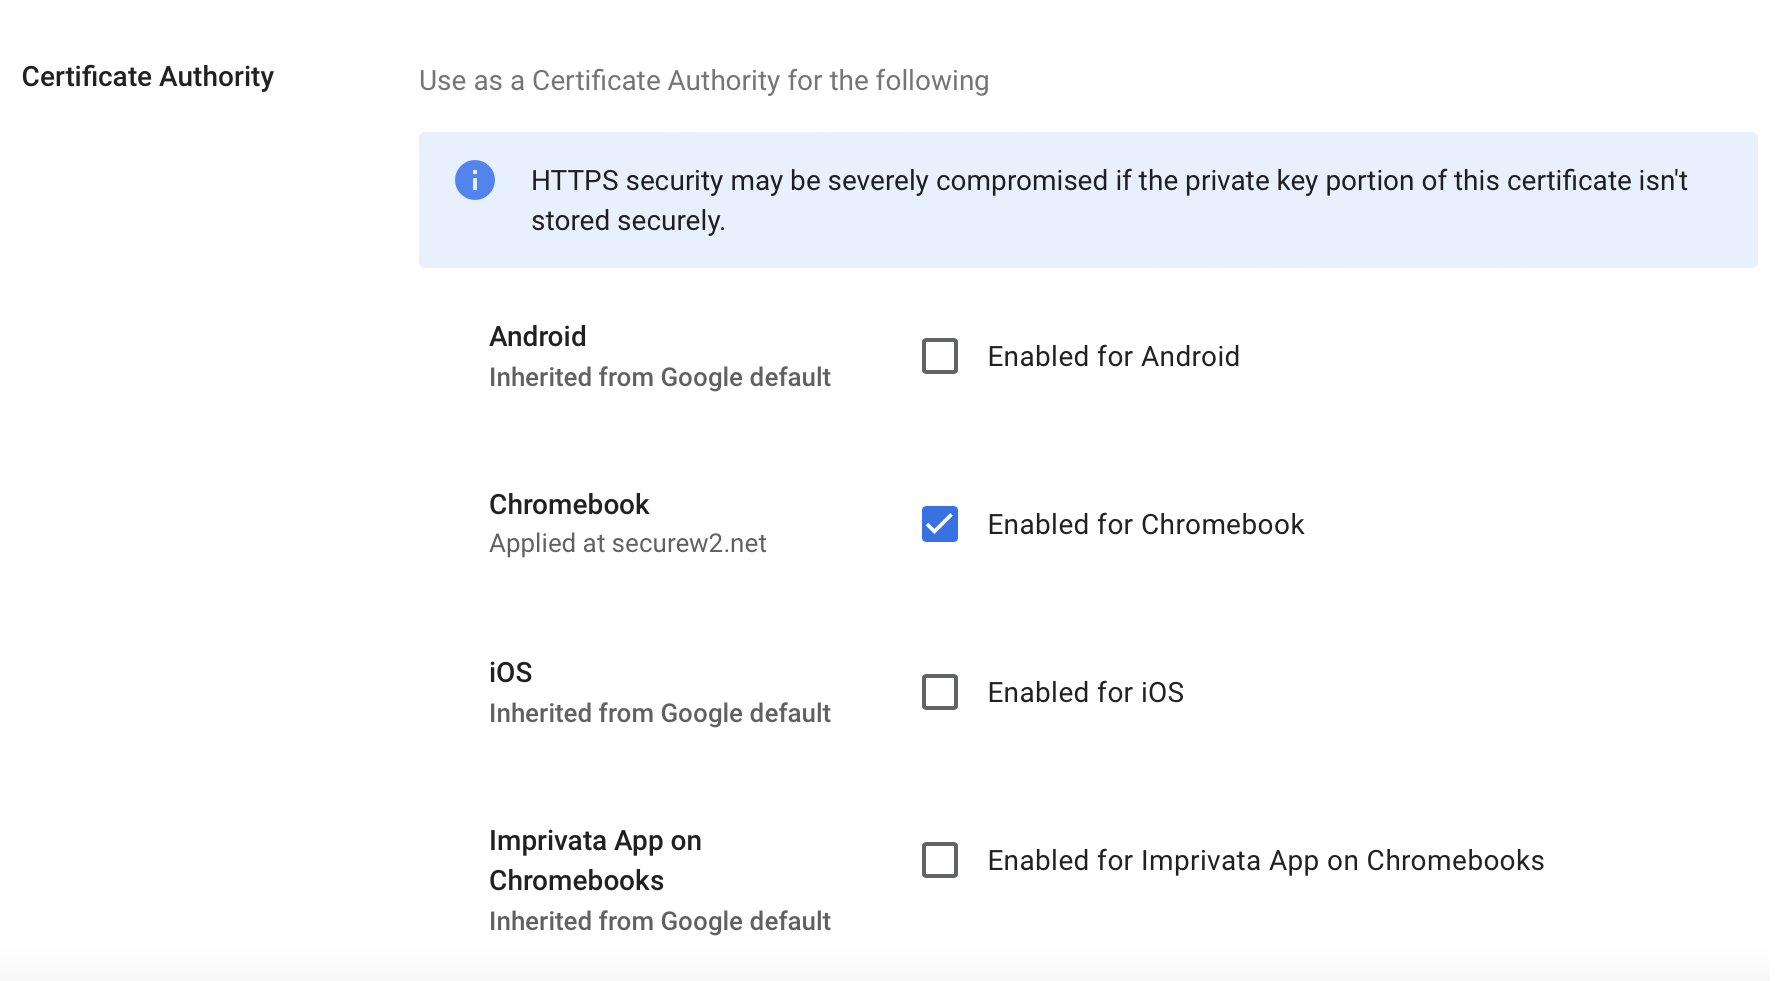
7
In the Certificate Authority section, select the Enabled for Chromebook checkbox.
Certificate Authority section — Enabled for Chromebook checkbox
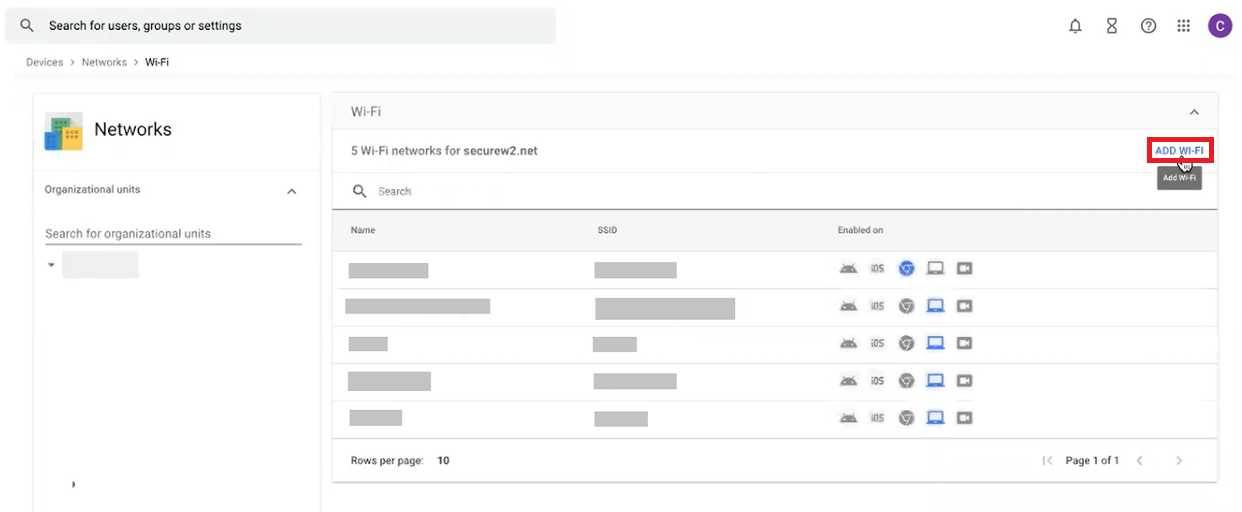
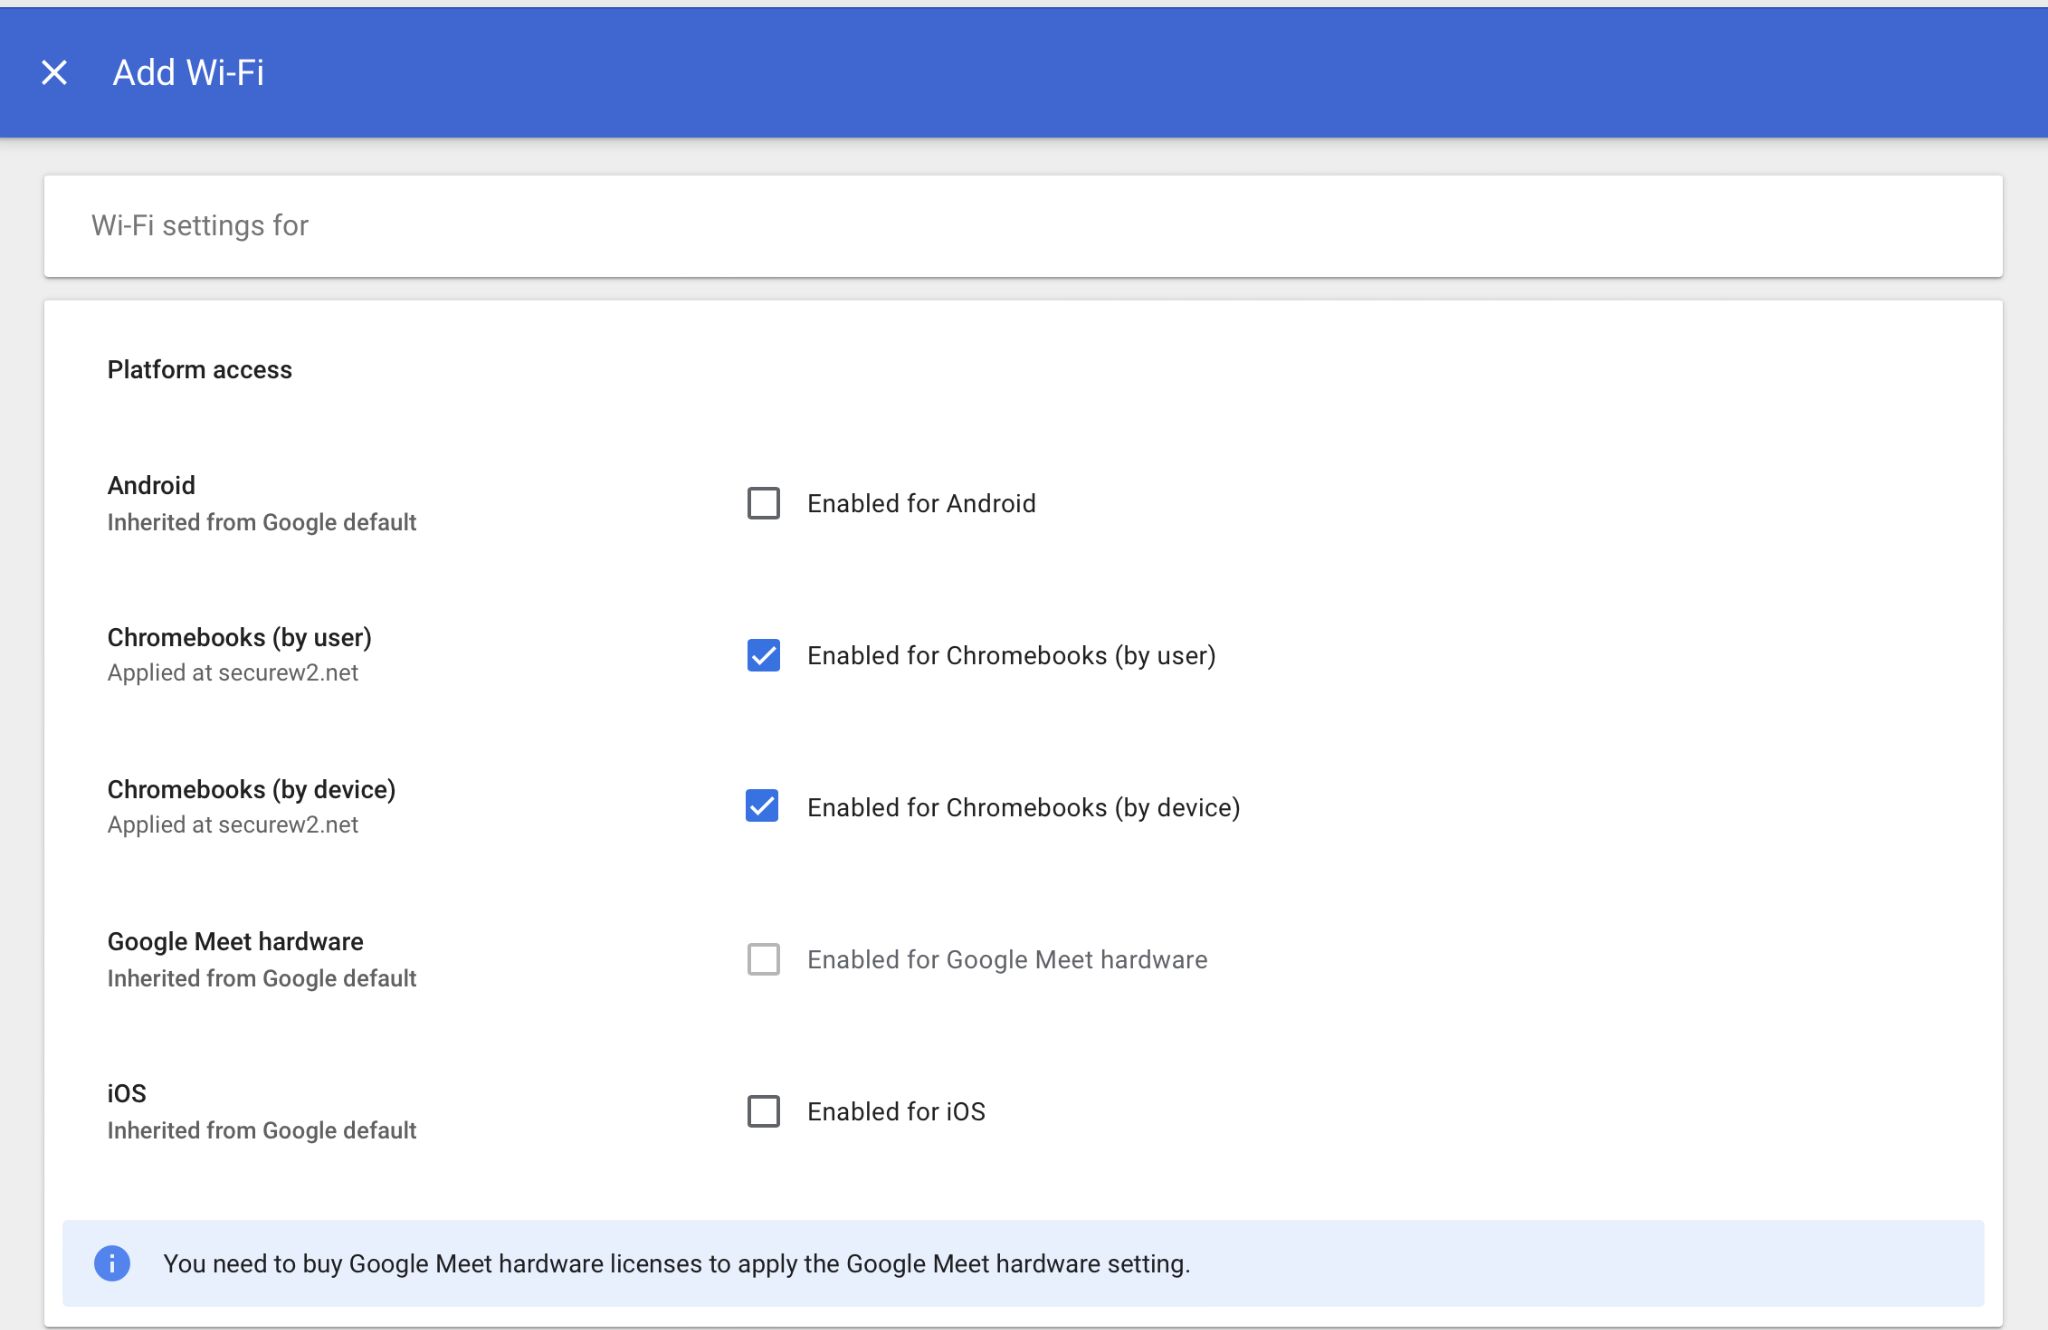
Select Wi-Fi.
Add Wi-Fi — Platform access and Details sections configuredSecurity Type and EAP-TLS configurationServer Certificate Authority — selecting the uploaded Root CA chain
3
On the Wi-Fi page, click ADD WI-FI.
4
On the Add Wi-Fi page, configure the following settings:
a.Under Platform access, select both Enable for Chromebooks (by user) and Enable for Chromebooks (by device) checkboxes.
b.Under the Details section, type the name and SSID of your Wi-Fi Network.
c.Select the Automatically connect option.
d.From the Security Type drop-down list, select WPA/WPA2-Enterprise (802.1X).
e.From the Extensible Authentication Protocol drop-down list, select EAP-TLS.
f.In the Username field, type ${CERT_SAN_EMAIL} or ${CERT_SAN_UPN}.
g.From the Server Certificate Authority drop-down list, select the RADIUS Server Issuer CA chain you uploaded earlier.
h.Click SAVE.
Important: OU assignment
When moving Chromebooks to the specific OU for certificate enrollment, ensure that the user also belongs to that specific OU.
Confirming success
After saving the configuration, re-enrollment initiates even if the device has a valid client certificate. Confirm in the JoinNow Management Portal under Data and Monitoring > General Events — look for the "Certificate Issued" event. The new Root CA will also be installed on the device.
Addigy
Prerequisites
Active subscription to the JoinNow Management Portal and CloudRADIUS
An active subscription to the Addigy Portal
Configuring the New Root CA in the MDM Profile
1
Log in to the Addigy portal.
2
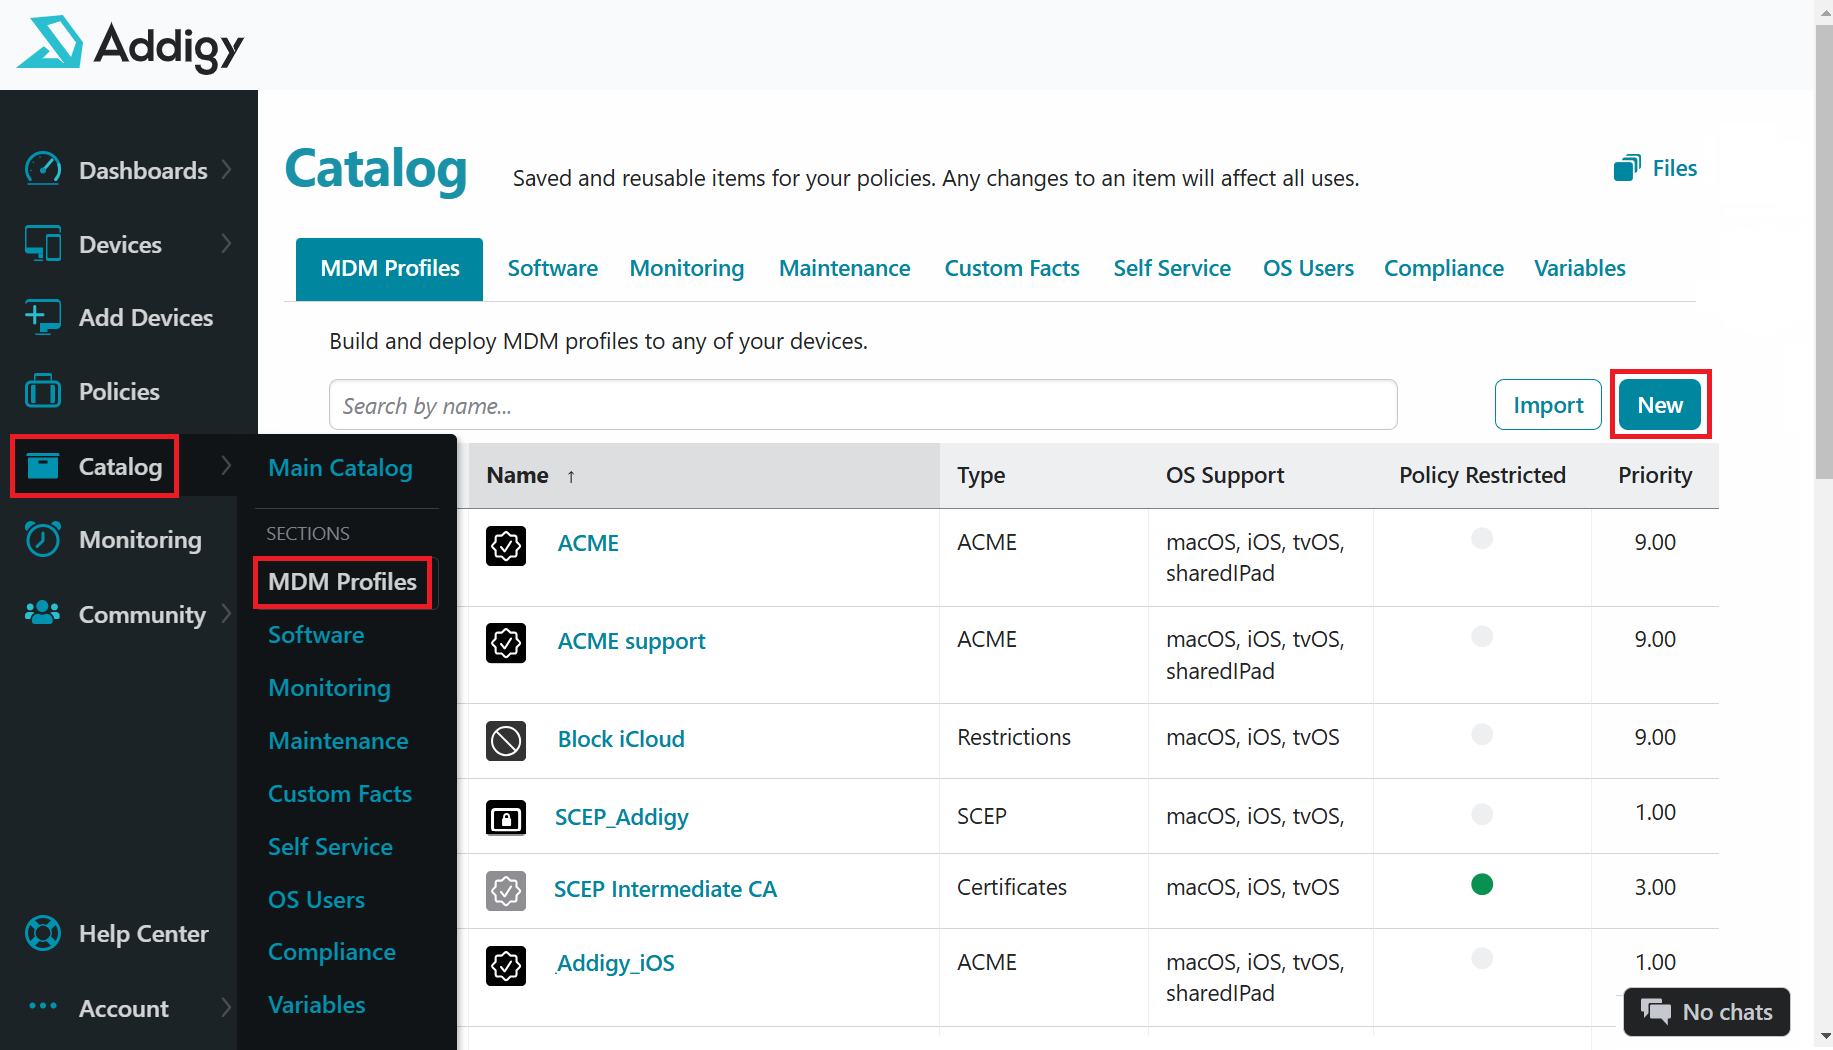
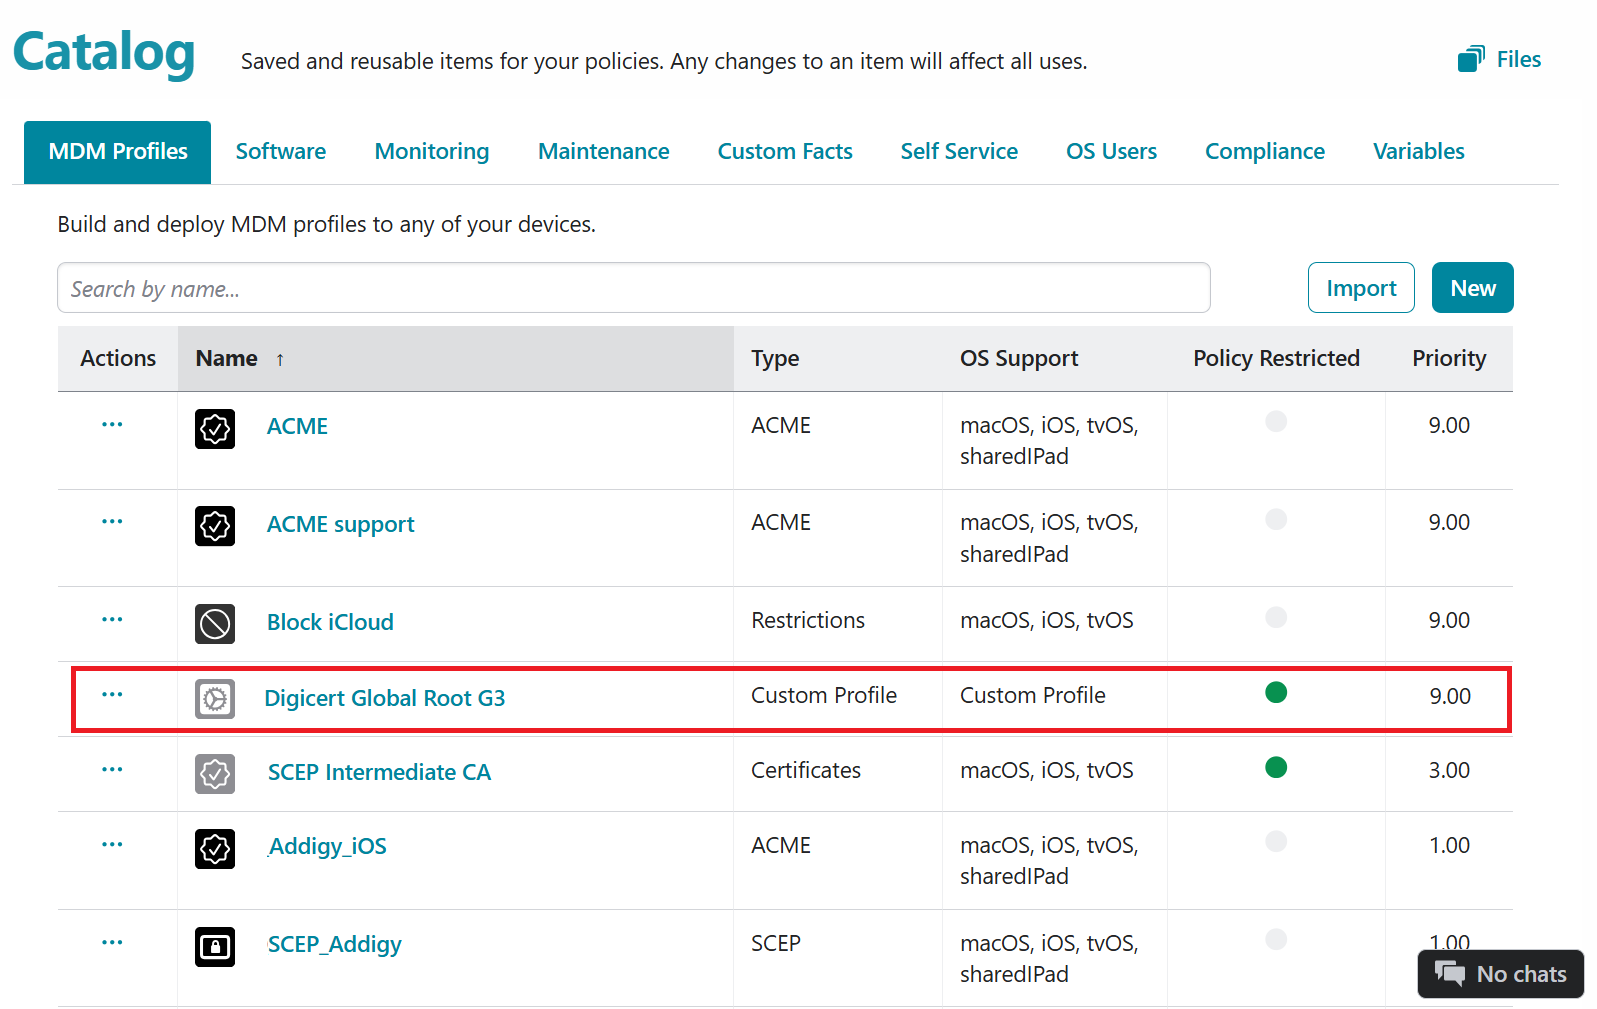
On the left pane, navigate to Catalog > MDM Profiles.
Catalog > MDM Profiles
3
On the Catalog page, click New.
4
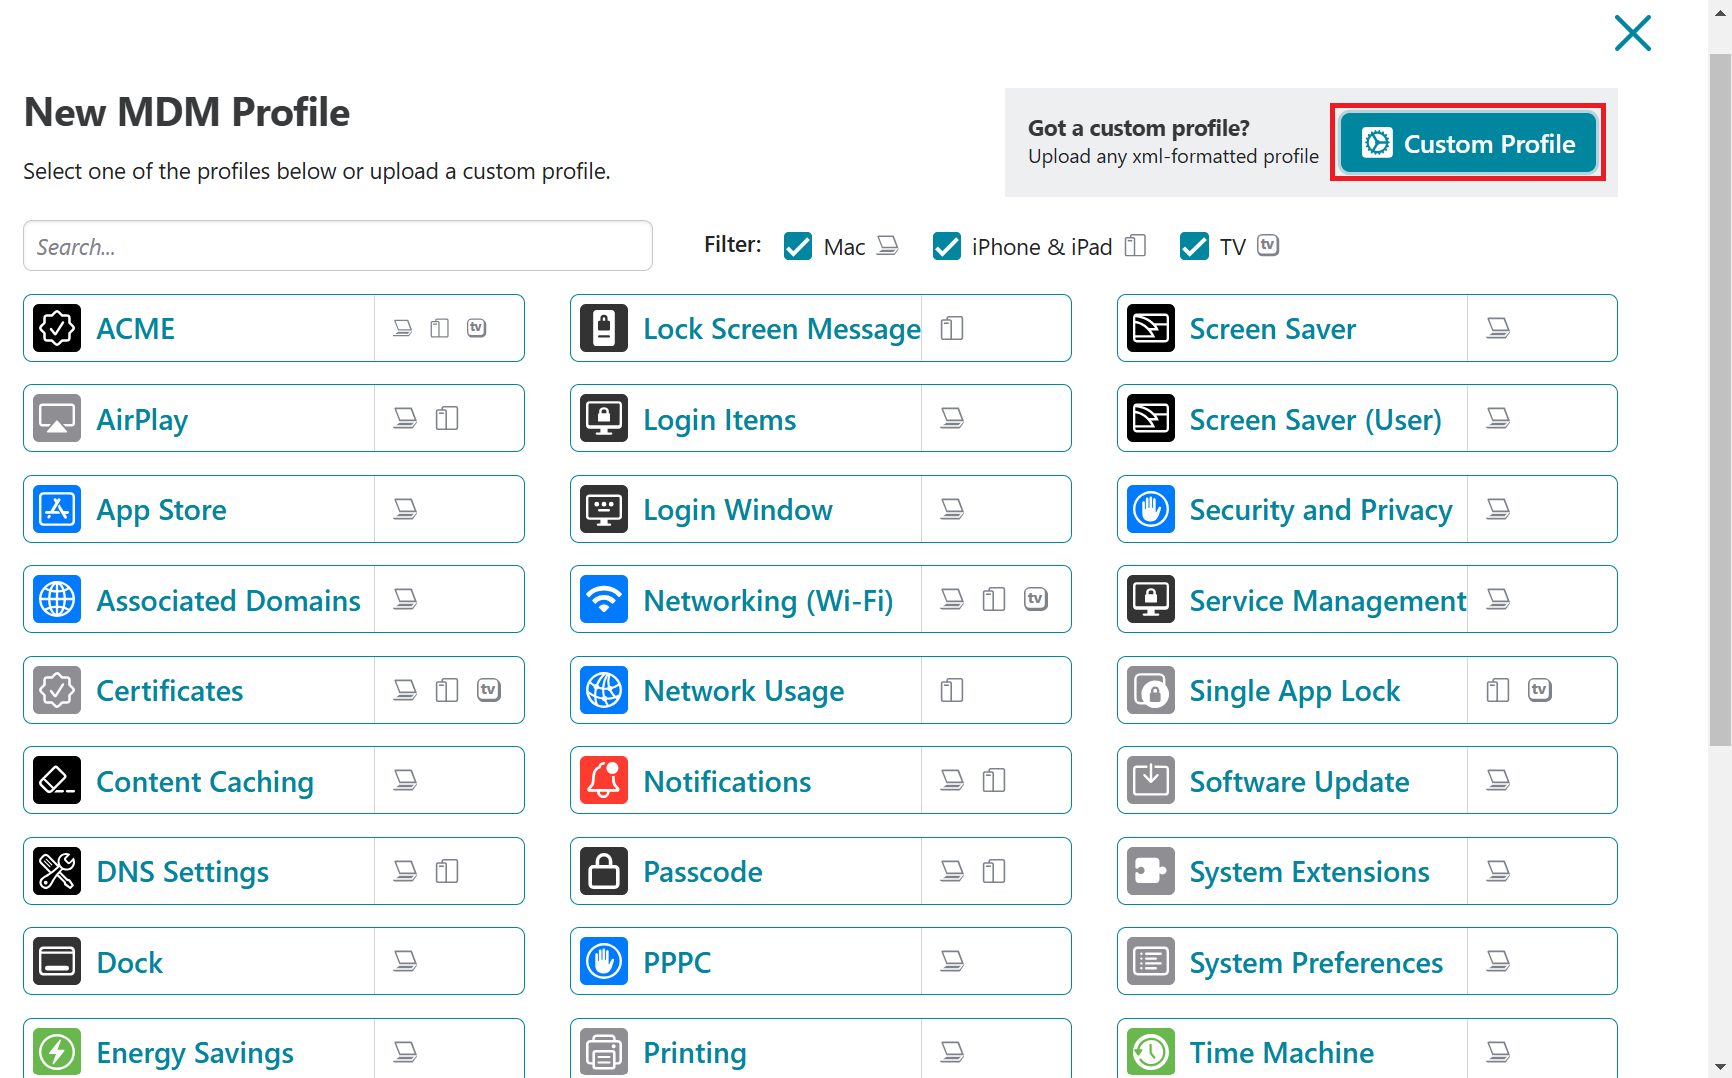
On the New MDM Profile pop-up window, click Custom Profile.
New MDM Profile pop-up — Custom Profile
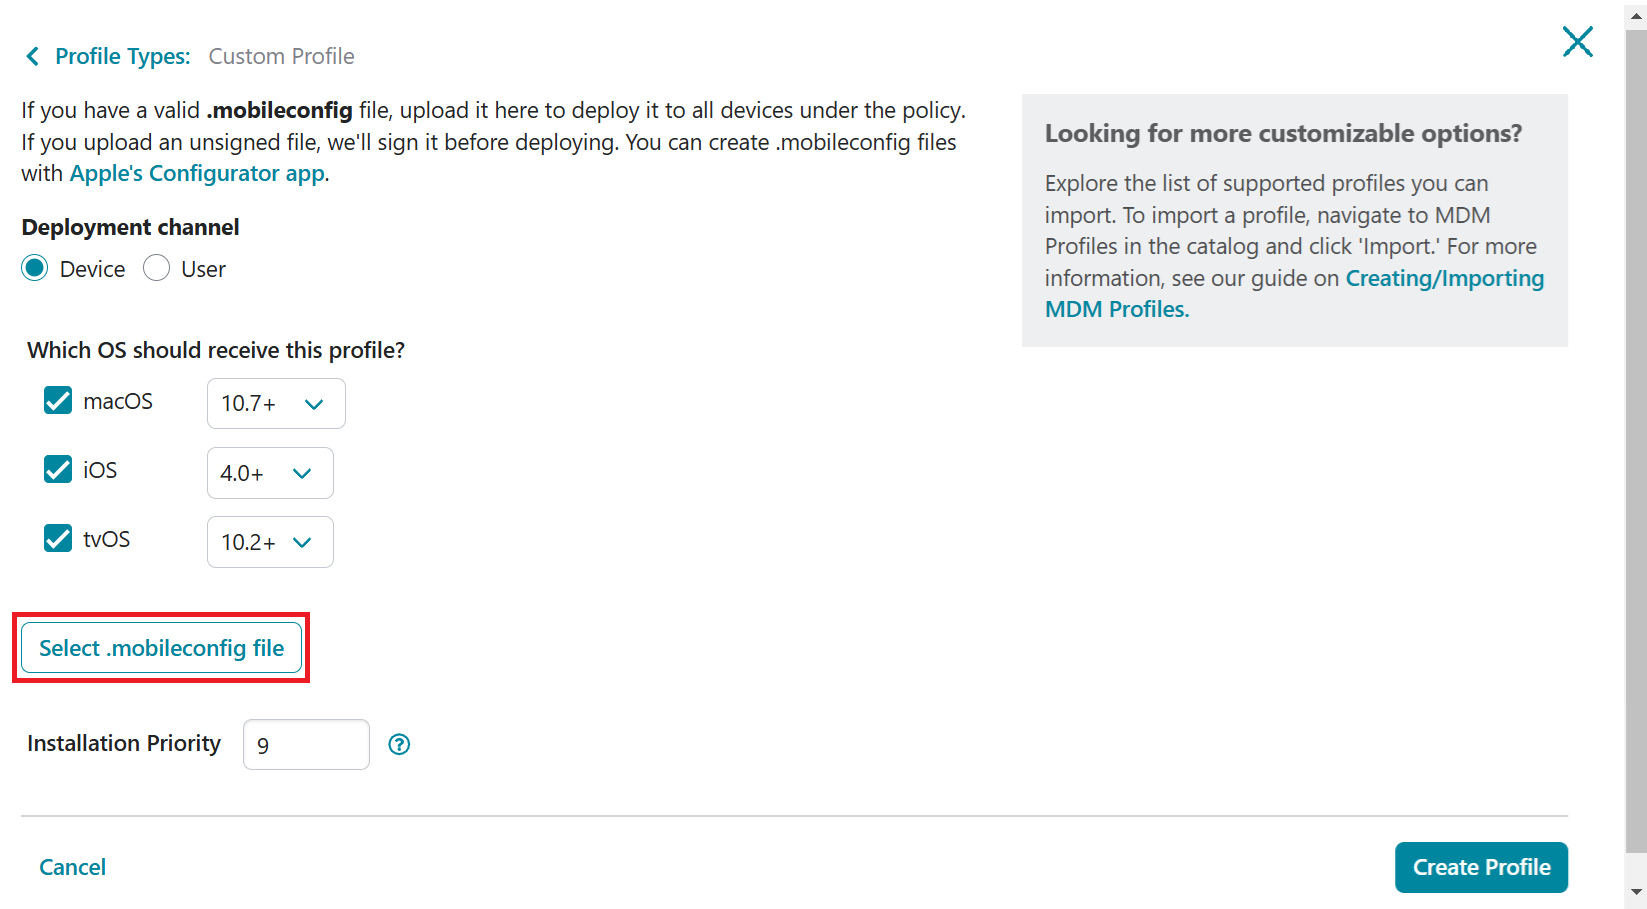
5
Retain the default values.
6
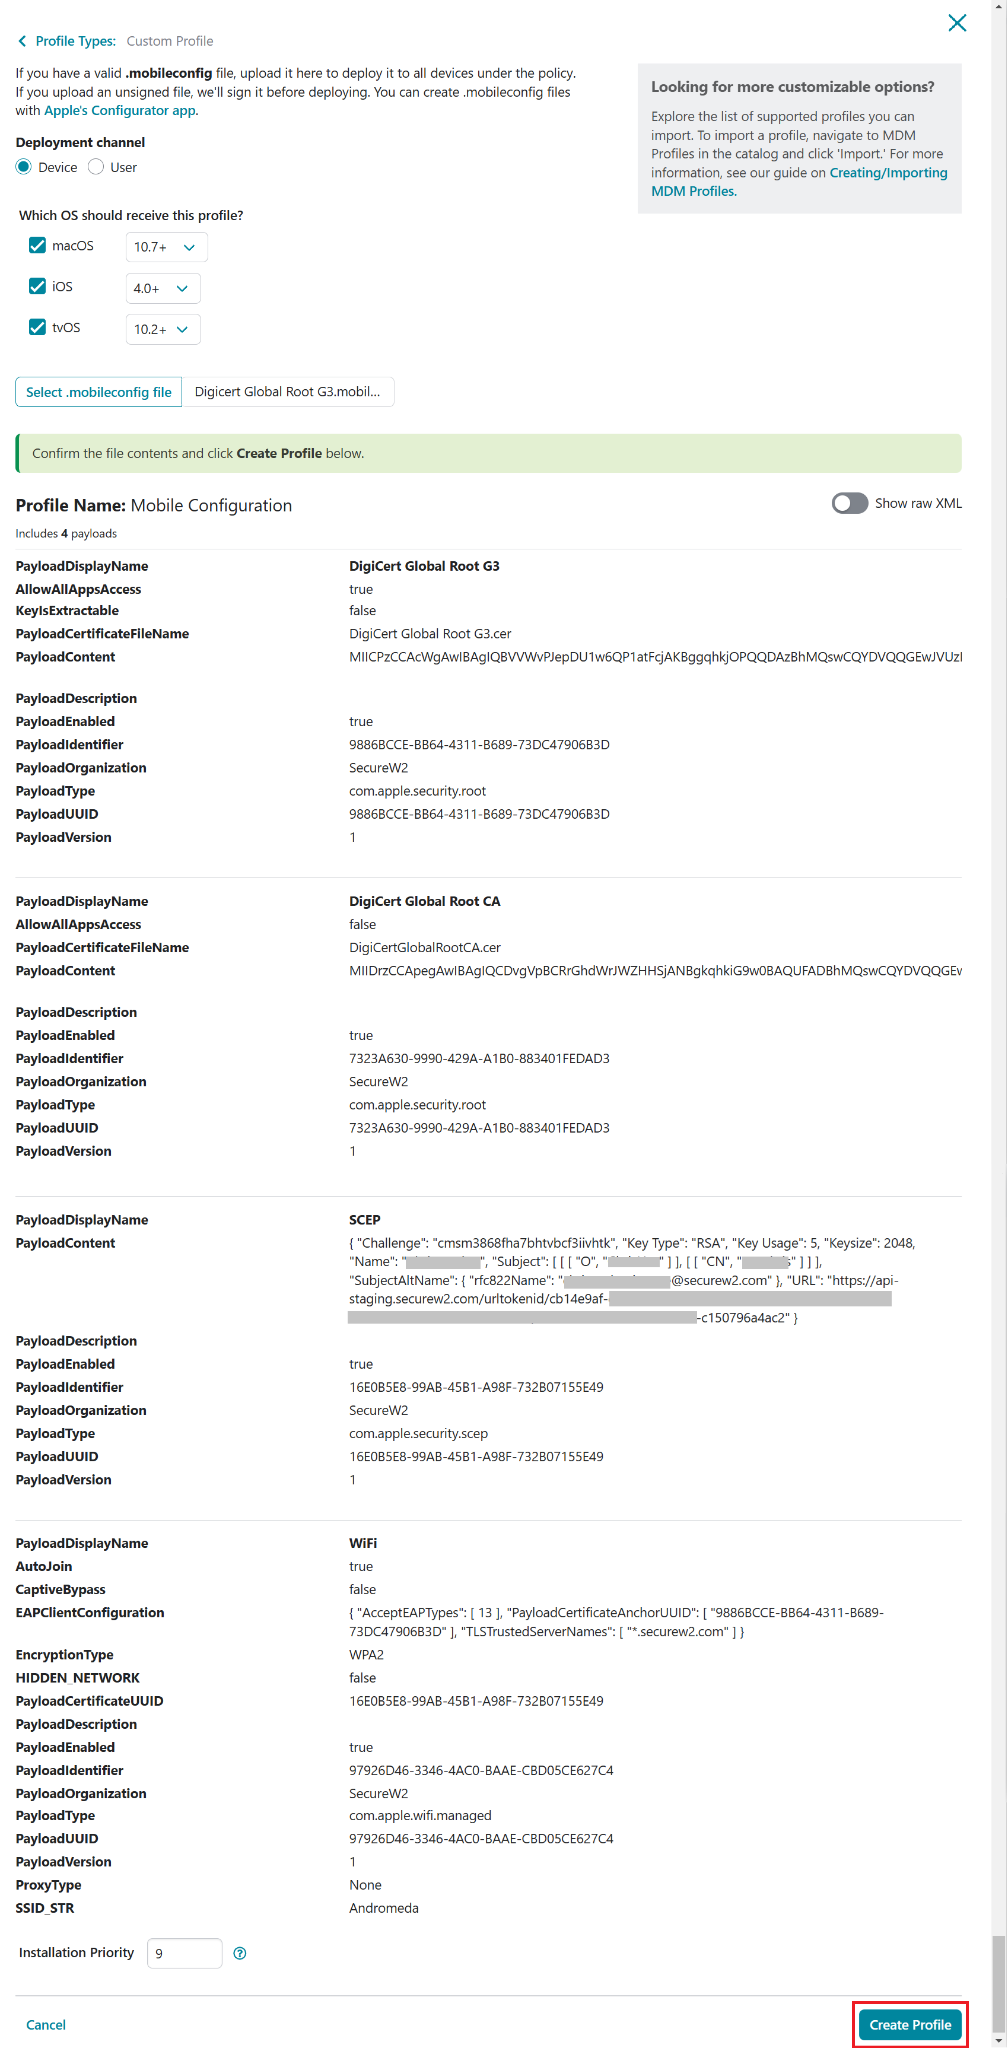
Click the Select .mobileconfig file button and upload the .mobileconfig file with the new root CA.
Select .mobileconfig file with DigiCert Global Root G3
7
Click Create Profile.
Create Profile
8
To deploy the changes, navigate to Policies, select the policy, and click the Deploy Now button.
Policies — Deploy Now to push to managed devices
Confirming success
Following an update to the WiFi profile, Addigy deploys the revised profile to all managed devices and installs the updated CloudRADIUS Root CA. After successful re-enrollment, the "Certificate Issued" event can be observed in the JoinNow Management Portal under Data and Monitoring > General Events.
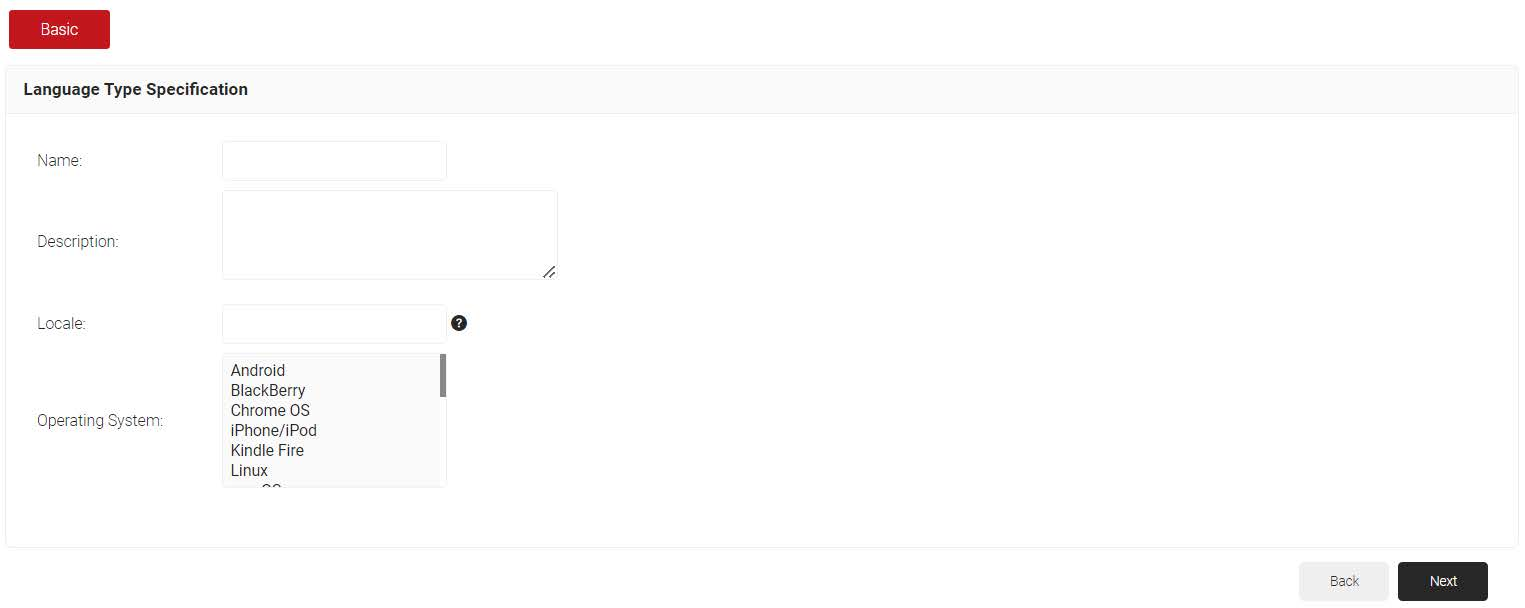
BYOD Device Enrollment
BYOD devices are not enrolled in a corporate MDM, so the updated DigiCert G3 trust profile cannot be pushed automatically. The process has two phases: the IT admin updates and republishes the network profile in the JoinNow Management Portal, then BYOD users re-run the JoinNow onboarding tool to receive the updated profile on their device.
Complete the admin setup steps below before communicating to users. Users cannot re-enroll until the updated profile is live.
Deadline: October 1, 2026
BYOD devices that have not re-enrolled through JoinNow before the server-side migration completes will lose RADIUS authentication. Complete the admin setup steps early — end users need lead time to take action.
Part 1 — Admin Setup
Complete these steps in the JoinNow Management Portal before notifying users.
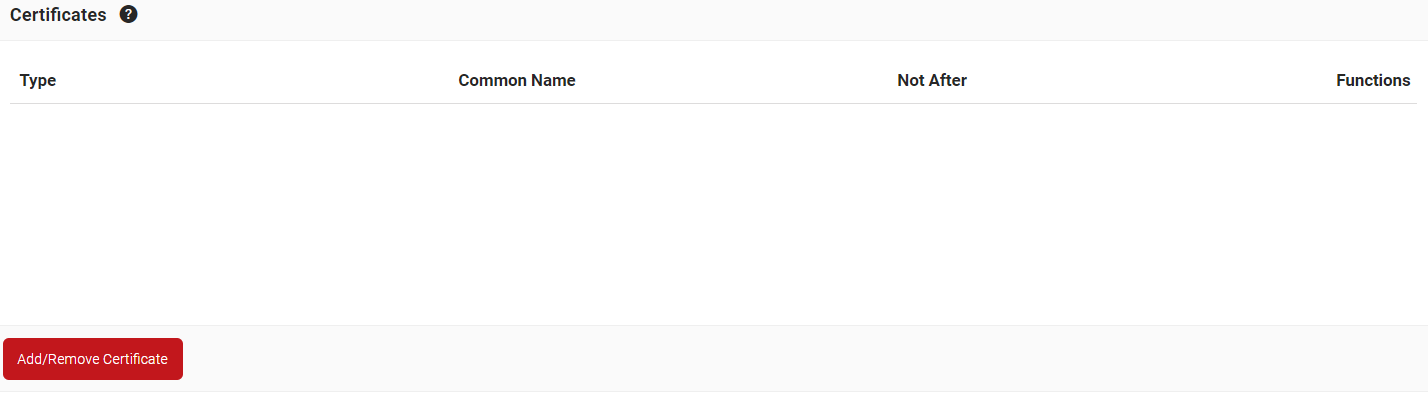
Step A — Add the DigiCert G3 certificate to the network profile
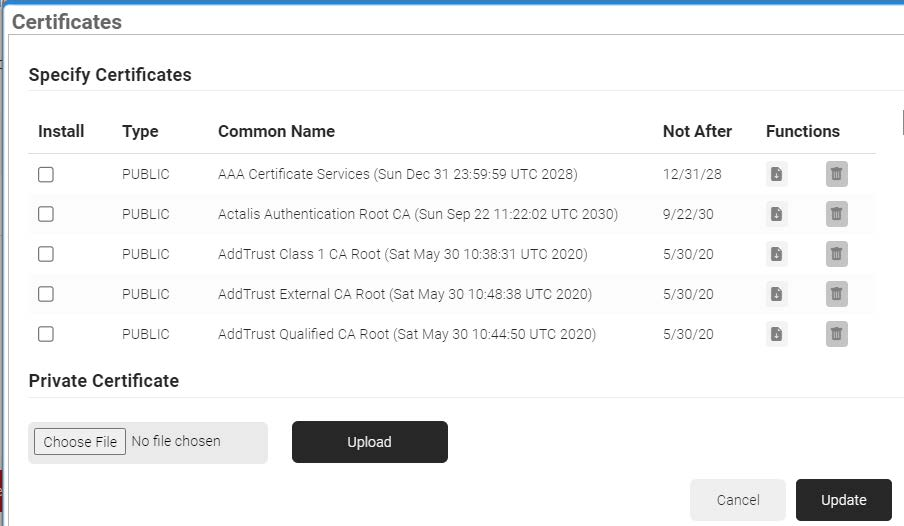
In the Certificates section, click Add/Remove Certificate.
Certificates section — Add/Remove Certificate
4
Select the checkbox for DigiCert Global Root G3.
Selecting DigiCert Global Root G3
5
Click Save.
Certificate selection
Add the Public Certificate of the CA that issued the RADIUS server certificate. Do not add the RADIUS server certificate itself here.
Step B — Enable Server Certificate Validation with the new CA
1
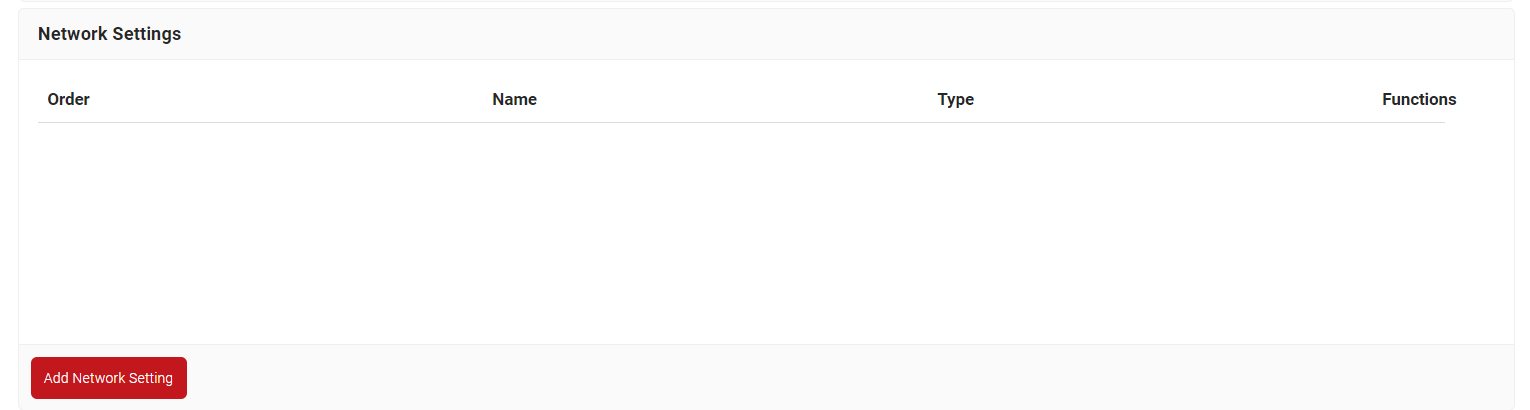
Still in the network profile edit view, go to the Network Settings section.
Network Profile — Network Settings section
2
Click Edit on the relevant network setting (EAP-TLS).
EAP-TLS network setting — Edit
3
Scroll to the Server Certificate field and click +.
4
Select the Enable Server Certificate Validation checkbox.
Server Certificate — Enable Server Certificate Validation
5
Select the checkbox corresponding to the DigiCert Global Root G3 certificate.
6
In Connect to these server names, confirm your RADIUS server common name is listed. If there are multiple common names, separate them with a semicolon.
Connect to these server names — RADIUS server common name
7
Click Save.
Step C — Republish the profile
1
Return to Device Onboarding > Network Profiles.
Network Profiles — Re-publish on the updated profile
2
Click Re-publish on the updated network profile.
Profile republished — DigiCert G3 Root CA now included
3
The profile is now live with the updated CA trust. Proceed to notify BYOD users.
Admin setup complete
The network profile is republished with the DigiCert G3 Root CA. BYOD users can now re-enroll.
Part 2 — User Re-enrollment
After the updated profile is live, communicate to BYOD users that they must re-run the JoinNow enrollment tool before October 1, 2026. Include the enrollment URL in your communication.
1
User navigates to your organization's JoinNow enrollment URL on their device.
2
User runs the JoinNow onboarding tool. JoinNow automatically delivers the updated DigiCert G3 trust profile to the device.
3
The device now trusts the new Root CA and will continue authenticating to RADIUS after the server migration.
Tracking completion
1
In the JoinNow Management Portal, navigate to Data and Monitoring > General Events.
Data and Monitoring > General Events
2
Filter for Certificate Issued events and confirm all expected BYOD devices have re-enrolled before the October 1, 2026 cutover date.
Certificate Issued events — tracking BYOD re-enrollment progress
Need help?
If you need help identifying which users have re-enrolled or configuring your BYOD enrollment flow, contact support@securew2.com.